Making
fine prints in your digital darkroom
Digital
cameras
by
Norman
Koren
updated February 16,
2007
Digital cameras are capable of excellent
image quality; most digital SLRs have
overtaken 35mm film cameras. Digital cameras vary enormously in size,
shape,
features, and operation. This page focuses on image quality; I can't
keep
up with all the latest models— there are simply too many. For detailed
product information, news, and reviews, check the
Links.
With digital
cameras
you don't have to buy film; you don't have to make one trip to drop it
off for development and another to pick it up (or mail it out and
wait).
Of course you have to buy enough storage (cheap) and make sure to charge the
batteries.
I particularly like the ability to view images immediately after you've
capture them. You can see if your composition is OK and you can check exposure with the help
of histograms. For some reason, still a mystery, I find that I
can
make more consistently
sharp
images with digital than I could with 35mm film.
Technical terms are explained in other pages on this site, particularly
the Understanding
image sharpness
series. I compare digital cameras with film in depth in Understanding
image sharpness Part 7: Digital cameras vs. film. Their detailed
performance can now be measured with the Imatest program.
I resisted buying a digital camera until March 2003, when I bought the
Canon
EOS-10D. In November 2004 I replaced it with the Canon EOS-20D.
Digital cameras fall into two broad categories.
- Compact digital cameras.
Sensors typically
have between 2 and 8 megapixels. Sensor size is 11 mm diagonal or smaller
(less than 1/16
the area of a 35mm frame). Most of these cameras can make excellent
letter-size
(8.5x11 inch or A4) prints; the
best
of them make decent prints up to 13x19
inches (Super A3). They come in a wide variety of shapes and sizes,
though
all are small compared to 35mm cameras. The smallest fit easily into a
pocket or purse. The differ primarily in viewing systems: most have a
separate
optical viewfinder window; a few have electronic LCD viewfinders, which
resemble SLR reflex viewfinders from the outside.
Most
have an LCD screen on the back that allows you to preview the digital
image.
But this feature comes at a price: most compact digitals have
significant
shutter lag— time delay between pressing the shutter and capturing the
image, which can be as long as 1/2 second. Shutter lag is rarely
mentioned
in the brochures; it may make the camera unsuitable for action
photography.
It's getting better in the latest models. Many have close focusing
(marco)
capability. Compact digital cameras advanced rapidly until about 2003,
when pixel count leveled off: image quality (exposure range and noise) tends to be compromised by
making pixels smaller. Advances now consist of new features and
incremental
improvements in image quality.
Two compact digital cameras
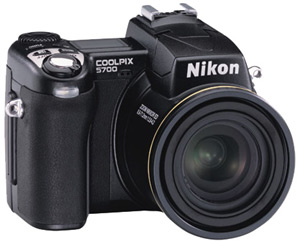
Nikon
5700
A classic design employing a 180,000 pixel digital reflex
viewfinder.
5 megapixels, 8x optical zoom:
8.9-71.2
mm f/2.8-4.2 (35-280 mm 35mm equivalent).
Focuses
to 0.8 inches in macro mode. Such designs typically have larger zoom
ratios
than cameras with separate viewfinder windows. Dimensions (WxHxD):
4.3x3.0x4.0
inches (108x76x102
mm); large for a compact digital. Weight: 16.9 oz (480g) without
battery.
Though its image quality is excellent, Michael
Reichmann found its operation to be clunky.
|
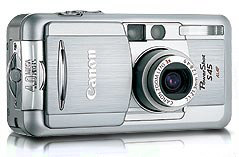
Canon
S45 / S50
A classic design employing an optical viewfinder window. 4
megapixels
for the S45; 5 megapixels for the identical S50, 3x
optical zoom: 7.1– 21.3 mm f/2.8-4.9 (35–105mm 35mm
equivalent). Focuses to 3.9 inches (10 cm) in macro mode.
Dimensions
(WxHxD)
4.41x2.28x1.65
inches (112x58x42mm)
excluding protrusions. Weight: 9.2 oz. (260g) without battery. The S50
would have about the same image quality as the Nikon 5700. Differences:
its maximum focal length is shorter, it doesn't focus as close, but
it's
smaller and lighter. At low ISO speeds (50 or 100) these cameras have
image
quality approaching DSLRs for prints up to 8½x11
inches (A4 size).
|
- Digital single lens reflexes (DSLRs).
Sensors typically have 5 or more megapixels with sensor size = 22 mm
diagonal
or larger. (The exception is the Sigma
SD9/SD10, whose Foveon
sensor is different from other digital cameras. It has either 3.3
or
10 megapixels, depending on how you count.) These cameras resemble 35mm
SLRs and have interchangeable lenses— usually interchangeable with
35mm
lenses of the same brand. They use the same types of shutters as 35mm
SLRs,
so you can't preview the image in the LCD screen. Shutter lag is
typically
much shorter than compact digitals and image quality tends to be higher
because the larger pixels have lower noise. DSLRs fall into two categories:
- APS-C or Four-thirds sensor size. 5-12 megapixels.
Sensor sizes from 22 to around 27 mm diagonal; half to 2/3 that of 35mm
(43.3 mm diagonal). This means lenses
designed
for 35mm cameras have a smaller field of view; they have a "focal
length
multiplier" between 1.5 and 2. Although I originally viewed them as a
stop on the way to full-frame DSLRs, I now realize they're here to
stay. Their image quality equals or exceeds 35mm, and they're smaller,
lighter, and much less expensive than the full-frame DSLRs (below).
Several manufacturers now make lenses for this format: because they
don't have to cover the entire 35mm frame they can be sharper, somewhat
smaller and lighter, and (perhaps) slightly less expensive. And
ultrawides are now available from Canon, Nikon, Olympus, Sigma, Tokina,
and Tamron. My Canon 10-22 mm is equivalent to 16 mm in the 35mm format.
- Full frame (24x36 mm or close) sensor size: Up to 16.7 megapixels. These
cameras have resolution approaching or equalling
medium
format, and they're rapidly replacing medium format in professional
applications. Because sensor manufacturing costs rise rapidly with
size, they are expensive (around $5,000-8,000). Medium format sensors
(near 645 size) are also available, but far more expensive. A number of
cameras have been announced, but are not yet available as of April 2005.
An entry level digital SLR
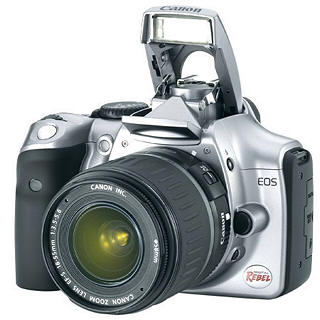 Canon
EOS-300D Digital Rebel Canon
EOS-300D Digital Rebel
Introduced in September 2003, the EOS-300D is a breakthrough
for the
price: a full featured 6.3 megapixel DSLR that takes all EOS lenses for
under $1000 US, including a decent 3x zoom: 18-55 mm
f/3.5-5.6
(29-88 mm 35mm equivalent). It physically
resembles
a small 35mm film SLR. Dimensions (WxHxD):
5.6x3.9x2.9
inches (142x99x72.4
mm) without lens. Weight: 19.7 oz (560g) without battery or lens. The
basic
18-55 mm lens weighs 6.7 oz (190 gm); high quality lenses weigh more.
Although
you wouldn't expect it to equal a premium "L" lens, Peteris Treijs
tested
it using my chart and found that it
was
consistently sharper than Canon's consumer-grade 24-85 mm.
The EOS-300D is a good choice for serious photographers on a
budget—
for ambitious beginners. Its size and weight would make it unappealing
for most casual photographers. Compared to the compact digitals, it's
faster
(very little shutter lag), has better image quality, especially at high
ISO speeds (it's still nearly grainless at ISO 400) and for prints
larger
than 8½x11 inches (A4 size),
and can take the full range of EF lenses. My EOS-10D
has similar image quality, but it has a few more features, greater
durability
(a metal frame body), and it weighs 10 oz (230 g) more: 27.9 oz (790 g)
without battery or lens. The 300D isn't for everyone (no camera is).
One
of my readers found its flash settings to be lacking in flexibility: he
swapped his 300D for a 10D. See Canon's
description, dpreview.com's
review, and Michael
Reichmann's comments.
|
.
The
key specifications that affect digital camera image quality
- Pixel count This is the obvious one (5 Megapixels,
wow!).
The more megapixels the better, but watch out. Megapixels are not the
only
indicator of quality; pixel size
matters. The table below relates pixel count to maximum print size for
high quality images. There are more total pixels on the chip
than active
pixels. Rows and columns near the edges are not used for image capture.
The number of active pixels is what counts; they're implied in
the
table below.
| How
many pixels do you need for a high quality print? |
Millions
of
pixels |
Print
size
(inches) |
Pixel
count doesn't
tell the whole story. Pixel size (which affects exposure range and
noise)
and lens quality also affect image quality. For sensors with small
pixels
(under 4 µm), resolution may be limited by lens quality.
You
can print somewhat larger for sensors with large pixels (over
6 µm, found in digital SLRs). Of
course
you always can print larger if you're willing to compromise. |
1
2
3
5
6
11+ |
4x5
5x7
8½x11
11.7x16.5
(A3)
13x19
16x24+ |
|
- Sensor size Can be confusing because it is
commonly
specified
by a number such as 1/1.8" or 4/3" that has little apparent
relationship
to sensor dimensions. Dpreview.com
has a nice
explanation. These numbers are based on the outside diameter of
Vidicon
tubes— vacuum devices used long before the advent of solid-state (CCD
and CMOS) sensors. I'd like to see this old nomenclature replaced by
the
sensor's diagonal size— it's nothing but confusing. The diagonal
dimensions
of the sensor is roughly, but not exactly, 2/3 the
specified
size. Most small sensors have a 4:3 aspect ratio (the same as standard
video monitors), but some are 16:9 (HDTV). 35mm (24x36mm) has
a 2:3 aspect ratio.
Sensor
designations and sizes
(for
small sensors with 4:3 aspect ratios)
Designation
(Type) |
Diagonal
mm. |
Width
mm. |
Height
mm. |
| 1/4" | 4.5 | | |
| 1/3.6" |
5.0 |
4.0 |
3.0 |
| 1/3.2" |
5.68 |
4.54 |
3.42 |
| 1/3" |
6.0 |
4.8 |
3.6 |
| 1/2.7" |
6.59 |
5.27 |
3.96 |
| 1/2.5" | 6.9 - 7.2 | | |
| 1/2" |
8.0 |
6.4 |
4.8 |
| 1/1.8" |
8.93 - 9.1 |
7.18 |
5.32 |
| 2/3" |
11.0 |
8.8 |
6.6 |
| 1" |
16.0 |
12.8 |
9.6 |
| 4/3" |
22.5 |
18.0 |
13.5 |
| 35mm |
44.3 |
24.0 |
36.0 |
You can find individual sensor sizes on manufacturer's websites, though it sometimes takes a little math. Sony's spec sheets for CCD sensors
lists diagonal in mm and the type (i.e., 2/3). To get height and width
you have to open the individual data sheets and multiply the
pixel size by the number of vertical and horizontal pixels. Panasonic publishes similar data. Two of their 1/2.5 inch sensors have different diagonals: 6.9 and 7.2 mm. Kodak also publishes sensor data.
- Pixel size Normally specified as a linear
dimension,
closely
related to pixel spacing or pitch. Not always easy to figure out from
camera
specs, but you can find it if you know the pixel count and sensor size.
Listed in the table below for several
models.
Typical pixel spacings are 2.6 µm for inexpensive compact
consumer
cameras, 3.4 µm for compact "prosumer" cameras, and 6.8 to 10
µm
for DSLRs. The active pixel area
is the square of the pixel spacing times the fill
factor — the fraction of the total pixel area covered
by
the active element. The fill factor is rarely specified outside of
sensor
data sheets. It has little effect on resolution, but is has some
relationship
to noise and sensitivity: the larger the fill factor, the better. Some
sensors have microlens
arrays
to increase the effective fill factor by concentrating light in the
center
of the each pixel.
It turns out there is an optimum range of pixel spacing for high image
quality.
- Small pixels suffer from increased noise (hence reduced
signal-to-noise
ratio), reduced exposure range (AKA dynamic range— fewer f-stops), and
reduced sensitivity (lower ISO speed). These effects are most
noticeable
in pixels smaller than 4 µm. The exact
relationship
between noise and pixel size is difficult to quantify since there are
several noise
mechanisms, each of which scales differently.
- Large pixels suffer from aliasing—
low spatial frequency artifacts that appear when the lens has
significant
resolution above the Nyquist
frequency:
1/(2*pixel spacing). Aliasing typically
manifests
as Moiré patterns on images with high frequency repetitive
patterns,
such as window screens and fabrics. It can be reduced by anti-aliasing
(low pass) filters, which unavoidably reduce resolution and
increase
cost. Most DSLR sensors, which have 6.8 µm or more spacing,
have anti-aliasing filters (the Kodak DCS 14n is an exception). I
believe
they are absent in most compact digital cameras: with 3.4
µm
or less pixel spacing, they aren't needed.
- Small sensors run into problems with lens diffraction,
which limits total image resolution at small apertures. The f-stop
where
the image becomes diffraction-limited is proportional to format size
(sensor
diagonal). It's around f/16-f/22 for the 35mm format (43.3 mm
diagonal).
At large apertures— f/4 and above— resolution is limited by
aberrations.
There is a resolution "sweet spot" between the two limits, typically
between
f/5.6 and f/11 for good 35mm lenses. A 22 mm diagonal sensor becomes
diffraction-limited
around f/8 and an 11 mm diagonal sensor becomes diffraction-limited
around
f/4— the same aperture where it becomes aberration-limited. There is
no
"sweet spot;" the total image resolution at optimum aperture is
considerably
less than for larger formats.
- Large sensors cost more. No getting around it. That's the major
reason
inexpensive cameras use small sensors— popular 11 mm diagonal sensors
have 1/16 the area of a 35mm frame. Of course cameras with small
sensors
can be made very compact.
You can find detailed sensor specifications in pages from Sony, Panasonic,
and Kodak. If pixels size isn't available, you may be able to use the following equations.
pixel size in mm = (diagonal in mm) / sqrt(H2 + V2), where H is the number of horizontal pixels and V is vertical pixels.
pixel size in microns = 1000 (diagonal in mm) / sqrt(H2 + V2)
The optimum pixel size for high quality imaging seems to be in the 5-9
micron range found in DSLRs. Larger pixels have aliasing
problems and can't take advantage of high quality lenses. Smaller
pixels
have more noise and less sensitivity, though they can still produce
excellent
images in compact cameras, particularly at low ISO speeds (50 or 100).
Digital SLRs will stick with 5-9 µm
pixel size as they evolve towards larger sensors with more pixels. A 24x36
mm (44.3 mm diagonal) full-frame sensor with 6.8 µm
pixel spacing (the same spacing as the Canon EOS-20D/30D) would
have
18.7 megapixels— close to the holy grail for digital SLRs. The
performance
of such a sensor would approach medium format film (see the analysis in
Digital
cameras vs. film)— and indeed it does for the 16.7 megapixel Canon EOS-1Ds Mark 2— but it will remain expensive for some time. A full frame sensor with 6 µm
pixel spacing (24 megapixels) is probably the most we'll
see in the forseeable future. Reducing pixel size would increase both
cost
and sensor noise, and would only offer a resolution advantage for
exceptionally fine lenses, which you can test for quality using Imatest.
Luminous-landscape.com
has two excellent articles on pixel/sensor size: Counting
megapixels by Michael Reichmann and Digital
camera Image Quality by Miles Hecker.
- Lens Lenses are specified by
their focal
lengths and and maximum apertures (smallest f-stop). The following two
definitions are for beginners.
- The focal length (normally specified in
millimeters)
indicates the lens's field of view. Short focal lengths tend to be wide
angle; long focal lengths tend to be telephoto. Prime
lenses have a single, fixed focal length. Zoom
lenses have a variable focal length. The zoom
ratio— the ratio of the longest
to shortest focal length— is usually reported as a multiplier, for
example,
4x. The majority of compact digital
cameras have zoom lenses. The exceptions are extremely inexpensive or
compact
models (some very tiny). Most DSLR lenses were originally
designed
for film cameras. They come in a wide range of zooms and primes. Early
zooms weren't as sharp as primes, but current premium zooms are
outstanding.
Consumer grade zooms can still be mediocre. Compared to zooms, primes
may
have be less expensive, have larger apertures, or have special
attributes
like macro (extremely close) focusing (with higher quality than zooms)
or tilt/shift capability.
- The maximum aperture (smallest f-stop)
of a
lens
is generally specified, for example, f/2.0, or f/2.8-f/4.5 for a zoom
lens
that would have f/2.8 at its shortest focal length and f/4.5 at its
longest.
Smaller f-stop numbers admit more light. (The f-stop is defined as
focal
length divided by the (circular) aperture opening.) The minimum
aperture
(largest f-stop) is rarely publicized. It is f/8 for most compact
digital
cameras and f/16 to f/22 for 35mm lenses. The inverse relationship
between
aperture and f-stop can be confusing for beginners.
.
The equivalent
35mm
focal length is often specified for digital camera
lenses.
That's because many photographers are familiar with lenses for 35mm
cameras:
we know 28 mm is a fairly wide angle and 135 mm is a moderate
telephoto.
The actual focal length is the equivalent focal length times the sensor
diagonal divided by 44.3 mm. For example, the Fujifilm
FinePix F700 is specified as having 35-105 mm focal length (35mm
equivalent).
Since the sensor size is 1/1.7" = 7.6x5.7
mm = 9.5 mm diagonal, the actual focal length is (35-105 mm)*9.5/44.3
= 7.5-22.5 mm.
Specifications sometimes mention "digital" zoom. You can safely
ignore
this spec: it's equivalent to cropping and resizing in an image editor;
it has nothing to do with a lens's capability. "Optical" zoom is all
that
really counts.
Unfortunately, lens quality is not mentioned
in
the specs. (Have you ever seen a lens described as "mediocre?" I assure
you they exist.) You have to search out reviews or go by reputation.
Or, with the Imatest
program, you can test your own.

There is an optimum match between a lens and
a
sensor. If a lens is too good— if has strong MTF response
beyond the sensor's Nyquist
frequency—
aliasing can be a problem and the lens's sharpness won't be useable.
If
the lens is not good enough, it won't be able to take advantage of the
potential resolution of the sensor. The lenses and sensors in high
quality
compact digitals are well matched, but matching is hit and miss with
DSLRs.
In general, cheap consumer grade lenses aren't up to the capabilities
of
DSLR sensors. Premium lenses, such as Canon's L-series, match nicely.
.
| Pixel
size and diffraction |
| Diffraction,
a fundamental
physical effect, limits a lens's performance at small apertures (large
f-stop numbers). It is approximated by the equation, Rayleigh limit
(lp/mm)
= 1600/N, where N is the f-stop. At the Rayleigh
limit, MTF = 9%; lenses have little response at higher spatial
frequencies. At large apertures (small f-stop numbers) lenses are
aberration-limited.
Aberrations are a function of lens design— not a fundamental effect.
Here
we only consider diffraction.
The highest spatial frequency a sensor can resolve is
its Nyquist
frequency, equal to 0.5/(pixel spacing). When a lens is stopped
down
so its Rayleigh limit is below the Nyquist frequency, the camera is
limited
by the lens rather than the sensor. For optimum quality (when extreme depth
of field is not required), the aperture should be set at least one
stop larger than the aperture where the Rayleigh limit equals the
Nyquist
frequency: NR=N = 3.2 * pixel
spacing
(µm). For a pixel spacing of 3.4 microns, typical of compact
digital
cameras, NR=N = 3.2 * 3.4 =
f/11,
so the aperture should be set at f/8 or larger. The corresponding
aperture
range for digital SLRs, which have pixel spacings between about 6.8 and
9 microns, is f/16-f/22.
|
|
f-stop
|
Rayleigh
limit
(lp/mm)
|
Pixel
spacing
(µm)
for
Rayleigh
limit
=
Nyquist
|
| 5.6 |
286 |
1.75 |
| 8 |
200 |
2.5 |
| 11 |
145 |
3.44 |
| 16 |
100 |
5 |
| 22 |
73 |
6.87 |
| 32 |
50 |
10 |
|
| Depth of field
at a given f-stop
is inversely proportional to a sensor's diagonal dimension, so a
compact
digital camera with an 11 mm diagonal sensor has the same DOF at f/8 as
a 35mm camera at f/32 (plenty). |
|
- Timing lags These include
shutter lag
and total (shutter+autofocus) lag. You can speed things up on many
cameras
by pressing the shutter part way to activate the autofocus. But shutter
lag can still be considerable, especially on older compact digital
cameras.
It's much better in DSLRs. The 4 megapixel Canon EOS-1D
SLR, reviewed December 2001, is the fastest: it feels
like a film SLR. The Canon EOS-10D is
almost
as fast. Watch out: camera manufacturers aren't eager to pubilcize
timing
lags. You usually can't find it in the specifications, where it should
be. It's frustrating to press the shutter, then wait... Even half a
second
can seem like an eternity when you're ready. Long enough to turn
Cartier-Bresson into Derriere-Bresson, master of the post-decisive
moment.
If you feel modern now, you'll be post-modern by the time the shutter
trips. Did
I warn you about starting me on puns? No pain, no pun.
You can find autofocus and shutter lag for
several
camera models by probing deep into Dpreview.com's
camera reviews. Look for pages titled, Timings
& Sizes. They contain a lot of detail. Examples,
shutter lag for the 4 megapixel Canon
G3, reviewed December 2002, is about 0.1 seconds— fast. It is 0.2
to 0.4 seconds for my son's 3 megapixel Kodak
DC4800, reviewed December 2000.
- Sensor A/D converter bit depth
The bit
depth of sensor's Analogue-to-Digital (A-to-D) converter is usually
larger
then the 8-bit depth of standard image files. (16-bit depth is
available
for TIFF and a few other image file formats, but not for standard
JPEGs.)
Bit depth isn't always listed in specification sheets. When it's
available, dpreview.com
lists it as "A/D Converter" on the specification pages of its reviews.
Bit depth is 12 for the Canon EOS 10D and 300D. It's 14 for the
recently
announced Sony
DSC-F818, a premium 8 megapixel compact digital with an electronic
finder.
Exposure (dynamic) range is related
to both
sensor bit depth and sensor noise. Sensor noise, as we've mentioned, is
closely related to sensor size— the larger the sensor, the lower the
noise.
Increasing the bit depth increases exposure range only if sensor noise
is low enough. In the case of the aforementioned Sony
DSC-F818, its 2/3" (8.8x6.6 mm
= 11 mm diagonal) sensor has a wimpy 2.7 µm pixel spacing— small
enough to make me skeptical of the advantage of the 14 bit A-to-D
converter.
For comparison, digital SLRs have pixel spacings between 6.8 and 9
µm;
a 14-bit converter would be more advantageous in a digital SLR.
To take full advantage of the potential
exposure
range of a digital camera, you should capture images in RAW format. for
further explanation, see the (still unfinished) page, Tonal
quality and dynamic range in digital cameras. Sensor noise
and dynamic range can be measured by Imatest's Q-13 Stepchart
module.
| How
is ISO speed determined in digital cameras? |
| The answer is found in Kodak
Image Sensors - ISO Measurement (App note MTD/PS-0234), extracted
from ISO
standard 12232:1998. (Only 73 CHF— about $59 US— for 131 kB; such
a deal!)
There are two basic types of ISO
measurement:
saturation-based (also called "base") and noise-based. The
saturation-based
ISO is
ISO = (15.4*f#2)
/ (L*t) [Exposed
so
an 18% gray card has a level 18/106 of full scale. See below.]
where f# is the
effective f-number of
the camera lens, L is the luminance in cd/m2 of an
18%
reflector (the familiar 18% gray card), and t is the length of
the
exposure in seconds. Saturation-based ISO corresponds to the
camera
ISO setting, which is controlled by the electronic gain of the
system. You can use this equation to find the approximate luminance of
an object, L = (15.4*f#2)
/ (ISO*t), where f# and t
are
read from an 18% gray card. For a typical white surface (90%
reflectance), L
= (3.08*f#2) / (ISO*t).
Digital image sensors are linear
devices: their
pixel voltage (and the pixel level in a RAW image file) is proportional
to the light energy reaching the pixel up to the point where it
abruptly
saturates. Now here's the heart of the matter.
When
an exposure is made
according to the
above setting, an 18% gray card has a voltage or pixel level 18/106 of
full scale (e.g., a pixel level of 696 at the output of a
12-bit
A-to-D converter, which can represent 4096 levels). In an 8-bit color space
encoded for display at gamma = 2.2 (sRGB, Adobe RGB, etc.), the
corresponding pixel level is 114 (from the formula, 255*(18/106)(1/2.2) ).
Any portion of the
image with luminance equivalent to more than 106% reflectiance (5.9x
brighter than the gray card) would be saturated— pure
white;
burnt out... gonzo. Since a white card is about 90% reflectance, that
doesn't
leave much margin. The Kodak
document says, "Very demanding applications might need more
headroom
for highlights, and so might use a higher number when calculating base
ISO." That's why exposure compensation— equivalent to increased ISO
speed—
is often required to avoid burnt out highlights for "very demanding
applications"
such as ordinary sunlit outdoor scenes.
The Kodak document has little to
say about noise-based
ISO measurement, which is related more to image quality than to camera
ISO settings.
|
|
Other
considerations
- Color quality can be
remarkably
good
with digital cameras, even compact models. I find the color quality to be
outstanding,
perhaps because the process of generating color with a digital sensor
is
so much simpler than with film. Colors are purer and saturation doesn't
need to be enhanced to make the color satisfying (though the sticker on
the parking meter and yellow curb reach 100% saturation). Digital
camera color quality can be measured with the Colorcheck
module of Imatest.
- Memory (storage) doesn't
affect
image
quality directly, but the more you have, the more high quality images
you
can store. If you don't have enough memory, you may be forced to store
images at reduced quality or fiddle around deleting images before
taking
more. Virtually all digital cameras come with inadequate memory. You
will
need to buy more. There are two generic types: microdrives (tiny disk
drives,
typically 1 GB or larger; Hitachi dominates the market) and flash
(nonvolatile
semiconductor in several formats; get at least 256 MB
for
a compact digital; 512 MB for a digital SLR). Flash cards are the best
choice in most instances— they're now available in up to 4 Gigabytes.
You should be aware that not all flash memory is created equal. Check
outRob
Galbraith's CompactFlash
Performance Data base before making a purchase. Some manufacturers
rate speed relative to an audio CD: 150 kB/sec. 12x
is 1.8 MB/sec, 24x is 3.6 MB/s,
etc.
Actual in-camera performance tends to be slower. Large amounts of
memory
is particularly helpful for storing images in RAW format— direct
unprocessed
data from the sensor chip. You can obtain the best image quality by
processing
RAW images offline— on a personal computer, which has much more
processing
power than a camera. With memory, the more the
merrier!
- Additional storage. My
EOS-10D stored ~150 raw images
on a 1 GB Compact Flash card, enough to meet my needs for a day of
hiking— I can
always review images and delete some if needs be. But it's not enough
for
an overnight trip. You'll need a laptop or a compact storage device.
Laptops
are the most versatile, but they're expensive, slow to boot up, power
hungry,
and too heavy to carry on a hike. Adorama
lists several storage devices under Digital - Memory - Portable
Hard Drives. The Nixvue
Vista series comes with 20-60 GB and has a small color LCD screen
that
allows images to be reviewed and zoomed. It displays EXIF exposure
information
and histograms, and it supports Canon raw formats. $435-610, depending
on storage capacity. The Delken
PicturePAD series has similar capabilities. Adorama has its own,
less
capable but less expensive, Super
DigiBin
series (20-60 GB). One of my readers, Dennis Fisher, gives it a strong
recommendation, though its battery life is somewhat short. I've heard
particularly high praise for
the SmartDisk
FlashTrax devices, available with 20, 40, or 80 GB— slightly more
expensive than Nixvue. ( I purchased a Dell
laptop (model 5150)
with a UXGA screen that has a larger viewing angle than most laptops
(±70
degrees claimed), making it marginally adequate for image editing (most
laptops are terrible), but I might still get one of the simpler compact
storage devices for trips to remote regions.
- Dust.
Dust on the sensor can be a problem in digital SLRs with
interchangeable lenses. The dust doesn't move out of the way when you
advance the film. You must be careful when changing lenses,
particularly in windy or dusty environments. For example, my friend Alan
Ackoff, will never change
lenses (even with film cameras) when you're photographing a (dry and
dusty) New Mexico rodeo. The first line of defense is a simple
syringe— the plastic type with a large bulb. www.cleaningdigitalcameras.com is an excellent website with professional-level information on sensor cleaning.
Depth
of field is
the
range of distance where an image appears sharp. It is discussed in
great
detail in my Depth of field page.
DOF
is approximately proportional to the f-stop, and inversely proportional
to image sensor size, i.e, the smaller the sensor, the larger
the
DOF at a given f-stop.
Probably the easiest way of thinking of DOF is
to relate it to 35mm cameras. Let N be the f-stop (aperture) on
your digital camera, let N35 be the f-stop on a 35mm
camera that gives the same DOF, let d be the diagonal of your
digital
camera sensor (see the Sensor designation table, above),
and let d35 = 43.3mm be the diagonal of a 35mm
image.
Then,
N35
= 43.3 N/d
For example, suppose you have a digital camera
with
an 11mm diagonal sensor, typical of the compact 5 megapixel cameras
with
2/3
inch sensors: the Minolta
Dimage 7i, Nikon
Coolpix 5700, Sony
DSC-F717, Olympus
E-20, etc. At f/8, the DOF is the same as a 35mm camera at f/32.
That
is a huge depth of field: nice if you want everything in
focus, but problematic if you need to take advantage of a narrow DOF to
isolate a subject from a distracting background (this is typically done
with telephoto lenses). At f/8, image sharpness is diffraction-limited.
In digital cameras with small sensors (<= 11 mm), diffraction would
severly degrade image sharpness at apertures above f/8. That's why f/8
is the smallest aperture on most compact digital cameras.
On digital SLRs with a "multiplication factor" M, typically
around
1.6x (Canon EOS D60, Nikon D100),
DOF
is larger than a 35mm image with the same field of view by a factor M.
Expanding
exposure
range According to Secrets
of digital photography, Nikon's digital cameras at ISO 100 (the low
end of their speed range) have a dynamic range of about 446:1,
equivalent
to 8.8-stops of brightness, better
than slide
film and approaching negative film. (I used to be skeptical of this
number, but I've confirmed it using Imatest Q-13 Stepchart).
They give a nifty technique that
enables you to expand the effective dynamic range of images with
stationary
subjects by combining
two or more exposures. My son
figured
this out for himself and used it to soften the contrasty backlit image
of Rome and Saint Peters below (click
here for enlarged image), taken with the Kodak DC4800. Combining
images
to expand exposure range can be easily accomplished with the Stack
transformation
in
Picture Window Pro 3.5.

| In mid-June 2001 I purchased a Kodak
DC4800 for my son
to take to Europe and India. It's a
nifty
little camera, capable of amazingly sharp 8½x11 inch prints and respectable 13x19 inch prints. Colors are lovely, but it can't capture the tonal range
of
negative film with the default settings (3.1
Megapixel JPEG; 900k file size) unless you combine
two exposures (see example above). The main thing that
bothered
me was the time delay of nearly a second between pressing the button
and
the exposure. I didn't have time to explore its many options; I hated
to
give it up. Nathan used it well: click here
for examples. |
Summary
No digital camera is ideal for everyone— your choice depends on a
number
of factors.
- Size and weight. Larger is
often better,
though not necessarily. Many compact digitals can make outstanding 8½x11
inch prints and several can make decent 13x19
inch prints, though larger, heavier digital SLRs have the edge at that
size. What are your ambitions? What are you willing to carry?
- Cost. Most of us are
constrained by
budget. What are you comfortable with? With a careful choice of
equipment
you should be able to make excellent 8½x11
inch prints, even on a student budget. If you're "middle class" you
should
be able to reach 13x19 inches
without
too much pain. But if you want to make larger very high quality prints,
you'll have to spend some serious money. I can't quite justify the Canon
EOS-1Ds: I'd need a 24 inch wide Epson
7600 printer to take full advantage of its quality.
- Lens.
What is
the zoom range and maximum aperture? What about quality? "Digital" or
"combined"
has little to do with the lens, and should be ignored.
- Viewfinder.
You
should handle cameras to see what you like. Viewfinders are similar in
digital and film SLRs, but the digital SLR viewfinder image will be
smaller
if the sensor is smaller than full frame 35mm. I'm happy with the
viewfinder
in the EOS-10D. Electronic viewfinders in compact digitals are not to
everyone's
taste: they don't have the clarity of optical viewfinders, which they
superficially
resemble, but they're improving and they allow larger zoom ratios. Zoom
ratios in cameras with optical viewfinder windows are limited to about
4x; 3x
is typical. But these cameras are much more compact, and image quality
can be extremely high.
- Other features.
Spend some time studying reviews. Examples: The Minolta
DiMAGE A1, a compact digital with electronic viewfinder and 7x
zoom (the successor to the 7-series), has built-in image stabilization:
a very nice feature, particularly if you don't like carrying a
tripod.
The Fujifilm
FinePix
F700 claims to have a better exposure (dynamic) range than other
compact
digitals. Dpreview.com
disputes that claim, though its data shows a small advantage.
There's
always something new to learn.
- RAW capability.
Not of interest to casual photographers, but important if you're
serious.
RAW images can yield better images quality in difficult
lighting/exposure
situations.
- Reviews. Search them out in
the
links,
below. See the Sharpness
comparisons page of the Imatest
website.
Links
The subject of
digital
cameras is too vast for me to keep up with. Here are the essential
sources
of news and reviews.
Imaging-Resource.com and Digitalcamerainfo.com both use Imatest (developed by yours truly) for measuring image quality in their reviews.
Steve's
Digicams and Digital
Photography Review and also
have extremely comprehensive reviews.
Luminous-landscape.com
Michael Reichmann only reviews a few cameras— he focuses on the cream
of the crop. His reports are always stimulating.
Photo.net
digital camera reviews
Digital
Outback
Photo
RobGalbraith.com
Excellent source of detailed technical news in areas such as support
software
and accessories. His CompactFash
Performance Database is particularly interesting.
Ecoustics.com has a comprehensive list of reviews on other sites. Useful for researching.
Additional
links
for digging deeper:
DCReviews.com
| megapixel.net
(excellent French/English monthly) | Digital
Camera Resource
John Tinsley
(high-end professional digital cameras) | fredmiranda.com
| Digital
PhotoCorner
Nikondigital.org.
Information and reviews, including Canon SLRs. From Moose
Peterson and David
Cardinal.
DigitalCamera-HQ.com
A nice site for searching and comparing models, with links to reviews
and
price comparisons.
Short
courses in Digital Photography 
LetsGoDigital
News in English, Dutch, and Spanish.
Digital
Photography For What It's Worth (excellent articles on
selecting
and using digital cameras, geared towards beginners)
Related pages: The
Canon EOS-10D Digital SLR | Digital
vs.
film | Tonal
quality and dynamic range in digital cameras
.
| Images
and text copyright (C) 2000-2013 by Norman Koren. Norman Koren lives
in Boulder, Colorado, where he worked in developing magnetic recording
technology for high capacity data storage systems until 2001. Since 2003 most of his time has been devoted to the development of Imatest. He has been involved with photography since 1964. |
 |