Image editing with Picture Window Pro:
Tinting and hand coloring Black & White images
by Norman Koren
|
|
|
| This page illustrates how to tint and hand color Black & White photographs. |
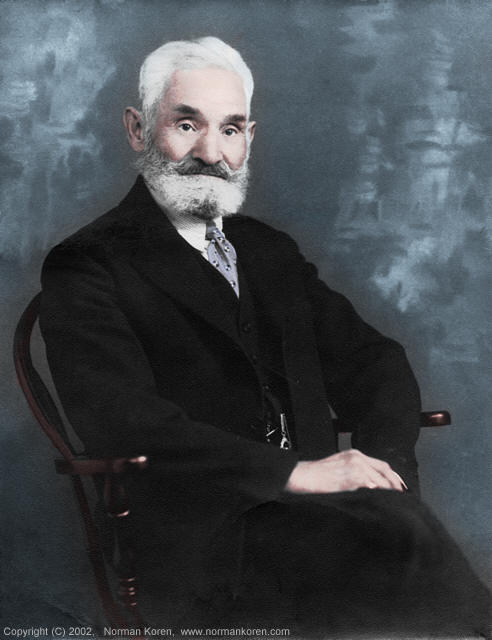
| My great-grandfather, Naftali Linger, had more than his share of Chutzpah.
One day, when he was in his seventies, he was assaulted by a gang of young
ruffians who taunted him for his old world Jewish appearance. When they
pulled his beard he struck back, sending two of them to the hospital. A
politically connected relative had to spring him from jail.
"Oy America, America. In Russia it would have meant Siberia," he marveled. Sometimes his grandchildren, nephews and nieces would gather round and beg him to put the plams of his hands together so they could see the large scar that ran from one hand to the other. "Well," he would explain in Yiddish, "I was working in my shop when I heard a scream from the front. It was your grandmother. There, standing over her was a Cossack with a raised sword. I didn't need to ask any questions. I knew what he wanted. Bubbeh (grandmother) was a beauty. I grabbed the sword with both hands and took it. Naturally he ran. Wouldn't you? Well, it turned out to be a blessing. What's a Cossack without his sword? The next day he came back and we made a pact that the Cossacks would never harm us if I returned the sword and never told his friends. We shook hands, and despite the pain it was the sweetest handshake I ever had." |
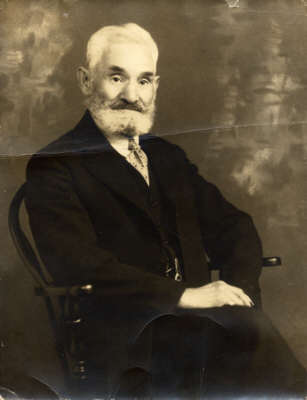 |
The two stories and one photograph are all I have to remember him. Fortunately the photograph is rather well preserved, marred only by some creases and small stains. But the sepia tone is yellower than I like, so I decided to breath new life into it digitally. I scanned the 7.6x9.8 inch print at 400 dpi on the Epson 2450. File size is 3025x3930 pixels, sufficient for an A3 enlargement.
 Removing
defects should always be the first step. You can use Picture
Window Pro's Speck removal tool (one of the Miscellaneous tools), which
replaces defects with the average of nearby pixels, but I prefer Clone
because it maintains surface texture and grain. Clone works by copying
pixels from nearby good areas of similar colors.
Removing
defects should always be the first step. You can use Picture
Window Pro's Speck removal tool (one of the Miscellaneous tools), which
replaces defects with the average of nearby pixels, but I prefer Clone
because it maintains surface texture and grain. Clone works by copying
pixels from nearby good areas of similar colors.
Defect removal is best done with the image zoomed to at least 1:1![]() .
Click on the Clone symbol
.
Click on the Clone symbol![]() or click Tools, Clone
to bring up the Clone dialog box, illustrated on the left.
The cloning brush is defined by the Radius, Transparency and Softness sliders.
I adjust Radius occasionally, making it larger to speed editing in areas
with large defects and little detail. If the dialog box is buried, click
on Bring transformation dialog to top
or click Tools, Clone
to bring up the Clone dialog box, illustrated on the left.
The cloning brush is defined by the Radius, Transparency and Softness sliders.
I adjust Radius occasionally, making it larger to speed editing in areas
with large defects and little detail. If the dialog box is buried, click
on Bring transformation dialog to top![]() .
Shift-click on the area you want to clone from, then click on the area
to clone to. You can move the cursor along scratches and creases. When
Linked
checked in the OPT box
.
Shift-click on the area you want to clone from, then click on the area
to clone to. You can move the cursor along scratches and creases. When
Linked
checked in the OPT box![]() (the default setting), the "from" and "to" circles track. You can change
the relationship any time using shift-click to reset the "from" circle.
If you make a mistake, you can undo it by pressing control-Z. I recommend
using short strokes when so you don't lose too much work when correcting
errors-- you can go back several strokes if needs be.
(the default setting), the "from" and "to" circles track. You can change
the relationship any time using shift-click to reset the "from" circle.
If you make a mistake, you can undo it by pressing control-Z. I recommend
using short strokes when so you don't lose too much work when correcting
errors-- you can go back several strokes if needs be.
I use small radii for detailed areas, like the collar shown on the right, where the lower circle clones to the upper, and larger radii for the rather featureless background. For routine defects like small specks or stains I use a small spacing between the "from" and "to" circles. But the crease presented some difficulties. Because the scanner light source is oblique, the image is light just above the crease and dark below it. I used large spacings to clone from a distance-- to try to bring these areas into balance with the rest of the background. Where that didn't suffice, I used the Lighten and Darken (Miscellaneous) tools with large radii, keeping transparency above 90% to change the density gradually.
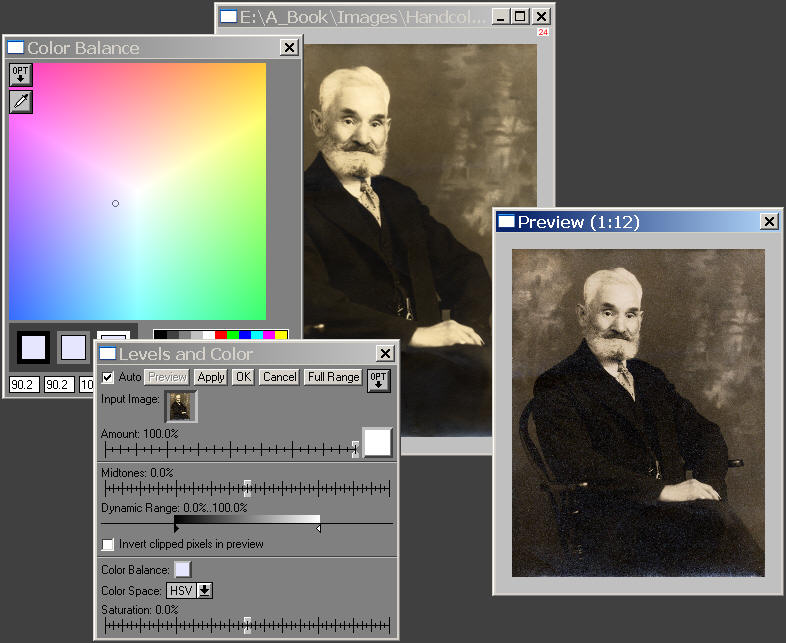
The first approach used the Levels and Color transformation, illustrated below. Levels and Color is one of Picture Window Pro's most versatile transformations. Its simple controls allow you to do several things at the same time: you can adjust shadow, midtone and highlight density, color balance and saturation. Here we use it for color balance-- to remove the yellow cast.
The images below have been shrunk for Web presentation.
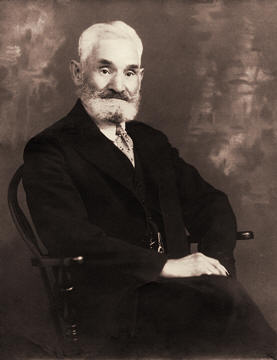
| The second approach used the Tint
transformation, which was designed for colorizing B&W images. Tint
can be used for striking effects, but here we apply it delicately. Its
operation is described in detail below. When Tint
is applied to color images, they are first converted to B&W, so, unlike
Levels
and Colors, you start from scratch. Other transformations-- Color
Curves (RGB mode), Color Balance
or Filter-- could have been employed,
but were less straightforward.
Both images are satisfactory; the differences between them are quite subtle. But neither filled the bill. I wanted something more. |
 |
Start with a color image that has little or no color.
I decided to start from a monochrome original, though I could have started with less saturated versions of either of the above images. The original must be a color image. If your image was scanned in B&W, the Convert transormation is the simplest way to convert it to color. Select the original image and click Transformation, Convert..., 24-bit (or 48-bit) color, OK. You can also do the conversion with the Tint transformation, which allows you to add a tint to the image. Select the original image and click Transformation, Gray, Tint... Add a tint using the techniques described below, then Click OK.
If you need to convert a full color original to monochrome, my favorite approach is the Monochrome transformation, which allows you to filter the image as you might have done while taking it. You can use a green filter to lighten leaves or a red filter for Ansel Adams dark skies-- any filter you want. Click Transformation, Color, Monochrome... Then click on the green Filter box and click Select Solid Color. This brings up a Filter Color dialog box, similar to the Color dialog boxes illustrated below. Experiment with the filter color, and when you are satisfied with the Preview image, click OK. Then convert it back into color using one of the techniques in the previous paragraph. Another approach is to desaturate the image with the Saturation transformation. This allows you to maintain a slight coloration, which can be a nice way to start for hand coloring. Click Transformation, Color, Saturation. Move the slider to the left to reduce saturation. HSV and HSL color spaces produce very different results. When you are satisfied, click OK.
Tint the background.
The first step in hand coloring the image is to tint large areas, in this case the background. I chose turquoise (cyan-blue). Tinting takes place in two steps. First, make the mask. Next, tint the masked area.
We must create a mask-- a B&W image with the same pixel size as the edited image-- to select the area to be tinted. Masks is appropriate for working with large areas. The painting technique, described below, is better suited for small areas. To make the mask for the background,
Apply a cyan-blue tint to the background, using the mask.
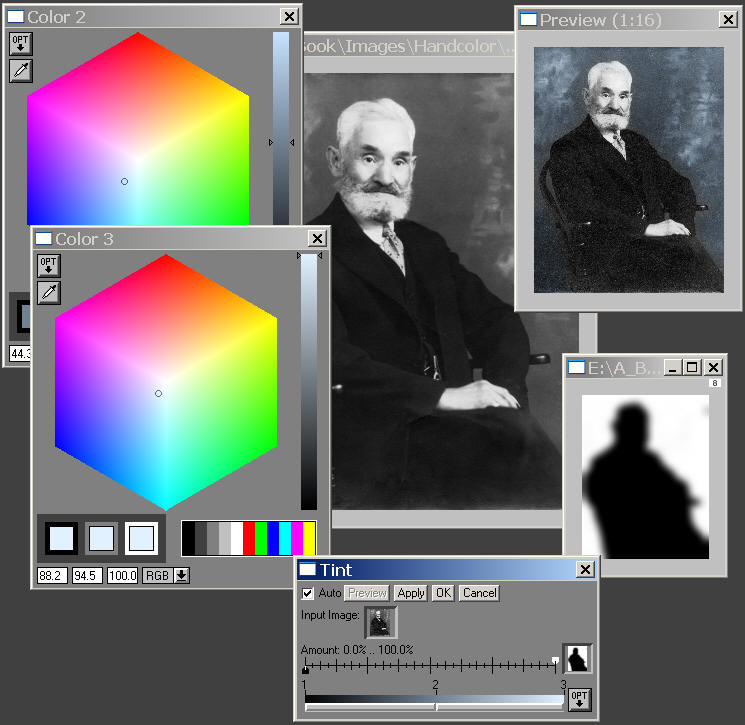
Paint the remaining colors using Clone with the One to One option.
Now we get to the fun part of hand tinting-- "painting" colors using
the mouse as a brush. You can adjust the radius, transparency and softness
of the brush for exquisite control; you can go back and forth between adding
and removing color. Painting is accomplished using the Clone tool![]() with the One to One option
with the One to One option![]() checked; this copies pixels from one image to the same location in another
image of equal size. One to one cloning is a powerful technique; it can
also be used for adjusting small areas with
any transformation that
doesn't alter geometry-- sharpening, blurring and tone and color adjustments.
checked; this copies pixels from one image to the same location in another
image of equal size. One to one cloning is a powerful technique; it can
also be used for adjusting small areas with
any transformation that
doesn't alter geometry-- sharpening, blurring and tone and color adjustments.
The working image-- the image with the turquoise background-- is one of two active images; the other is the is the monochrome source, which is used to create the tinted images for cloning. Painting proceeds in two phases. First, we create one or more tinted images starting from the monochrome source.

Using One to One Clone to tint the face
I tinted the chair by cloning from the same red image I used for the face.
The necktie presented a small dilemma. I wanted to make it red to match my great-grandfather's fiery personally, but I knew it couldn't have been red. The picture was taken in the 1920's, when most photographers used orthochromatic film, which was insensitive to red. A red tie would have appeared black. So I made it pale blue.
|
The final hand-colored image has far more presence than the original. My great-grandfather looks timeless rather than old-fashioned. I'm pleased with the result. But I reserve the right to change the necktie to red.

| Images and text copyright (C) 2000-2013 by Norman Koren. Norman Koren lives in Boulder, Colorado, where he worked in developing magnetic recording technology for high capacity data storage systems until 2001. Since 2003 most of his time has been devoted to the development of Imatest. He has been involved with photography since 1964. |  |