Photographic technique part 1:
Cameras, lenses, tripods, bags, film, filters, links
by Norman Koren
|
|
|
Part 2 | Vision | Panoramic photography | Travel | Airport X-rays |
Untill March 2003 I used 35mm cameras (Canon FD manual focus SLRs and the Hasselblad XPan), which are capable of finer results than many people realize. With good 35mm technique you can make wonderfully sharp 13x19 inch prints (as large as most consumer photo printers can handle). Of course you can do even better with larger formats-- my best images in the 1970's were made with Hasselblad 6x6 cm. I have a flatbed scanner, the Epson 3200, that can make scans good enough for sharp 13x19's from medium format; it scans film up to 4x9 inches. Medium format and 4x5 still tempt me— I've refurbished my old Hasselblad gear (a 500C with 50, 80, 120 and 250 mm lenses).
Since March 2003 I've been using a Canon EOS-10D digital SLR with outstanding results. Although resoultion isn't quite equal to 35mm at its best, sharpness is excellent and consistent, colors and tones are superb, and there is no noise or grain at ISO 100 and 200, and it's minimal at 400. Some of the new lenses are outstanding. It replaces my Canon FD system, but I still use the XPan for panoramics.
This part discusses camera equipment and technique. Part
2 discusses photographic vision, panoramic
photography, and travel.
.
|
 |
|||
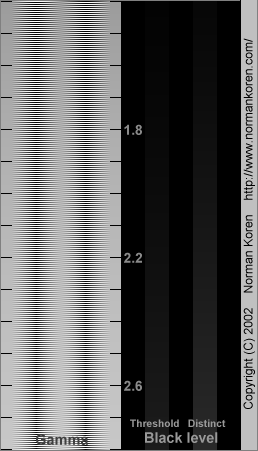
| I encourage you to load this chart on your computer and check it occasionally.I'll be happy to grant permission to reproduce it on your website if you e-mail me, give me credit and a link to this page. | ||||
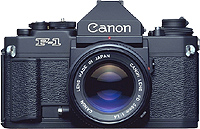 My
favorite 35mm camera is the all-manual Canon
"New" F-1, which was manufactured from 1981
to 1986. It features exceptional construction quality, full manual
operation (focus and exposure), and match-needle spot metering of the
central
12% of the frame (ideal for use with the zone
system; it makes it easy to determine zone placement). The older
Canon
F-1 and FTb are also excellent choices and less expensive. The main
advantage
of the "New" F-1 is that its exposure meter operates faster in dim
light.
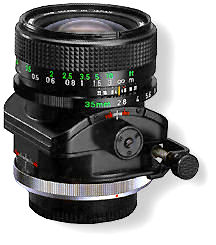
This makes a big difference with the manual aperture 35mm
f2.8 TS (tilt/shift) lens which must be stopped down for metering
and
exposure. The precision feel of the "New" F-1 makes it a pleasure to
use.
My
favorite 35mm camera is the all-manual Canon
"New" F-1, which was manufactured from 1981
to 1986. It features exceptional construction quality, full manual
operation (focus and exposure), and match-needle spot metering of the
central
12% of the frame (ideal for use with the zone
system; it makes it easy to determine zone placement). The older
Canon
F-1 and FTb are also excellent choices and less expensive. The main
advantage
of the "New" F-1 is that its exposure meter operates faster in dim
light.
This makes a big difference with the manual aperture 35mm
f2.8 TS (tilt/shift) lens which must be stopped down for metering
and
exposure. The precision feel of the "New" F-1 makes it a pleasure to
use.
One problem with the old Canon F-1 and FTb is that they were designed for the PX13/PX625 mercury battery, which is no longer manufactured (it makes highly toxic waste). The solution is the MR-9 adaptor from C.R.I.S. Camera Services in Phoenix, Arizona, that allows you to use a silver 76 battery instead. It consists of a nicely machined adaptor and a five cent germanium diode to drop the voltage.
April 2003: Everything has changed now that I have the EOS-10D. I'm selling most of my Canon FD equipment. I'll probably buy a full-frame body (24x36 mm sensor) in about two years when prices should drop to my comfort level (I've love the 1Ds, but I can't justify $8,000 US.)
Prime lenses tend to be lighter, faster (larger aperture, i.e., lower maximum f-stop), less expensive, and have less flare (susceptibility to light bouncing between glass elements that tends to fog the image in contrasty light) than zooms of comparable focal length. The best modern zooms (for example, the Canon L-series) are very sharp, particularly at moderate apertures (f5.6 to f11); their performance often equals fine prime lenses. Cheap zooms vary in quality. Some are quite decent; some are junk. Zooms are incredibly convenient; they enable you to frame an image precisely, and you don't need as many lenses.
Lenses tend to be sharpest between two stops down from maximum aperture and f11. At f16 and beyond, sharpness is limited by diffraction. 35mm cameras should be set to f/16 or beyond only when extreme depth of field is required, but large formats cameras, such as 4x5 or 8x10 work well at apertures smaller than f/16.
The best site for lens reviews is PhotoDo. Unfortunately it's is no longer being updated; it doesn't have recent lenses. It uses modern MTF (modulation transfer function) tests, which are used by manufacturers in designing lenses. Its articles about MTF testing are well worth reading, as is my series, Understanding image sharpness and MTF. The old "lines per mm" tests were subjective and inadequate in many ways, though they could be useful for comparing lenses. Fredmiranda.com has a nice set of user reviews for Canon, Nikon, and independent lenses. Photo.net has excellent reviews of several lenses with user comments. I don't pay attention to lens reviews published in the major advertiser-supported magazines. They tend to be "review-mercials." Popular Photography's reviews contain real data, but their format doesn't make for easy omparison of different brands and models.
I used the Canon FD manual focus system, which was manufactured until 1986, until I got the Canon EOS-10D in April 2003. I've been gradually selling most of my FD bodies and lenses. EBay prices have dropped considerably in the last two years; some great bargains are available for film buffs.
 Here
are some of my favorite Canon FD lenses:
Here
are some of my favorite Canon FD lenses:
According to Zeiss (Camera Lens News No. 10 article on film flatness), "more than 99% of all customer complaints about lacking sharpness in their photos can be attributed to misalignments of critical components in camera, viewfinder, or magazine, focus errors, camera shake and vibrations, film curvature, and other reasons." Film curvature is not a problem with digital.When you're shopping for a lens, you will be interested in the magnification at the lens's closest focusing distance. Canon doesn't give it in all its literature, but you'll find it here, on the USA lens listings.
 A
sturdy tripod is invaluable for making sharp photographs. You'll need
to
choose between the two types of leg material.
A
sturdy tripod is invaluable for making sharp photographs. You'll need
to
choose between the two types of leg material.
 (Older;
I no longer use it.) The lightweight 3001BN
legs (3.9 lbs; 57" max; 3205 when I purchased it) with a 3262QR ball
head
(discontinued; similar to the 484RC2).
Not as sturdy or tall as I'd like— I have to stoop slightly when I use
it. Adequate for lenses up to 200mm, a little wobbly, but usable with
care,
for 300mm, and pretty risky with 400mm.
(Older;
I no longer use it.) The lightweight 3001BN
legs (3.9 lbs; 57" max; 3205 when I purchased it) with a 3262QR ball
head
(discontinued; similar to the 484RC2).
Not as sturdy or tall as I'd like— I have to stoop slightly when I use
it. Adequate for lenses up to 200mm, a little wobbly, but usable with
care,
for 300mm, and pretty risky with 400mm.Heads— The 222 grip head (3265 in the US), shown on the right, is incredibly fast and convenient. Although it's only rated at 2.5 kg (5.5 lbs) capacity, it's sturdy and capable of supporting most medium format cameras. I've used it successfully with a 400 mm lens on the 3221W tripod— it's great for wildlife. I'm a little leary about using it with the lightweight 3205 because it would become unbalanced when tilted sideways for portrait (vertical) orientaton. But I've had no problem with the 3221W, even with an 80-200 mm zoom.
 A
solution to the portrait orientation balance problem is to use an elbow
bracket— a device that attaches to the camera and has two quick
release
mounts that allow you to rapidly switch between landscape (horizontal)
and portrait orientation. Really
Right Stuff makes one for the EOS-10D that does not, alas, work
with
Manfrotto heads.
A
solution to the portrait orientation balance problem is to use an elbow
bracket— a device that attaches to the camera and has two quick
release
mounts that allow you to rapidly switch between landscape (horizontal)
and portrait orientation. Really
Right Stuff makes one for the EOS-10D that does not, alas, work
with
Manfrotto heads.
Manfrotto's model 341 Junior Elbow Bracket (left) works with the 3157N quick release plate used in the heads on this page. It has only recently become available in the US. It's on the Bogen's US page but not on Manfrotto's page. Adorama was out of stock, but B&H had it. You can make fabulous high-resolution wide-angle stitched panoramas by using it in combination with the 222 grip (above), which swivels when you partially squeeze it. The 341 has a small design flaw: the tightening knob lacks a retaining clip: it's completely loose— not attached to the bracket in any way. This makes it easy to lose when the bracket is removed from the camera. The clip from the 3157N quick release plate doesn't fit.
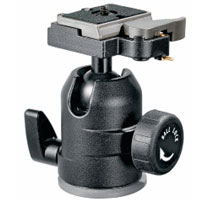 Manfrotto
has new line of ball heads, models 484RC2
(weight 0.7 lb; supports 8.8 lbs)— similar to my old lightweight
heads,
486RC2
(weight 1 lb; supports 13.2 lbs)— adequate for digital SLRs, 35mm, and
perhaps medium format, and 488RC2
(weight 1.46 lb; supports 17.6 lbs), shown on the right— the best of
the
three for stability.
Manfrotto
has new line of ball heads, models 484RC2
(weight 0.7 lb; supports 8.8 lbs)— similar to my old lightweight
heads,
486RC2
(weight 1 lb; supports 13.2 lbs)— adequate for digital SLRs, 35mm, and
perhaps medium format, and 488RC2
(weight 1.46 lb; supports 17.6 lbs), shown on the right— the best of
the
three for stability.
All of the heads mentioned (many of which now have the RC2 suffix) above use the same 3157N quick release plate. At $11 each, I like the price. I keep one on each of my camera bodies and long lenses. Photo.net's tripod page recommends the Arca Swiss B1 ball head. It's undoubtedly elegant, but at over $300 and $40 per quick release plate, it can become an expensive proposition; I see little real advantage. Manfrottos are perfectly fine if they're maintained properly.
Maintaining ball heads— Manfrotto ball heads are
excellent
performers provided you clean and lubricate them about once a
year.
I take my 3262QR head apart using an Allen wrench, then carefully
remove
all grease from the ball and the metal parts that come in contact with
it. If necessary I add a little waterproof bicycle grease to the
tightening
mechanism. But not too much— it tends to migrate to the ball, where it
causes slippage.
| Moi!
with some of my favorite gear
|
 |
Canon EOS-10D |
|
|
Photograph
by Barry Anderson
Canon EOS-D60 September 2003 |
| I tried a number of packs before I settled on the
Lowepro
Street & Field (S&F) Deluxe
Waist Belt with SlipLockTM lens cases and pouches, |
.. |
|
The Lowepro Deluxe Waist Belt comes in four sizes—9 (small): waist 24 - 28 in. (61 - 71 cm), 11 (medium): waist 28 - 34 in. (71 - 86.5 cm), 13 (large): waist 34 - 42 in. (86.5 - 106.5 cm), and 15 (extra large): waist 42 - 48 in. (106.5 - 122 cm). The size designates the number of loops for holding S&F SlipLock pouches and cases. Choose the largest that fits. Optional shoulder and vest harnesses are available. Forget them. They are uncomfortable, don't carry much, and interfere with the backpack. Here are some SlipLock accessories to mount on the belt:
|
I'm not very experienced with slide film, so I have little to say except that choice of slide film is more critical than negative film. The film itself is the final product, so you'd better like it. Exposure is much more critical, so you need good equipment and good technique. I say a little about exposing slides in A simplified zone system for correctly exposing negatives. If you prefer slide film, consider using a relatively low contrast film such as Fujichrome Astia 100, which has a significantly larger exposure range than Velvia 50, Provia 100F, or Ektrachrome 100VS. This should make it superior in many instances for scanning, even though the reduced contrast makes the slides themselves less dramatic. It gets a lot less press than Provia or Velvia. I have no experience with it.
Although I haven't tried it, Gigabitfilm (English version) makes an extremely high resoluton, low grain ASA 40 B&W film, that has started to acquire an excellent reputation. No MTF data, but claimed resolution is >240 lp/mm at 1.6:1 contrast and 720 lp/mm at 1000:1 contrast. For reference, Kodak T-MAX 100, which has an outstanding MTF f50 of 120 lp/mm, claims 63 lp/mm at 1.6:1 contrast and 200 lp/mm at 1000:1 contrast— less than 1/3 as much. Gigabit is worth checking out.
The only filter I use to alter the image is a polarizer. They can be used to darken the sky at angles around 90o from the sun. Sometimes, especially when there are high clouds early or late in the day, the effect can be dramatic. They can also be used to subdue distracting specular (shiny) reflections from non-metallic objects, especially water. (They can also be used to enhance reflections.) To minimize flare light I remove the UV filter when I mount a polarizer.
Split Neutral Density filters can be extremely helpful for capturing scenes with dark foregrounds and light skies, especially with digital cameras and slide films, which have a much narrower exposure range (5 or 6 f-stops) than negative films. To use them effectively you'll need a tripod and time— they take a while to adjust. They come in one, two, and three f-stop gradations (densities of 0.3, 0.6, and 0.9) with sharp and soft boundaries. Links: Ray Barbee | Eastern Light. Manufacturers: Cokin | Lee | Singh-Ray | Tiffen.
Split ND filters can produce artificial results, especially when the boundary deviates from a straight line, for example, when part of the image protrudes into the sky. If you can capture all the information on film, contrast masking can be a more effective way of bringing the image into balance. If you have a digital camera and sturdy tripod, you can take double or multiple exposures and combine them. The Stack images transformation in Picture Window Pro 3.5 is particularly convenient for this purpose.
My favorite filters for Black & White are Yellow (darkens the
sky
so it looks subjectively correct), Orange (darkens the sky more; I
liked
it better), Red (darkens the sky deeply; rather unrealistic; favored by
Ansel Adams for many of his most dramatic shots), and Green (my
particular
favorite because it lightens foliage; it also darkens skys about as
much
as yellow). Never use B&W filters on a digital camera. You
get
far better results applying a filter in software when you convert an
image
to B&W: Picture Window Pro's Monochrome
transformation does a particularly fine job of allowing you to
preview
the effects of the filter.
If you need repair work on a Hasselblad, Leica, Rolleiflex, Contax (rangefinder), or cameras of similar design or vintage, or if you need a lens cleaned and coated, I highly recommend Focal Point Inc. in Louisville, Colorado. 303-665-6640. John does excellent work at reasonable prices. He just adjusted the rangefinder on my XPan. Now I can trust it.
Infrared (IR) photography is a fascinating topic—IR images are wonderfully surreal. Digital sensors are sensitive to IR, but many digital cameras have filters to reduce IR sensitivity. For better or worse, the Canon EOS-10D has such a filter.
Bob Atkins, frequent contributer to photo.net and moderator of its Nature section, has an excellent technique page, as well as some nice reviews of Canon cameras and lenses.
William Castleman has some interesting descriptions of Canon lenses and bodies, including the EOS-1Ds and EOS-1D Mark II. His latest tests use my Koren 2003 test chart.
Volker Gilbert has a series of outstanding technical articles on the equipment and techniques of digital photography. En Français.
Tim Grey articles on digital imaging. Tim is a prolific writer associated with the Lepp Institute of Digital Imaging (and now a honcho at Microsoft).
Steve Hoffman's Tech tips and equipment reviews Good stuff on the Canon EOS-10D, RAW converters, scanners, and general equipment and technique.
Thom Hogan (by thom) Technical articals and reviews of Nikon equipment, including the Fuji S2 Pro (interesting to me because I know Canon gear so much better).
Kieth Cooper's Northlight Images has a number of reviews and articles on digital technique— an excellent resource. Of particular interest: rumors about upcoming Canon releases. See EOS-1Ds Mk III | Digital Rebel XTi / 400D
A sharper image by Staffan Johansson. Tips for getting ultra-sharp images from 35mm. Obsolete (Tech Pan is no longer available); I can make equally sharp images with the EOS-20D.Max Lyons (TawbaWare.com) has some interesting utilities, digital camera tips, tricks, and essays, and a few lens tests (Canon 28-105, 28-125, 50 f/1.8, Sigma 24-70, 15-30, Tokina 19-35).
Large Format Photography.Info Non-commercial community of large format photographers, includes a repository of primers, how-to articles, user's reviews of equipment, and an active discussion forum. Edited by Q.-Tuan Luong, written by many contributors. A must-read for learning about LF techniques and gear.
Fred Miranda has a nice collection of articles and reviews (strong on Canon techniques and lenses).
Robert Monaghan maintains several pages bursting with information on medium format photography, lenses, and camera repair. Somewhat confusing to navigate. Some of the fascinating pages I've found: Third Party Lenses Resource Megasite Home Page | Fisheye and Ultrawide Angle Russian and Ukrainian 35mm Lenses (possibly the best bargains in photography today)
Nature Photographers Online Magazine Excellent articles, reviews, and tips.
Ken Rockwell has a wide range of articles on technique and equipment— film and digital cameras and scanners. Opinionated and lively. I occasionally disagree— his opinions are sometimes premature, but more often they're solidly based.
Bjørn Rørslett has articles and reviews on Nikon digital cameras and accessories (also the XPan) and subjective reviews of Nikon lenses. In evaluating his reviews, remember than lateral chromatic aberration and distortion can be corrected digitally.
John Shaw's top tips Concise advice on composition (simplify!) and camera technique (use a sturdy tripod, slow films, good lenses and a level, avoid midday light, get close) from an outstanding nature photographer. Sponsored by Nikon. More on John's equipment.
Digital Photography For What It's Worth Excellent articles on selecting and using digital cameras, geared towards amateurs.
 |
Photography (7th Edition) by Barbara London, John Upton, Ken Kobré, and Betsy Brill. Paperback, 426 pages. A comprehensive introduction to the art and craft of photography. Probably the best single book for the ambitous beginner. |
|
 |
Basic Photographic Materials and Processes, Second Edition by Leslie Stroebel, John Compton, Ira Current, Richard D. Zakia. Paperback, 440 pages. Indispensable for learning the craft and science of photography. Covers optics, light, photometry, sensitometry, chemistry, and perception. Introduces digital photography. |
|
 |
Photographing the Landscape by John Fielder. Paperback, 192 pages. Good introductory material. Nice images of Colorado and neighboring regions. A cross between a coffee table and a how-to book. |
|
Photographic
technique part 2: Photographic vision, panoramic photography, travel

| Images and text copyright (C) 2000-2013 by Norman Koren. Norman Koren lives in Boulder, Colorado, where he worked in developing magnetic recording technology for high capacity data storage systems until 2001. Since 2003 most of his time has been devoted to the development of Imatest. He has been involved with photography since 1964. |  |
