Image
editing with Picture Window Pro:
Introduction
by Norman
Koren
updated
December 23,
2003
| This
page introduces Picture Window Pro and gives an overview of its
functions
and features. |
Introducción
al Picture Window Pro 3 by Carlos E. Mora is an excellent
Spanish language tutorial.
Why
edit images?
The
images produced by scanners and digital cameras are often quite good,
but rarely perfect. They may suffice as records of a scene or event,
but
they seldom have the dramatic impact of a great print. If your goal is
to make prints that go beyond simple simple records-- prints that
capture
the essence people and places, the sublety of still lives, or the
grandeur
of landscapes-- to create prints that stand as works of art-- you will
need to make many adjustments, large and small-- to alter the
brightness,
contrast and color of all or parts of the image until it looks
exactly
right. You will need to
edit.
Image editing is the heart of the creative act of photographic
printmaking--
it is where you transform a well-crafted snapshot into a work of art.
It
is where you implement Ansel Adams' oft-repeated statement,
"The negative is
comparable to the composer's score and the print to its performance."
In his youth Adams was disappointed by camera shop prints of his
mountain
photographs-- they didn't convey what he saw and felt.
That disappointment
launched him on a successful quest to make prints that conveyed his
feelings
about the landscape he loved. He shared his knowledge in his Basic
Photo
series, particularly in The Negative and The
Print, classics
that are relevant to this day. Technology has transformed the means
of image editing, but not the ends.
Adams realized that a print can never capture the tonal range
of an
actual scene, particularly a naturally illuminated landscape. A print
has
a maximum tonal range of no more than 100:1. Scenes have widely varying
tonal ranges, often much greater. If you try to transfer a scene
literally
to a print, the contrast may be too low, resulting in a flat
appearance.
More often it's too high, blocking out highlights and shadows. Even if
you correct the contrast (and do nothing else), you will rarely capture
the visual experience of the scene.
Why? Because our eyes function differently when
viewing prints and viewing
scenes. As they move about a scene, they constantly adapt to
differences
in illumination using all sorts of cues not present in a print. The
scene
we experience is the result of numerous small and large adaptations.
When
we look at a print, our eyes hardly adapt. They grasp the print as a
whole.
In order to capture the feeling of a scene, those adaptations have to
be
put into the print. And to capture the artistic essence of the scene--
to reveal its essence-- we often have to go a great deal further.
In practice, this means if you photograph in natural
light, you must
dodge (lighten selected areas of a print) and burn (darken selected
areas).
When I started with photography I thought the master straight
photographers
(Alfred Steiglitz, Paul Strand, Edward Weston, Wynn Bullock, and Ansel
Adams, to name a few.) who practiced "pure" photography didn't do much
dodging and burning. Wrong! They
were consummate artists
who understood the workings of the human eye. They worked very hard on
their prints, balancing every element to maximize the visual intensity.
They would have loved digital technology. As Paul
Caponigro said in a 1973 workshop,
"If I were God,
I would say 'Let there be light.' Then I'd never have to dodge or burn."
Some of the specific goals of image editing are
-
Adjust the geometry: crop, rotate, correct perspective distortion, etc.
- Remove dust specks and scratches.
- Correct for lens aberrations, if needed: distortion (barrel
and pincushion),
chromatic
aberration (color fringing), and light falloff (in wide angle
lenses).
- Adjust the brightness, contrast, color tint, and color
saturation of the
image as a whole.
- Adjust portions of the image to bring them into balance with
the image
as a whole. This typically involves the use of masks
and may be facilitated by sophisticated techniques such as contrast
masking.
- Sharpen the image, and, if necessary, reduce grain.
Picture
Window Pro from Digital Light and Color
Digital Light & Color
was
founded in 1993 by Jonathan Sachs, co-founder of the Lotus Development
Corporation and author of Lotus 1-2-3, one of the landmark programs of
personal computing. When Jonathan left Lotus in 1990, he combined his
formidable
software skills with his passion for photography to create a digital
photo
editing program that has evolved into today's Picture Window Pro.
Picture
Window Pro is an extremely
powerful image editor that has every feature serious photographers
require.
Among them,
- Full support for ICC
color management.
- Full support for
48-bit color
and 16-bit B&W files. This allows repetitive edits with no loss
of
quality.
- Outstanding masking
capabilities for adjusting
portions of an image, including creating masks based on image
properties.
- A wide array of geometrical transformations, including
resizing, cropping,
rotation, warping, perspective correction (equivalent to lens tilt),
lens
distortion (barrel and pincushion) correction, and lateral
chromatic aberration (color fringing) correction.
- Excellent tutorials
and
support. See the message
board.
And it's affordable.
$89.95
for the Pro version, which I recommend. A 30 day trial version is
available
for download.
The inevitable question will arise, "Why not Photoshop?"
Photoshop is,
after all, the dominant image editor in graphic arts. The answer:
Picture
Window Pro is less expensive, easier to learn and easier to use. And
extremely
powerful. Photoshop is intended for advertising and display. It has an
enormous range of features most photographers will never need; features
which make it difficult to learn and less than intuitive to use. As a
result,
a whole industry has grown up around teaching it; numerous classes are
offered and over 400 books are in print. You can start making artistic
prints of the highest quality far more quickly with Picture Window Pro.
And if needs be, you can always open the files with Photoshop. I often
talk to people who have tried digital printing but prefer the
old-fashioned
chemical darkroom. They have one thing in common: they've struggled
with
Photoshop.
Robert Schwiebert's eloquent comments sum it up.
I've been a Photoshop
user for a few years and have accumulated a number of good plug-ins and
actions to support my photographic workflow. In the past I had glanced
a PWP, but didn't really take anything seriously except Photoshop. Then
I spent some time reading your various articles that reference PWP's
use,
and I decided to download a demo copy to work with. After spending some
quality time using the program I realized that, for photographic work,
it provides all the capabilities of Photoshop plus my add-ons, and much
more. It's hard to know where to stop in singing its praises: a clean
and
consistent user interface, fast image processing, exceptional
documentation,
48 bit image support, lower cost upgrade path, ... I can really see why
you promote it so much, and I hope it gets a more prominent place in
the
market. Anyway, the upshot is that I've officially retired Photoshop.
It's
very satisfying to have one high-quality, well-integrated tool that
serves
my photographic needs.
The
Picture Window screen
| The title bar (top row)
contains the program name and version
and the usual Windows boxes for minimize, maximize and close.
The second row contains pull-down menus: File,
Edit, Transformation, Mask, Tools, Window and Help.
Commands accessable
through this row are summarized in the table below.
The third row contains icons for
selected operations.
The workspace is everything below
the third row. Only a portion
is illustrated. It contains images and dialog boxes. The Levels
and Color transformation, described below,
is in progress. |
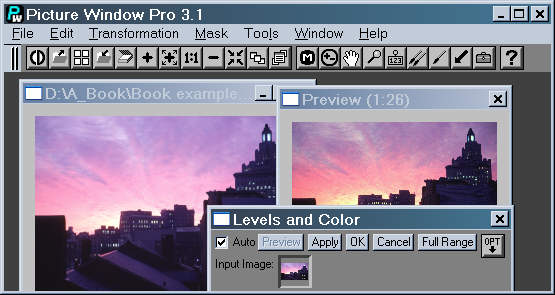 |
.
Images are edited by means
of transformations,
which operate on the entire image or portions selected by a mask,
and by tools,
which typically operate on small areas of the image, selected by
dragging
the mouse. Transformations create a new copy of the image; tools update
the current copy.
A
quick guide to Picture Window Pro functions,
below,
summarizes transformations, tools, and other operations.
Commands
by operation, at the bottom,
lists transformations by function (Color Balance, Contrast, History,
etc.).
Image
size and display
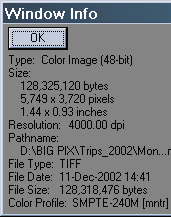 The
true size of a digital image is its pixel size, for
example 5,749
x
3,740 pixels. You can see image size by right-clicking on the image and
selecting Display info,
or clicking
on Window,
Info...
Digital images are also specified by their size in inches and
Resolution
in dpi (dots or pixels per inch). For example, the box on the left
indicates
1.44 x 0.93
inches at 4000.00 dpi resolution.
Don't
be overly concerned by these numbers. They refer to film in
the scanner,
and have no effect on the monitor display or print size. Picture Window
ignores them (you set the print size when you make the print), but some
programs use them for setting print size. If you need, you can change
them
without changing the image pixels using the Resize
transformation with
Preserve:File
size and proportions. Most of the time I ignore them. The
true size of a digital image is its pixel size, for
example 5,749
x
3,740 pixels. You can see image size by right-clicking on the image and
selecting Display info,
or clicking
on Window,
Info...
Digital images are also specified by their size in inches and
Resolution
in dpi (dots or pixels per inch). For example, the box on the left
indicates
1.44 x 0.93
inches at 4000.00 dpi resolution.
Don't
be overly concerned by these numbers. They refer to film in
the scanner,
and have no effect on the monitor display or print size. Picture Window
ignores them (you set the print size when you make the print), but some
programs use them for setting print size. If you need, you can change
them
without changing the image pixels using the Resize
transformation with
Preserve:File
size and proportions. Most of the time I ignore them.
When an image is opened, it is displayed at 1:1 magnification
(one image
pixel per screen pixel) if it's small enough to fit inside the screen;
otherwise it is reduced to fit the screen. The amount of reduction, for
example (1:8),
is indicated at the top of the image window. Right-clicking on an image
brings up zoom controls, several of which have icons:
Zoom
Out to Fit Screen  ,
Zoom
In and Resize (Expand Window) ,
Zoom
In and Resize (Expand Window) ,
Zoom
In ,
Zoom
In  ,
Zoom Out ,
Zoom Out  ,
Zoom
to 1:1, Zoom to 1:1 and Resize ,
Zoom
to 1:1, Zoom to 1:1 and Resize .
Use
1:1,
or zoom in even more, when you need to examine examine imge pixels
closely,
for example, when you use the clone tool to remove dust specks or when
you sharpen the image. Note that there are two options for zooming to
1:1.
Zoom
to 1:1 and Resize
usually enlarges the window to fill the screen. I often use Zoom
to 1:1 (no Resize), which has no
icon, because it leaves
the window unchanged, keeping tools and other windows uncovered. .
Use
1:1,
or zoom in even more, when you need to examine examine imge pixels
closely,
for example, when you use the clone tool to remove dust specks or when
you sharpen the image. Note that there are two options for zooming to
1:1.
Zoom
to 1:1 and Resize
usually enlarges the window to fill the screen. I often use Zoom
to 1:1 (no Resize), which has no
icon, because it leaves
the window unchanged, keeping tools and other windows uncovered.
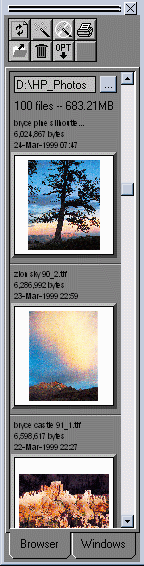
Thumbnail Browser.
Clicking on the Browse...
icon opens a Thumbnail Browser on the left of the Picture Window screen,
shown
here on the right. Click on the Browse button
opens a Thumbnail Browser on the left of the Picture Window screen,
shown
here on the right. Click on the Browse button to select the folder to browse. OPT
 allows you to select Tiny, Small, Medium, or Large images. Small is
shown;
I normally use Large. Thumbnails can be sorted by name, date, or size.
The thumbnail display can be used for managing image folders: you can
open
or delete files as you please. The Browser window can be resized
(widened)
to display thumbnails side-by-side. Thumbnails are stored in a file
named
PW35.BrowseInfo
(similar in function to Windows XP's Thumbs.db),
which is updated when the Thumbnail Browser is opened or the folder is
changed.
Warning:
Deleting a thumbnail deletes the image file itself. Be
careful!
allows you to select Tiny, Small, Medium, or Large images. Small is
shown;
I normally use Large. Thumbnails can be sorted by name, date, or size.
The thumbnail display can be used for managing image folders: you can
open
or delete files as you please. The Browser window can be resized
(widened)
to display thumbnails side-by-side. Thumbnails are stored in a file
named
PW35.BrowseInfo
(similar in function to Windows XP's Thumbs.db),
which is updated when the Thumbnail Browser is opened or the folder is
changed.
Warning:
Deleting a thumbnail deletes the image file itself. Be
careful! |
 |
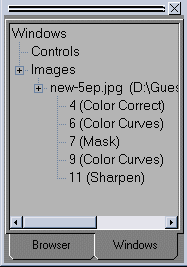
After several
transformations have been performed, several image windows
may be open. You can access the history of these images (a chart
showing
the transformation that created each of them) by clicking on the Windows
tab
in the Thumbnail Browser.
Image
editing sequence
Image
editing is typically performed in the following sequence.
Each step involves a tool or transformation. The sequence is, of
course,
not rigid. I tend to follow it most of the time, but there always
afterthoughts--
I'm forever finding dust specks I missed, especially after sharpening.
Then there's that last tonal adjustment... Before you start, make sure
your system is calibrated
so your
monitor conforms to generally accepted standards (gamma
= 2.2 for Windows, etc.) and your prints match your monitor.
-
Crop
the image and make any
other geometrical adjustments using transformations in the Geometry
toolbox.
- Clean
up the image-- remove
scratches and dust spots using the Clone or Speck Removal tools.
- Adjust
the overall brightness,
contrast and color. A huge arsenal of transformations is available for
this purpose: Filter and the Gray
and Color toolboxes.
- Create
masks
if needed and adjust portions of the image.
When
tonal and color adjustments
are complete, sharpen the image with Unsharp Mask. Use a mask to avoid
sharpening smooth areas like skies-- sharpening increases grain. If grain
is objectionable, consider using a separate program, Neat
Image, to reduce it. It comes close to working miracles.
Transformations are applied in the following steps.
-
Select
the image to be adjusted
(click on it).
- Select
the transformation. This
brings up a dialog box with sliders and other controls.
- To
adjust a portion of the image,
select a mask
by clicking on
the box to the right of the Amount: slider and selecting a mask image.
The Amount: slider splits into two sliders. White (the masked area)
defaults
to 100% and black (the unmasked area) defaults to 0. You may need to
adjust
them appropriately.
- Make
adjustments in the transformation
dialog box until the Preview image looks good. The original and Preview
images may be resized if necessary. With transformations that affect
fine
detail, such as Sharpen or Blur, I usually enlarge the Preview, and
often
the input image, to 1:1. I may move the amount slider from 100% to 0
and
back to observe the effect of the transformation.
- Click
OK to complete the transformation
and close the dialog box. Click Apply to complete the transformation,
keeping
the dialog box open-- useful for continuing where you left off.
- The
new image is named Untitled
n,
where n is an integer that increments in steps of 2
(1, 3, 5, ...).
After several transformations, Untitled images can crowd the screen and
gobble memory: 48-bit images scanned at 4000 dpi from 35mm film can be
as large as 120 MB. You can access a chart with the history of these
images
(the transformation that created each of them) by clicking on the Windows
tab in the Thumbnail Browser.
You should name and save "keepers" and delete intermediate images you
no
longer need. It's a good idea to save an early, good version of an
image,
before you do too much processing. I usually save a version after I've
cropped it, removed dust, and done some basic color adjustment, but
before
I've adjusted masked areas or done any sharpening, just in case I
misjudge
something along the way.
An example of a transformation follows. More examples can be
found in Making
fine prints Part 3: Image editing, Example:
Sunset, Providence, and Tinting
and hand coloring B&W images.
Transformation
example: Levels and Color...
The
Levels and Color
transformation makes a good example. It's the Swiss army knife of
transformations
for adjusting color, brightness, and contrast: easy to use and
versatile,
though not as powerful as specialized transformations such as Brightness
Curve (B&W) or Color
Curves
(color), which are my favorites.
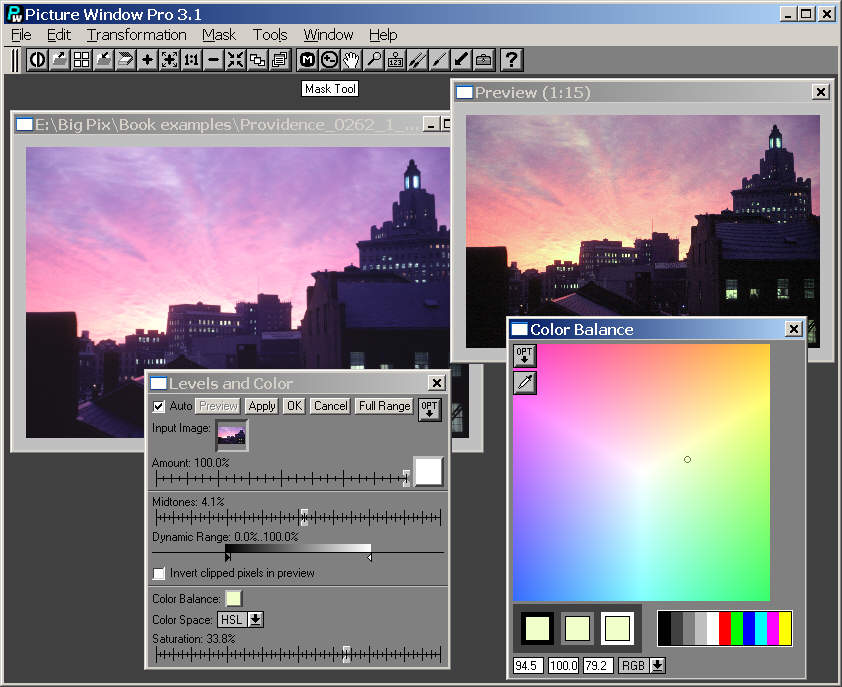 In the illustration above, the input image
is on
the upper left, the Levels
and Color
dialog box is on the lower left, the preview image is on the upper
right,
and the color picker (for Color
Balance)
is on the lower right. The preview image usually has less resolution
than
the final image so it can be calculated faster. It appears
automatically
if the Default Preview
box in Preferences
is set to Auto.
If the Auto
box is checked, it is recalculated whenever an adjustment is changed.
Both
the original and preview images are illustrated smaller than normal:
they
can be resized at any time.
In the illustration above, the input image
is on
the upper left, the Levels
and Color
dialog box is on the lower left, the preview image is on the upper
right,
and the color picker (for Color
Balance)
is on the lower right. The preview image usually has less resolution
than
the final image so it can be calculated faster. It appears
automatically
if the Default Preview
box in Preferences
is set to Auto.
If the Auto
box is checked, it is recalculated whenever an adjustment is changed.
Both
the original and preview images are illustrated smaller than normal:
they
can be resized at any time.
The Preview,
Apply,
OK
and Cancel
boxes appear in most transformations.
Preview
is grayed out when Auto
is checked.
Apply
performs the transformation (creates a full image), but leaves the
dialog
box open for further adjustments.
OK
performs the transformation and closes the dialog box. Full
Range is specific to Levels
and Color.
It sets Dynamic Range (the black and white pointers) so the so the
minimum
is 0% and the maximum is 100%.
OPT
allows you to set options, which may be specific to the transformation.
The options in Levels and
Color are
generic: Reset
and Probe
Size.
 Most
transformations have an Amount
slider
to control the amount of the transformation. When no mask has been
selected
(the box to the right of Amount
is
pure white), there is a single Amount
slider. To select a mask
(a B&W
image the same pixel size as the Input Image, used to select areas that
receive adjustment), click on the box on the right of the slider.
Available
masks (loaded in PW Pro) can be selected, and a double slider appears,
as shown on the right. The double slider allows you to control Amount
separately in dark and light areas of the mask (gray is intermediate).
The default is 100% adjustment in white areas and 0% in black, but it
can
be inverted or set as desired.
Most
transformations have an Amount
slider
to control the amount of the transformation. When no mask has been
selected
(the box to the right of Amount
is
pure white), there is a single Amount
slider. To select a mask
(a B&W
image the same pixel size as the Input Image, used to select areas that
receive adjustment), click on the box on the right of the slider.
Available
masks (loaded in PW Pro) can be selected, and a double slider appears,
as shown on the right. The double slider allows you to control Amount
separately in dark and light areas of the mask (gray is intermediate).
The default is 100% adjustment in white areas and 0% in black, but it
can
be inverted or set as desired.
The adjustments
below Amount
are specific to Levels and
Color. The
Midtones
slider and the black and white pointers below Dynamic
Range control the midtones, shadows, and highlights,
respectively.
These controls allow you to adjust both brightness and contrast.
Clicking
the Full Range box on top sets the left (black) arrow to 0% and the
right
(white) arrow to 100%. I use Brightness
Curve
(B&W) or Color Curves
when I want
to perform these adjustments more precely, with a histogram display.
Sometimes
when
Color Balance is
used, you may
want to increase the right (white) arrow beyone 100%. Clicking the Invert
clipped pixels in preview box shows when you've gone too
far.
Clicking on the Color
Balance box brings up a color picker window, illustrated
in the
lower right. The Color Picker offers a number of options, including
selecting
colors by typing numbers in boxes or using standard filters (CC or
Wratten
designations). The Color
Balance box
affects mostly highlights. The Color
Balance
transformation has six boxes for adding or removing color casts from
highlights,
midtones, and shadows.
Color Space:
can be set to HSV
or HSL.
These two spaces, which
transform RGB images into hue, saturation, and lightness or value, are
required for adjusting tones. (Lightening or darkening an RGB image
presents
the problem of how much to adjust each setting to keep the same hue.)
You
should be familiar with the effect of Color
Space on saturation when you lighten or darken an image: HSV
and HSL behave
quite differently.
Last but not
least is the Saturation
slider. More options (Preserve Low, High, Low and High, and neither)
are
available in the Saturation
transformation.
A
quick guide to Picture Window Pro functions
This table shows highlights of available
commands. I've omitted several; the entire list would be overwhelming.
You may want to use the table as a reference and skip to the example below,
illustrating the use of the versatile Levels
and Color Transformation. I do most of my tonal and color
adjustments
with Brightness Curve
(for B&W)
and Color Curves
(for color).
| File |
| File |
|
| Standard
Windows commands.
Self-explanatory. |
New..., Open...  ,
Save ,
Save  ,
Save as..., Open Photo CD ,
Save as..., Open Photo CD  ,
Print..., Print setup..., Close ,
Print..., Print setup..., Close |
| Browse... |
Display
thumbnails. The
thumbnails and width of the display can be resized as needed. The
Windows
tab displays a chart listing the open images with the history of the
transformations
used to create them. |
| Select Source... |
Select
a scanner or digital
camera (TWAIN interface). |
Acquire...  |
Acquire
the image via the
TWAIN driver (scan or load from camera). |
| Preferences |
Select
operating preferences
(background, border colors, default directories, etc.) |
| Color management... |
Opens
the Color Management
Settings dialog box. Online tutorial: Color
management. |
|
| Edit |
| Edit |
| Undo,
Undo all, Copy
(whole image), Paste (load whole image) |
|
| Transformation
Adjust
the
appearance
of
the image. |
| Transformation....
Adjust
the appearance of the image. |
Geometry... |
| Copy |
.. |
Make
a copy of the image. |
| Mirror/Rotate... |
|
Mirror
or rotate by multiples
of 90 degrees. |
| Crop/Add Border... |
|
Crop
an image, add a border,
or soften the edges. Can also rotate the image by small amounts and
soften
the border. |
| Resize... |
|
Resize
(resample) the image.
Normally used to change pixel size, but there are a number of options,
e.g., you can the image size in inches and dpi resolution without
changing
the pixels. Online tutorial: Image
Resizing and Resampling Techniques. |
| Warp... |
|
Rotate
(in fine increments),
crop, perspective correct, stretch, and warp an image. |
| Displace... |
|
Shift
or rotate the image
(small increments). |
| Lens distortion... |
|
Correct
for lens barrel
or pincushion distortion. |
|
| Gray...
(Commands
that affect tones
in B&W images. All work with color images.) |
| Negative |
.. |
Invert
the image. |
| Levels and Color... |
|
Control
color balance, brightness
and contrast. The Swiss army knife of color/tonal adjustments:
versatile
and easy to use, but other commands are more powerful. |
| Brightness Curve... |
|
Adjust
the brightness curve
(gray scale) of an image. The finest adjustment for brightness and
contrast.
I perfer it when Show histograms is selected. Online tutorial: Using
Curves and Histograms.
is selected. Online tutorial: Using
Curves and Histograms. |
| Brightness... |
|
Adjust
brightness. Simple,
but handy with a mask because you can simultaneously brighten and
darken
different regions. The Preserve options are Black, White, Black and
White,
or Neither. |
| Tint... |
|
Convert
a B&W image
to color by setting different gray levels to selected colors.
Replicates
toning: sepia, etc. Used in B&W
workflows. |
| Light Falloff... |
|
Correct
the light falloff
in wide angle lenses. |
| Gamma Adjust... |
|
Change
the image gamma. |
| Combine Channels... |
|
Combine
three B&W images
of the same size into one color image. The inverse of Extract
Channel.
The channels can be RGB, HSV,
or
HSL. |
|
| Color...
(Commands
that affect tones
and color in color images. Not for B&W.) |
| Balance... |
.. |
Add
or remove a color cast.
Separate controls for highlights, midtones, and shadows. |
| Curves... |
|
Adjust
color, tone, and
saturation curves (HSV, HSL, or RGB) using curves combined with
histgrams
(powerful).
Similar to Brightness
Curve. Online tutorial: Using
Curves and Histograms. |
| Saturation... |
|
Adjust
saturation in HSV
or HSL color space. The Preserve options are Low, High, Low and High,
or
None. |
| Extract Channel... |
|
Extract
a channel of a color
image: R, G, B, HSV Hue, Saturation, Value, or HSL Hue,
Saturation,
Luminance. The inverse of Combine Channels. |
| Monochrome... |
|
Convert
a color image to
B&W using a filter selected with the color picker. Equivalent
to exposing
B&W film with a filter. |
| Correction... |
|
Allows
you to alter a color
without affecting the overall image. Same as the Color Mechanic
Photoshop
plug-in. |
| Chromatic Aberration... |
|
Correct
for lateral
chromatic aberration (color fringing) |
| Change Color Profile... |
|
Change
the color
profile associated with an image. Can change image data only,
profile
setting only, or both (default). |
| Registration... |
|
Compensate
for pixel misregistration,
which you can get in some cheap scanners. |
|
| Convert... |
Convert
image type (8, 16-bit
B&W, 24, 48-bit color, 1-bit binary) |
| Filter... |
Filter a color
image, as you would during the exposure. Specify CC value, Wratten
designation,
or RGB values. Images can also be used as filters. Exposure
compensation
is available. Many options. |
| Composite... |
Combine
images under control
of a mask. |
| Gradient... |
Generates
an image the same
size as the current image filled with a graduated sequence of colors.
Most
useful for creating simple geometric masks (B&W images) with
gradual
gradation. |
| Blur... |
Blur
the image. Several
methods including simple and gaussian with adjustments. |
| Sharpen... |
Sharpen
the images. Simple
sharpen or Unsharp Mask with radius, amount, and threshold adjustments.
Online tutorial: Sharpening
Images. |
| Advanced Sharpen... new
in 3.5! |
Blur
the image, remove white
or black specks, and sharpen it in a combined operation that optimizes
image quality and detail. Offers more precise and flexible control than
standard Sharpen... |
| Text... |
Add
text to the image. Online
tutorial: Text
Effects. |
| Special
effects...
(Generally
produce non-photographic, artistic results. The list is not complete.) |
Add Noise,
Calendar
(overlay a calendar on top of an image), Difference
(between images),
Edge
(shows edge locations), Emboss (combine an image
with its displaced
negative; very artsy), Grid, Halftone,
High contrast,
Kaleidoscope
(very cool), Posterize (a classic effect), Spiral
(distort
a circular portion of the image),
Tile (quick way of making multiple
images), and others. |
| Layout... |
Create
an image consisting
of a background page overlaid with one or more image panels. Online
tutorial:
Using
the Layout Transformation. |
| Stack Images new
in 3.5! |
Combine
images under the
control of amount sliders or masks. A powerful way of expanding the
dynamic
range of digital cameras, when you can take multiple exposures (on a
tripod). |
|
| Mask |
| Mask
....Select
portions of the image to be affected by transformations. |
Create
a mask for selecting a portion of the image to adjust or to combine with
another
image using the Composite . Works with tonal and color transformations,
sharpening, blurring, etc. This is a powerful and important tool. Making
masks rapidly is the key to selective image manipulation-- dodging,
burning,
etc. Online tutorials: Creating
and Using Masks | Dodging
and Burning.
for selecting a portion of the image to adjust or to combine with
another
image using the Composite . Works with tonal and color transformations,
sharpening, blurring, etc. This is a powerful and important tool. Making
masks rapidly is the key to selective image manipulation-- dodging,
burning,
etc. Online tutorials: Creating
and Using Masks | Dodging
and Burning. |
|
| Tools |
| Tools |
|
|
| Readout tool |
 | Examine
pixel values (RGB,
HSV, HSL, or RGB Density). |
| Zoom |
 | When
activated, clicking
on an image zooms it in, centered on where you clicked. Shift-clicking
zooms the image out. |
| Scroll |
 | Use the
mouse to scroll
around the image (useful when the image is enlarged beyond the edges of
its window). |
| Magnifier |
 | Opens a
small resizable
window with a magnified portion of the image. |
| Clone |
 | Copy
pixels from one part
of an image to another, or between imges. Adjustable Radius,
Transparency,
and Softness. |
| Paint |
 | Paint
colors using a brush
with adjustable Radius, Transparency, and Softness. |
| Line and Arrow |
 | Draw a
line (without or
with arrow heads) on the image. |
| Miscellaneous |
 | For
retouching small areas.
Includes Lighten, Darken, Increase Saturation, Decrease Saturation,
Blur,
Sharpen, Speck Removal, Smudge, Red Eye Removal, and Add Noise. These
operations
are performed with a brush with adjustable Radius, Transparency, and
Softness.
Each function has options for fine control. You can undo mistakes with
Control-Z. |
|
| Window |
| Window |
|
| Commands
for selecting and
arranging image windows. |
Next,
Bring Dialogs
to Top  ,
Arrange,
Close
All. Cycle through Windows ,
Arrange,
Close
All. Cycle through Windows is available as an icon only. (Control-Tab also cycles through windows.)
 |
| Commands
for controlling
image magnification.
Zoom
options are available
when you right-click on an image. |
Expand,
Fit (Zoom
Out to Fit Screen) ,
Zoom
In and Resize (Zoom In and Expand Window) ,
Zoom
In ,
Zoom Out ,
Zoom
Factor, Zoom 1:1, Zoom 1:1 and
Resize. |
| Info... |
View
image information (type,
size, date, profile, etc.) |
| File comments... |
View
or write file comments,
saved with the file in TIFF tags, etc. |
|
| Help |
| Help |
Open
Electronic Manual,
Getting Started, Contents, Search,
and Glossary are self-explanatory.
Context brings up context sensitive help window for the current transformation.
Support
Settings allow you to set some obscure but important settings
that
affect operation. |
|
Commands
by operation
Commands
are listed alphabetically by operation (i.e., function
name) (in blue)
for operations that are frequently required, not obvious, or can be
accomplished
by several transformations.
Adjust
Color
balance
See
the online Tutorial,
Color
Balancing Techniques |
Filter:
Filter the image, as you would at the time of exposure.Specify CC
value,
Wratten designation, color temperature correction (in degrees K; 6500K
leaves the image unchanged), or RGB values (using a color picker).
Exposure
compensation should be manually applied.
Color
Balance: Add
or remove a color cast. Separate controls for highlights, midtones, and
shadows. Easy to use.
Color
Curves: With
Color Space: set to RGB, this gives the finest control of color balance
using curves combined with histogram display.
Online
histogram tutorial.
Levels
and Color:
A single adjustment. Simple, but not very powerful. |
| Adjust
a single Color without
affecting overall balance |
Color
Correction: An amazing transformation, identical to the Color
Mechanic
Photoshop plugin. Can be further refined with a Mask. |
| Adjust
Contrast |
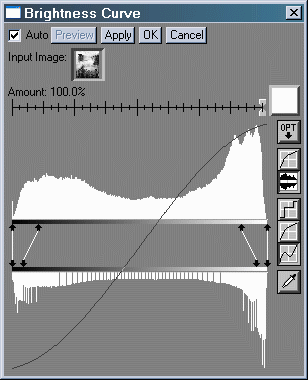
| Brightness
Curve: (B&W images) or Color Curves:
(V or L channel for
color images). Best if Show histograms
is selected. Shift-click on the upper bar to add a control point.
Control-click
to remove it.
The
illustration on the right
shows how Brightness Curve (identical to Color
Curves with
the V or L channel) is used to increase contrast. Curves gives
tremendous
control and flexibility.
The Curves transformations
combine adjustment with histograms (plots of pixel value distribution,
from 0 to 255). This is valuable because most fine prints have some
pure
black region; histograms show you the distribution of pixel values.
I use curves transformations
for most of my color and tonal adjustments. Color Curves
also controls
hue and saturation in HSV and HSL color spaces; it is good for color
balancing
in RGB color space, though I usually use Filter. |
.. |
 |
|
| Crop |
Crop/Add
Border:
Can also rotate the image by small amounts and soften the border. |
| Dodge
or burn |
Large
areas: Use any of the lighten or darken transformations (below) with a
Mask.
Small
areas: Use Miscellaneous
toolsLighten
or Darken. Be sure to set the desired options. |
| History |
| After
several transformations have been performed, several image windows may
be open.
File,
Browse...
or the Browse icon
with the Windows tab selected shows the history of each open image--
its
source and the transformation used to create it.
You should name and save
"keepers" and delete intermediate images that are no longer needed,
especially
if consume lots of memory. (Right-click on the image and click on
Display
info to see the amount of memory used.) It's a good idea to save an
early,
good version of an image, before you do much processing-- before
sharpening
and operations that require masking. |
.. |
 |
|
| Correct
Lens
aberrations and deficiencies |
Lens
distortion: corrects pincushion and barrel distortion.
Light
falloff: corrects
light falloff at edges of wide angle lenses.
Chromatic
Aberration:
Corrects lateral chromatic aberration (color fringing). |
| Lighten
or darken |
Brightness:
Simple, but handy with a mask
because you
can simultaneously brighten and darken different regions. The Preserve
options: Black, White, Black and White, Neither, are important.
Levels
and Color:
Allows you to adjust shadow, midtone, and highlight level.
Brightness
Curve
or Color Curves allow you to perform fine
adjustments with the help
of a histogram display. My
favorite. |
Perspective
control
(view camera shift, rise) |
Warp. |
| Rotate
(small angles) |
Warp,
with OPT set to rigid.
Crop/Add
Border.
Angle can be entered in a box at the bottom of the dialog box.
(Use
Mirror/Rotate
for multiples of 90 degrees.) |
Adjust
color
Saturation |
Saturation:
powerful and easy to use, with several options. All transformations in
this section work with HSV or HSL color space.
Color
curves: a little
more powerful and complex: works with curves, displays histogram. I
usually
do this along with a lightness or value adjustment.
Levels
and color:
Simple, no options. |
| Soft focus |
A
soft focus lens isn't
unsharp or out of focus: it diffuses light from highlights into
shadows.
To approximate soft focus, click on Transformation,
Blur...,
then select a Gaussian blur with a fairly large radius (you'll have to
do some trial-end-error to get the effect you desire). Click OK, then
click
on the original image and click on Transformation, Composite...
Select the blurred image for the Overlay. Set Operation to Lighten,
Alignment
to None, and adjust Overlay Amount for the desired effect. Have fun
experimenting
with other operations and moving sliders. This is best done after dust
removal but before tonal adjustments. You can achieve a similar effect
without Composite by adjusting the Amount slider in
Blur,
but the result is a little less like a soft focus lens. |
| Undo |
Control-Z.
You can undo mistakes with any of the tools,
Clone,
Paint,
and Line and Arrow. |
|
Next steps
This page introduced Picture
Window Pro and outlined its capabilities. To review the
basics of image
editing, read Making
fine prints Part
3: Image editing or the online tutorials, The
Basics of Digital Images, the Tutorial
chapter from the Picture Window electronic manual, and Nine
Tips for Making Better Prints. The key to serious image
editing is
selective adjustment with masks. Making masks quickly is a vital skill.
To learn more, read Making masks
or the online
tutorials, Creating
and using masksand
Dodging
and burning.
For more depth, look at the
advanced pages on
image editing in Example:
Sunset,
Providence, Contrast
masking (a very powerful
technique for balancing
contrasty images), and Tinting
and
hand coloring B&W images.
.
|
Images
and text copyright (C) 2000-2013 by Norman Koren. Norman Koren lives
in Boulder, Colorado, where he worked in developing magnetic recording
technology for high capacity data storage systems until 2001. Since 2003 most of his time has been devoted to the development of Imatest. He has been involved with photography since 1964. |
 |