Image editing with Picture Window Pro:
Example: Sunset, Providence, January 1962
by Norman Koren
|
|
|
| This page illustrates how to use Picture Window Pro to turn a raw scan into a fine image using masking, color curves and the remarkable color correction transformation. |
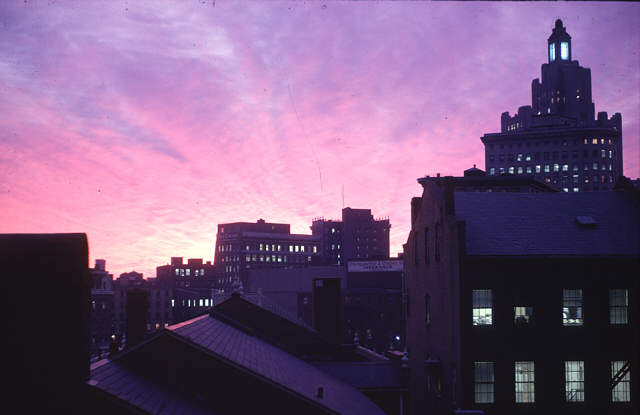
The Kodachrome slide came out beautifully. I made a Cibachrome print in the late 1970s using an elaborate mask to lighten the foreground relative to the sky. I made the mask by projecting the image half size, tracing the edge of the buildings, then cutting the outline with a scissors. I carefully positioned it in a fixture about half way between the enlarging lens and the easel, aligning it with a drawing of the edge. I exposed the masked sky, then removed the mask and exposed the entire image. Very tedious.
The cyan dye in the Cibachrome is somewhat faded (it was displayed in a bright room) but the slide is remarkably well preserved. The image below is straight out of the scanner without adjustment. It is bluer than the slide, and there is a significantly more embedded dust (or fungus or whatever) than there was in when I made the Cibachrome. It seems to have fared more poorly than other slides in the same plastic sleeves. Infrared dust removal in scanners doesn't work with Kodachrome, so I had to do a lot of cloning. The image looks pretty good with a little color adjustment-- more yellow (the compliment of blue). But it needs additional work to recapture the timeless feeling of that cold January evening, over forty years ago.
Polaroid has an excellent Dust & Scratch Removal Utility, which operates at a standalone program or as a Photoshop plug-in. It's a big time saver for dirty images like this one with lots of scratches and dust specks. You can download it for free. You'll see a somewhat intimidating questionnaire that asks for your scanner model and serial number. You don't need to answer.
The image below illustrates the Color Curves transformation for the B (blue) channel in RGB color space. Since the highlights in the image (the sky) are excessively blue, we reduce blue levels considerably. The extra control points (there were two at the beginning) were added by shift-clicking on the upper bar of the histogram. They can be removed by control-clicking. Adjustments to the other channels (R and G; not shown) are not as large.
An important adjustment, where the histogram is a particularly helpful, is to reduce the darkest tone in the image to pixel level 0 (pure black; the left of the histogram). We do this for each of the three channels. This is important for ensuring high print quality in virtually all images that have shadow regions (and that encompasses virtually all images). An image that doesn't have deep black tones in the darkest shadows appears weak and washed out. Aesthetic judgment plays a strong role in these settings: when an image has too much deep black, shadows can appear lifeless.
The images below have been shrunk for Web presentation.

 A
mask
is a Black & White (grayscale) image with the same pixel dimensions
as the image to be edited (the input image).
Its purpose is to select portions of the image to be altered. Masks work
with transformations that adjust brightness, contrast, color, sharpness,
and more. They are discussed in detail in Making
and using masks.
A
mask
is a Black & White (grayscale) image with the same pixel dimensions
as the image to be edited (the input image).
Its purpose is to select portions of the image to be altered. Masks work
with transformations that adjust brightness, contrast, color, sharpness,
and more. They are discussed in detail in Making
and using masks.
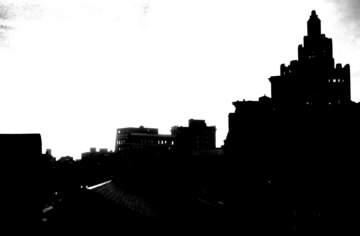
For this image we create a mask so we can adjust the foreground and sky separately: the foreground contrast must be increased and the sky must be darkened. In making the mask we must pay special attention to edges: flare light blurs the boundary between the foreground and sky, especially on the left, where the sky is brilliant yellow. If the mask is too sharp or too blurred, adjustments will make the boundary appear artificial. The goal is to design the mask so the boundary looks natural, even to experienced photographers. We accomplish this by making the mask gradual where the boundary is gradual.
To create the mask, click on the input image, then click on the Mask
tool![]() or Mask, New
to bring up the mask dialog box,
shown on the right. The initial tool for creating the mask is Color
Range
or Mask, New
to bring up the mask dialog box,
shown on the right. The initial tool for creating the mask is Color
Range![]() ,
which selects areas based on color properties. To select the sky, click
on the sky near the boundary, then click on Contract.
Now move the cursor along the sky side of the boundary, keeping the shift
key and the left mouse button depressed. As you move the cursor, the selected
areas, which appear white in the HSL
sliders, will expand. Take care to cover all representative areas of the
sky near the boundary.
,
which selects areas based on color properties. To select the sky, click
on the sky near the boundary, then click on Contract.
Now move the cursor along the sky side of the boundary, keeping the shift
key and the left mouse button depressed. As you move the cursor, the selected
areas, which appear white in the HSL
sliders, will expand. Take care to cover all representative areas of the
sky near the boundary.
Now the important trick. To make the boundary gradual, rather than abrupt, manually reduce the left black L (lightness) slider setting, indicated by the red arrow below. Click Apply to view the mask. To refine the settings, click on None to remove the mask, adjust the sliders, then click Apply again. If you've adjusted the sliders well, the transition at the boundary will look similar for the image and the mask. But the mask is not yet complete. Unmasked regions in the sky and masked regions in the foreground remain. The mask at this stage is shown on the left, below.
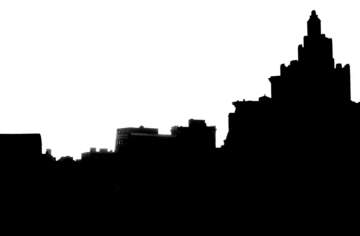
To complete the mask you must edit manually, using Paint![]() or Freehand Outline
or Freehand Outline![]() with Mask mode set to Add
with Mask mode set to Add![]() in the sky and Subtract
in the sky and Subtract![]() in the foreground. The final mask is shown on the right, below. Examine
the mask carefully: set Mask display
to Mask only
in the foreground. The final mask is shown on the right, below. Examine
the mask carefully: set Mask display
to Mask only![]() ,
magnify the image and scroll around it. Touch up any pinholes you may have
missed. When you are satisfied, click OK
to open the mask as an independent image. You can always edit it later
if needs be.
,
magnify the image and scroll around it. Touch up any pinholes you may have
missed. When you are satisfied, click OK
to open the mask as an independent image. You can always edit it later
if needs be.
|
|
|
 |
 |
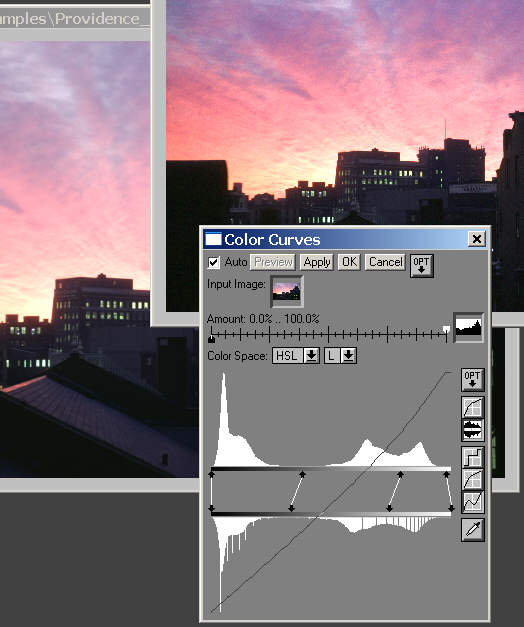
| Once we have the mask we can correct brightness, contrast and color
in the sky and foreground separately. Here we illustrate the adjustment
on the sky.
Click on the input image, then click on Transformation,
Color,
Color
Curves. Click on the Show Histograms icon To apply the mask, click on the box to the right of the Amount slider. A list of masks loaded in Picture Window Pro is displayed. Select the appropriate mask. The mask we just created is shown. For HSL color space you can adjust the H, S, or L channels individually by selecting from the second box to the right of Color Space. L is shown. I added two control points by shift-clicking on the upper bar of the histogram, then made the adjustments. The control points can be removed by control-clicking. Saturation (S) has also been increased. In the image on the right, the Preview window is shown on the upper right. The input image is in the background on the left. To complete the adjustment, click OK. The foreground is adjusted separately, using Color Curves with the white Amount slider set to 0.0% and the black slider set to 100% |
 |
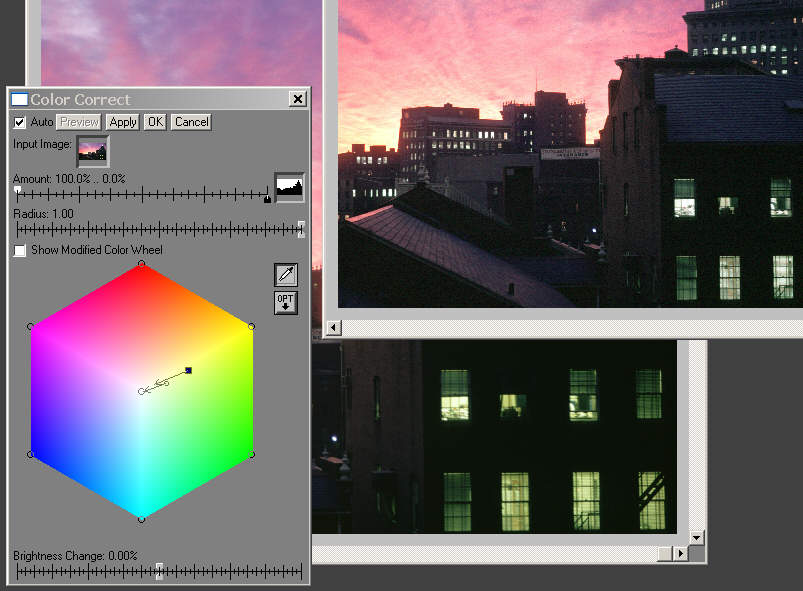
To add a control point, click on a point you want to alter in the input
image. If you need to, you can change the probe size with the OPT
button![]() .
A black square appears on the Color Wheel. Click on the black square and
move to the cursor to the desired color while pressing the left mouse button.
The final cursor position becomes the head of an arrow. The change appears
in the Preview window. You can add additional control points by repeating
this procedure. The most recent point has the black square at its end;
the others have circles. You can click and drag on an arrowhead to modify
an adjustment. The two control points shown were opened by clicking on
two greenish portions of the windows, one darker than the other. When you
are finished, click OK.
.
A black square appears on the Color Wheel. Click on the black square and
move to the cursor to the desired color while pressing the left mouse button.
The final cursor position becomes the head of an arrow. The change appears
in the Preview window. You can add additional control points by repeating
this procedure. The most recent point has the black square at its end;
the others have circles. You can click and drag on an arrowhead to modify
an adjustment. The two control points shown were opened by clicking on
two greenish portions of the windows, one darker than the other. When you
are finished, click OK.
Color Correct has a number of useful features. You can

To make sure no sharpening takes place in the sky, apply a mask.
Here, we use the same mask that we used for separately editing the foreground
and sky. It's a good idea to take a close look at the boundary between
the sky and foreground before applying the mask-- the image should be enlarged
to 1:1![]() .
You may want to feather the mask.
To do so, click on the mask, then click on Geometry,
Copy. This allows you to leave the original mask unchanged. Now
click on the input image, click on Mask,
and select the copy. Click on Feather
.
You may want to feather the mask.
To do so, click on the mask, then click on Geometry,
Copy. This allows you to leave the original mask unchanged. Now
click on the input image, click on Mask,
and select the copy. Click on Feather ![]() .
Adjust Radius by a few pixels (5-10 usually works fine): positive to enlarge
the mask (to sharpen the edge less), negative to shrink it (to sharpen
it more). Click Apply, then OK.
Now we're ready to sharpen.
.
Adjust Radius by a few pixels (5-10 usually works fine): positive to enlarge
the mask (to sharpen the edge less), negative to shrink it (to sharpen
it more). Click Apply, then OK.
Now we're ready to sharpen.
Click on the input image, then click on Transformation,
Sharpen... This brings up the Sharpen transformation dialog box
with the default method,
Sharpen. Enlarge
the Preview window to 1:1![]() so
you can observe the effects of sharpening. (This also speeds the preview.)
Click on the window to the right of the Amount
slider to select the mask. Since we are sharpening the foreground and not
the sky, reverse the Amount settings.
Move the white slider (the masked sky area) to 0 and the black slider (the
unmasked foreground) to 100%. Select Method:
Unsharp Mask. This allows you to set the Radius
and Threshold for finer control. When
Threshold
is set larger than 0, adjacent pixels that differ by less than the threshold
are unaffected by sharpening. The best Radius
setting depends on the sharpness of the input image: the sharper the image,
the smaller the radius.
so
you can observe the effects of sharpening. (This also speeds the preview.)
Click on the window to the right of the Amount
slider to select the mask. Since we are sharpening the foreground and not
the sky, reverse the Amount settings.
Move the white slider (the masked sky area) to 0 and the black slider (the
unmasked foreground) to 100%. Select Method:
Unsharp Mask. This allows you to set the Radius
and Threshold for finer control. When
Threshold
is set larger than 0, adjacent pixels that differ by less than the threshold
are unaffected by sharpening. The best Radius
setting depends on the sharpness of the input image: the sharper the image,
the smaller the radius.
Try out different Radius, Threshold, and Amount settings, observing their effects in the Preview window. Use the smallest Radius that gives effective sharpening. Set Threshold high enough to keep that grain in smooth areas from looking nasty, but not so high that edges are compromised. If you observe overshapening-- harsh, exaggerated edges, reduce Amount below 100%. When you are pleased with the result, click OK.


| Images and text copyright (C) 2000-2013 by Norman Koren. Norman Koren lives in Boulder, Colorado, where he worked in developing magnetic recording technology for high capacity data storage systems until 2001. Since 2003 most of his time has been devoted to the development of Imatest. He has been involved with photography since 1964. |  |