Making
fine prints in your digital darkroom
Scanning
film
by Norman
Koren
updated Jan. 16, 2003
In this page we discuss how to scan images for maximum quality, using
the Hewlett-Packard Photosmart S20 2400 dpi 35mm film scanner as an example.
Scanner hardware and specifications are discussed in a separate page on
Scanners.
| For more scanning
tips and techniques, go to my reviews of the Canon
CanoScan FS4000US 4000 dpi 35mm/APS film scanner (great hardware:
very sharp with excellent color; a few quirky software deficiencies; supported
by Hamrick VueScan) and the
Epson
2450 2400 dpi flatbed scanner (not as sharp as dedicated 2400 dpi
film scanners; excellent color, wonderful for medium format and 4x5, but
limited for 35mm; also supported by Vuescan). |
|
Scanners
and bit depth
Scanning is a process that converts prints or images on film-- negatives
or slides-- to digital format, i.e., pixels (picture elements). A scanner
consists of a fixture for holding the film or print, a light source, a
CCD sensor, and associated electronics and software. Either the film or
the CCD moves. An analog-to-digital converter converts the analog electrical
signal in the CCD to a digital signal with 10 to 14-bit precision (typical
values). n bits represents 2n discrete levels,
so 10 bits represents 1024 levels; 14 bits represents 16384 levels.
Most standard image file formats store pixels with 8-bit precision (256
levels): 24 bits per pixel for color files (8 bits each for R, G, and B),
8 for B&W. This is more than sufficient for full toned prints with
gradations as fine as the eye can see, but it is well below the capability
of most scanners. Information-- tonal detail-- is lost in converting a
10+ bit scan to an 8-bit file. If the pixels in the scan correspond closely
to the desired tones in the print-- if little editing is required-- this
loss is not significant. But if significant editing is required-- and editing
is almost unavoidable in images made outside highly controlled studio environments--
there can be a loss of tonal gradation and subtlety. This degradation can
be avoided by using file formats with 16-bit precision (48 bits per pixel
for color). All n scanner bits are transferred from the scanner;
the remaining 16-n bits are padded with zeros. No information is
lost-- images can be edited extensively without loss of tonal quality.
See Why you need a 48-bit color/16-bit
B&W image editor for a more detailed explanation. File formats
are summarized in the table below.
Image file
bit depth
|
Bit
depth
|
Bits
(bytes) per pixel,
B&W
|
Bits
(bytes) per pixel,
color
|
Discrete
levels
|
| 8 |
8
(1) |
24
(3) |
256 |
| 16 |
16
(2) |
48
(6) |
65536 |
Most scanner software, but not all image editing software, supports
16/48-bits. Picture Window Pro (my favorite)
offers full support, and Photoshop (the full version) offers limited support.
Photoshop Elements and LE, the "lite" versions supplied with many scanners
and printers, do not support 16/48 bits.
Scanner
software
Scanners operate under the the control of software, which is supplied by
the manufacturer and by two vendors.
-
Hamrick VueScan A popular,
inexpensive ($40) standalone program that supports a wide variety of scanners
(including the three I own). Updated frequently, excellent customer service.
Capable of producing excellent results, but has a few drawbacks: limited
color and tonal controls (there are no curves) and frustratingly slow screen
refresh (it's realtime in some other packages). It's not quite professional,
but a large, loyal user base swears by it. It keeps getting better.
-
Silverfast
A sophisticated, fully professional program with an exquisite user interface
and fine control (it's almost an image editor). Operates through the TWAIN
interface. Silverfast supports a wide variety of scanners (but not the
CanoScan FS4000US). Each copy of the program supports only a single scanner
model. Some Epson scanners come bundled with Silverfast
SE, which doesn't support 48-bit images, but is an excellent choice
for scanning in 24-bits-- it offers finer control than most manufacturer's
software. For 48-bit scans you need to purchase the premium version, Silverfast
Ai 6 ($119).
It could be overkill for most scanning objectives.
Here are some things to look for when comparing scanner software packages:
-
Does it have a histogram (a chart that displays the distribution of tonal
densities in the selected image area)? Histograms are very useful for making
tonal adjustments-- for ensuring that shadow and highlights are set properly.
Epson's TWAIN 5 software doesn't have one, but I've found that it maintains
highlight and shadow detail if I leave the controls alone. It works well
enough for 16/48-bit scanning, but Silverfast
SE is a better choice for 8/24-bits.
-
How fast is it? I've found VueScan to be a little slower than the others,
but it's improving.
-
Does it support 48-bit scanning? This is important if your editor supports
it.
-
Can you lock the exposure? This is important when making multiple scans
to be stitched into panoramas. I've yet to succeed locking the exposure
with Canon's FilmGet software for the FS4000US (even though I clicked on
lock). Vuescan works quite well.
Scanning
objectives
Scanner software gives you considerable control over the appearance of
the scanned image-- its resolution, cropping, color balance, saturation,
brightness, contrast, and sharpness. Adjustments are made prior to the
final scan. Three of them, resolution, exposure, and cropping, are applied
the scan itself. The remainder are applied after the scan but before saving
or transferring the image.
Color
and tone adjustments are done with a slightly different intent, depending
on whether you are saving the image with 8 or 16-bit precision.
-
For 16/48-bit scans, you should maintain detail in the shadows and highlights.
Neither extreme should be clipped, except for extreme specular highlights.
Leave sufficient margin at both ends of the tonal scale. Typically, little
adjustment is required; automatic settings are designed to accomplish this.
It doesn't matter if tones don't precisely match your intent; you can easily
adjust them in the image editor without loss of detail.
-
For 8/24-bit scans, significant editing causes loss of detail. Therefore
the scan should closely resemble the intended final image. In particular,
the black and white points of the scanned image should be close to the
final values-- with a little latitude to maintain important shadow and
highlight detail. Pure black should be a little above level 0, while pure
white should remain a little below level 255. 16/48
bit scans are much more forgiving. I strongly recommend them for maximum
quality.
Resolution depends
on the scanner's maximum optical resolution and the quality level you require
at your maximum intended magnification.
Every scanner has a maximum optical resolution,
specified in pixels per inch (ppi, often called dpi). (See the Scanner
table.) Some scanners publish interpolated resolution numbers that
are much higher. Don't bother scanning at these higher resolutions-- it
wastes time and storage space and offers no advantage. You can always resize
up later if needs be (for example, to send a print out for LaserJet printing).
In choosing scan resolution, first determine the
largest expected print magnification,
Magnification = M
= print dimensions/film dimensions.
For example, if you plan to print an uncropped 35mm
image (24x36 mm = 0.945x1.42
inches) on paper no larger than 8½x
11
inches (10.4 inch image length), M = 10.5/1.42 = 7.3x.
If you crop the image so the narrow side is printed 8.2 inches wide, M
= 8.2/0.945 = 8.7x. 8x
is a typical magnification for 35mm prints on 8½x11
inch paper. For an uncropped print on 13x19
inch paper (18.4 inch image length), M = 13x.
The number of image pixels per inch required for sharp prints has been
discussed in Selecting and using
printers and in Understanding image sharpness
Part 3: Printers and Prints. Here is the summary.
Image resolution
(pixels per inch) sent to printer
|
Print
Pixels per inch (PPI)
|
Subjective
description
|
| 100 |
Adequate
for very large images viewed at a distance. |
| 150 |
Good
for big enlargements-- 13x19 inches or larger. |
| 200 |
Excellent
sharpness for all sizes; nearly as good as 300 PPI. |
| 300 |
As
sharp as the eye can see; no advantage to increasing PPI. |
The scanner ppi required to obtain a given print ppi is,
Scanner ppi = M *
Print
PPI
This is the minimum value for setting your scanner. For example,
if you want to print a 35mm image on 8½x11
inch paper at 200 ppi quality, use a scanner ppi of at least 200*8 = 1600
ppi. I set the CanoScan FS4000US scanner, which has resolution settings
of 4000, 2000, or 1000 ppi, to 2000 ppi. I set it to 4000 ppi only if I
expect to print larger than 8½x11
inches. I set the Hewlett-Packard S20, which allows resolutions of 2400,
2100, 1800, ... ppi, to at least 1800 ppi. Since I like to have extra margin
in case I decide to print larger, I often select 2400 dpi.
Remember that images scanned at high resolution
for making large, high quality prints can be quite large. 48-bit images
require twice the storage of 24-bit images. A full frame 35mm image (0.945x1.42
inches) scanned at 4000 dpi in 48-bit color (6 bytes per pixel) requires
128.8 megabytes.
Huge. To edit files this large, your computer should
have plenty of RAM. 1 GB is not unreasonble (and not expensive at today's
prices).
| Image size and
resolution confusion |
| The
true size of a digital image is its pixel size, for example
5,749 x 3,740 pixels. Digital images are also specified by their size in
inches and Resolution in dpi (dots per inch) or ppi (pixels per inch, which
is technically correct, though dpi is widely used in its place). For example,
1.44 x 0.93 inches at 4000.00 dpi resolution. Don't be overly concerned
by these numbers. In this case they refer to film in the scanner; they
have no effect on the monitor display. Different image editors treat them
differently. Picture Window Pro ignores them
and lets you select print size manually. These properties can be changed
without changing the image pixels. Pixel size is what really counts.
Resolution
has many definitions, depending on context. Sometimes it refers
to digital sampling rate; sometimes it refers to the highest spatial frequency
where detail is visible. And there are instances where it's downright misleading.
In scanners Resolution refers
to the sampling rate, usually specified in pixels or dots per inch (ppi
or dpi). But it can also refer to the ability of a scanner to resolve detail.
For example, 2400 dpi dedicated film scanners tend to resolve detail better
than inexpensive 2400 dpi flatbed scanners. I try to avoid the word "resolution"
in this context and use "sharpness" or "MTF,"
but it can be confusing.
When we discuss printer ppi
above, we refer to the the number of image pixels per inch on the print.
This is not the same as specified printer resolution, for example, 1440
or 2880 dpi for Epson printers. These numbers are somewhat misleading;
they are the spacing between ink dots, which overlap. It takes several
ink dots to reproduce one pixel. Image editor and printer driver software
convert image pixels into printer dots. |
|
Sharpening
should be applied sparingly at scan time. Oversharpening should be rigorously
avoided.
Sharpening is discussed
below
and in Understanding image sharpness,
Part 2. An oversharpened image has exaggerated edges, which distort
histograms, making tonal adjustments more difficult. It can result in an
artificial appearance and in exaggerated grain. It is difficult to evaluate
the precise degree of sharpening at scan time. For this reason it's best
to apply it late in the image editing process. Modest amounts may, however,
be applied at scan time. For the Epson 2450, which has an extremely
soft image without sharpening, I usueally leave the Unsharp Mask box checked.
I've had no problems with oversharpening.
Summary A
good scan from a slide or negative has the following properties.
-
All important tones in the slide or negative should be present. If possible,
there should be no blocked highlights and no dead black areas. Colors should
not be overly saturated (this loses detail). The automatic brightness/contrast
adjustments in most scanners are set to do this. Tones should be fairly
close to their final intended values for 8/24-bit scans; more margin is
allowable for 16/48-bit scans, which are much more forgiving.
-
It should be sharp but not oversharpened. (I refer to the sharpness or
unsharp mask settings in the scanner software.)
-
Don't expect the tones to be perfect as scanned. Scanner software can't
do everything. That's the purpose of image editing software.
-
Resolution (in total pixels) should be appropriate for your intended purpose.
I strongly recommend scanning with 16-bit precision for B&W and 48-bit
precision for color; there is no excuse not to. Virtually all scanner software
supports 16/48-bits, and Picture Window Pro,
a superb 48-bit image editor, costs under $100 US-- a fraction the price
of a scanner. 48 bits allows multiple editing operations without tonal
loss, something I frequently do to get the print just right. Once editing
is complete, you can safely store files in 8/24-bit formats.
Scanning
workflow
Scanners and software packages differ in details, but the overall workflow
is similar.
-
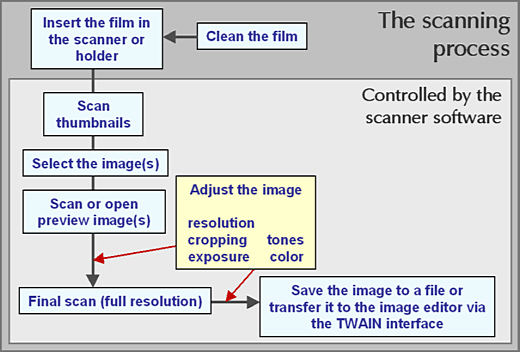 Clean
the film. This is a critical step--
it's where you get to apply the proverbial ounce of prevention. Clean the
film carefully, examining it closely under a bright lamp. I usually
use quick bursts of canned air (available at most office supply stores)
on each side. If dust remains, I go over the film with a clean 1 cm wide
bristle brush, then give it another burst or two of canned air. Here is
Greg
Brakefield's technique: "I
gently (and I mean VERY GENTLY) brush the media with a Kodak Camel
Hair brush and then follow-up with a Gentle wiping with an Ilford anti-static/dust
cloth. So far the results have been superb with NO Scratches."
Clean
the film. This is a critical step--
it's where you get to apply the proverbial ounce of prevention. Clean the
film carefully, examining it closely under a bright lamp. I usually
use quick bursts of canned air (available at most office supply stores)
on each side. If dust remains, I go over the film with a clean 1 cm wide
bristle brush, then give it another burst or two of canned air. Here is
Greg
Brakefield's technique: "I
gently (and I mean VERY GENTLY) brush the media with a Kodak Camel
Hair brush and then follow-up with a Gentle wiping with an Ilford anti-static/dust
cloth. So far the results have been superb with NO Scratches."
.
Dust appears as white specks on negative scans
and black specks on slide scans. It can be removed in the image editor
by cloning, which isn't difficult if there are only a few specks, but can
become tedious for extremely dusty images-- some of my old negatives have
stubborn embedded dust I can't seem to remove. Polaroid's
excellent Dust
& Scratch Removal Utility, which operates at a standalone program
or as a Photoshop plug-in, is a big time saver for images with lots of
scratches and dust specks. I don't bother with it when I have just a few
dust specks. You can download
it for free. A somewhat intimidating questionnaire asks for your scanner
model and serial number. You don't need to enter them.
.
In scanners with infrared
dust (IR) removal (ICE, FARE), the presence of dust is sensed by an
IR light beam, and the offending areas are filled by interpolation. This
saves a lot of trouble with little degradation of image quality. IR dust
removal doesn't work with Kodachrome or B&W film.
-
Open the scanner software.Some
scanner software operates standalone; some is opened from within the image
editing program via the TWAIN interface.
From
Picture Window Pro, select the scanner
(if you have more than one) by clicking on File,
Select
Source..., then open it by clicking File,
Acquire...
or by clicking on the TWAIN Acquire icon
 .
.
-
Insert the film into the scanner.
Most scanners have film holders, but film goes directly into the HP Photosmart
S20. If you have a film holder, be sure the film is clean
after
you insert it in the holder.
-
Scan the thumbnails. This step
scans the film at low resolution and displays either small, low resolution
thumbnail
images for for each frame or the entire film area. Epson's TWAIN 5
software for the 2450 gives you either display, depending on the Automatic
Thumbnail Preview setting in Configuration:
Preview.
-
Select the image(s) to be scanned.
Depending on the software and preferences, either select specific thumbnail
image(s), or select an area of the film by dragging the mouse.
-
Scan or open the preview image image.
The preview image has higher resolution than the
thumbnail but less than the final scan. It should fill most of the screen.
Depending on the software, the preview image is either derived from the
initial scan or from a second scan.
-
Adjust the image. This is where
you control image appearance: resolution, exposure, cropping, tone (brightness
and contrast) and color (balance and saturation). Settings for resolution,
exposure, and cropping are applied during
the scan, but most tonal adjustments and all color adjustments are applied
afterwards--
they are actually part of editing or post-processing. Remember,
the adjustment intent is slightly different for 8/24
and 16/48-bit formats. Depending on the software, the "Brightness" setting
can control exposure or alter the image after the scan.
.
Be sure to select the correct film type (color positive or negative;
B&W negative). I've seen occasional recommendations for scanning film
with software set to other than the correct film type: color
negatives as positives, B&W negatives as color, etc. I'm unconvinced.
There might be some advantage in isolated cases for cheap scanners with
defective software, but all you're likely to do is complicate your workflow.
-
Perform the final (full resolution) scan.
This can be slow for high resolution scans. If IR
dust removal is employed, there may be two scanning passes. It is usually
combined with color and tone adjustments and saving or transferring the
image.
-
Save the image to a file or transfer it to
the image editor via the TWAIN interface. This is usually
done in the same step same step as the final scan, but I'm listing it separately
because IR dust removal, color, and tonal adjustments are done between
scanning and data transfer. Save high quality images in the TIFF (.tif)
format. The JPEG and GIF formats used for Internet display involve a loss
of quality. You can always save an image in another format after you've
edited it.
| Is
your computer having problems recognizing your scanner? I've
run into troubles with both USB and SCSI devices. Deon van der Westhuysen
of Cape
Town, South Africa has written a cute little standalone program called
RescanHardware
that requests Windows to check for hardware that has been added (or turned
on) since the computer was last restarted-- like SCSI scanners. It's equivalent
to opening Device Manager and selecting "Scan for hardware changes." I
haven't tested it yet. Click here
to learn more and download it. |
|
..
Scanning
example
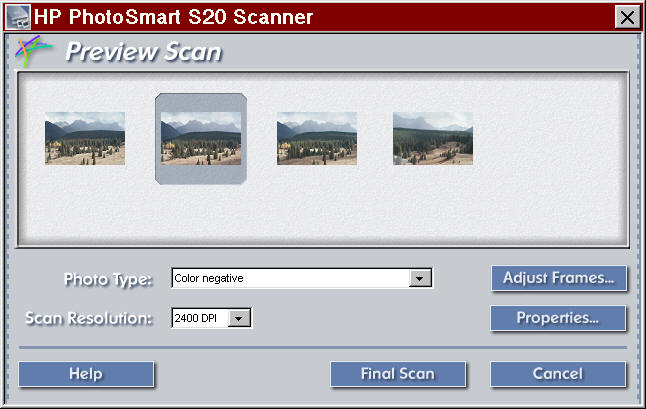
The example uses Hewlett-Packard's PhotoSmart S20 scanner software opened
from the Picture Window Pro image editor.
Open Picture Window Pro, then open the HP scanner software (via the
TWAIN interface) by clicking File,
Acquire...
or clicking on the scanner icon.
This brings up an empty Preview Scan screen. Opening the scanner software
in this way allows 48-bit color files to be acquired; only 24-bit files
can be acquired when the HP software is operated in standalone mode. Be
sure Photo Type
is correct, then clean the film and insert insert it into the scanner.
You can set Scan Resolution
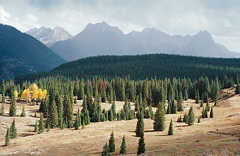
now, but you can also set it later, before the final scan. The thumbnail
images (in this case, for a strip of four negatives of mountains near Silverton,
Colorado) appear in the Preview Scan screen, shown below.
 Select the image to edit. The Image Adjustments screen appears, a portion
of which is shown below. This screen includes a brightness Histogram, shown
separately.
Select the image to edit. The Image Adjustments screen appears, a portion
of which is shown below. This screen includes a brightness Histogram, shown
separately.
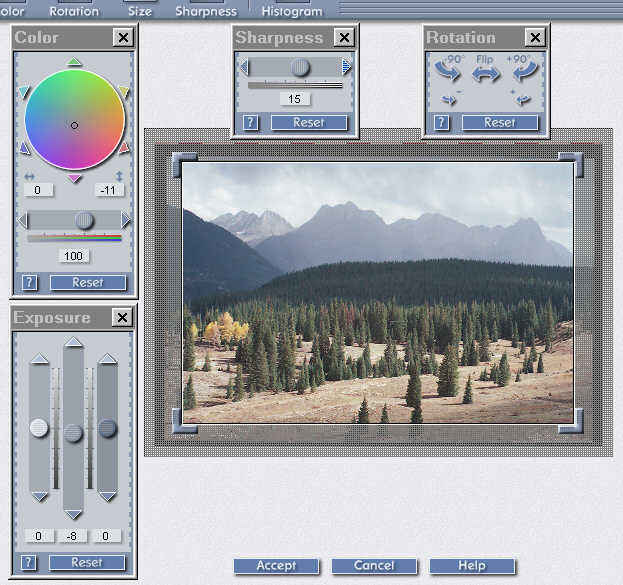 The PhotoSmart software makes its best guess for color balance and saturation,
which is set in the Color box, and for brightness and contrast, set in
the Exposure box. These guesses are not great. Color balance is pretty
good-- just a tiny bit magenta. Color saturation is poor. Contrast is low,
indicated in the first brightness Histogram: only about 70% of the potential
tonal range is used; there are no deep black tones. The changes I made
were,
The PhotoSmart software makes its best guess for color balance and saturation,
which is set in the Color box, and for brightness and contrast, set in
the Exposure box. These guesses are not great. Color balance is pretty
good-- just a tiny bit magenta. Color saturation is poor. Contrast is low,
indicated in the first brightness Histogram: only about 70% of the potential
tonal range is used; there are no deep black tones. The changes I made
were,
-
Cropping: I usually keep a little more of the image than I expect
to use. It's very easy to crop during image editing.
-
Color balance: Shift it slightly less magenta. from [0 -11] to [0
-8]. This is a very small shift.
-
Saturation: Increase it from 100 (default) to 135. Avoid the temptation
to take it too far: detail can be lost.
-
 Tone
(Exposure box) settings [highlight, middle, shadow]: Change them from
[0, -8, 0] to [16, -7, -15]. This increases overall contrast, as indicated
in the second histogram. The apparently blocked shadows and highlights
in the second histogram are artifacts of sharpening the preview scan; they
are absent at the default Sharpness setting (15) and from the final full
resolution scan. The histogram is not
accurate-- that will be apparent when we compare it with the image editor's
histogram. But the Histogram screen can still be used to determine levels:
when you move the cursor over the preview image, the level appears as the
small arrow just beneath the histogram. The color appears in the box at
the lower left and the RGB density levels appear in the bars at the lower
right. Note again that these adjustments are not critical if the image
is to be saved or transferred in 48/16-bit format. But no harm is done,
except with
Canon's FS4000US
FilmGet 1.0 software, which performs them with 8-bit precision.
Tone
(Exposure box) settings [highlight, middle, shadow]: Change them from
[0, -8, 0] to [16, -7, -15]. This increases overall contrast, as indicated
in the second histogram. The apparently blocked shadows and highlights
in the second histogram are artifacts of sharpening the preview scan; they
are absent at the default Sharpness setting (15) and from the final full
resolution scan. The histogram is not
accurate-- that will be apparent when we compare it with the image editor's
histogram. But the Histogram screen can still be used to determine levels:
when you move the cursor over the preview image, the level appears as the
small arrow just beneath the histogram. The color appears in the box at
the lower left and the RGB density levels appear in the bars at the lower
right. Note again that these adjustments are not critical if the image
is to be saved or transferred in 48/16-bit format. But no harm is done,
except with
Canon's FS4000US
FilmGet 1.0 software, which performs them with 8-bit precision.
-
Sharpness: The default value is 15. Sharpening is difficult to control
at this stage; you can't see its actual effect because the preview scan
has lower resolution than the final scan. I do most sharpening late in
the image editing process, after the tones and colors have been adjusted,
with the image displayed at 1:1 magnification so I can see the effects
of sharpening. To avoid enhancing grain in smooth areas like skies, I use
Unsharp Mask with a threshold, and I mask
smooth areas to leave them out of the sharpening operation.
.
When I scanned this image I increased Sharpness to 42. I was able to
get away with this I was using a very fine grained film-- Kodak Supra
100 (now-discontinued). More sharpening would have made the sky a little
too grainy and exaggerated edges in the image. The S20's Sharpness function
is discussed in detail in Imaging
Resource's S20
review. They suggest that 60 is an optimum setting, but this is apparently
for slides, which tend to have less grain than negatives. I've found 25
to 50 to be good values for negatives, with the higher values for newer
fine grained films. I've recently become more conservative about sharpening
at scan time; I usually just leave it at the default setting. You can learn
much more about sharpening in Understanding
image sharpness and MTF curves, Part 2.
 More
about sharpening: Sharpening increases contrast at boundaries. In a
boundary that goes from dark to light, sharpening darkens the dark portion
and lightens the light portion of the image immediately adjacent to the
boundary. This is illustrated in the figure on the left. Sharpening improves
perceived sharpness and detail in prints, although it doesn't increase
the actual information content. Too much sharpening makes grain and film
defects more visible, and can lead to edge artifacts. But the right amount
definitely enhances the image. Sometimes the amount of sharpening needed
for edges results in a rough, grainy appearance in smooth areas, which
can be especially troublesome in skies. To combat this, image editing programs
have a function called "unsharp mask" (from the old days when it was done
with unsharp low contrast film images). "Unsharp mask" sharpens only if
the difference between adjacent pixels exceeds a manually set threshold.
Only edges get sharpened; smooth areas are passed over; grain is not exaggerated.
More
about sharpening: Sharpening increases contrast at boundaries. In a
boundary that goes from dark to light, sharpening darkens the dark portion
and lightens the light portion of the image immediately adjacent to the
boundary. This is illustrated in the figure on the left. Sharpening improves
perceived sharpness and detail in prints, although it doesn't increase
the actual information content. Too much sharpening makes grain and film
defects more visible, and can lead to edge artifacts. But the right amount
definitely enhances the image. Sometimes the amount of sharpening needed
for edges results in a rough, grainy appearance in smooth areas, which
can be especially troublesome in skies. To combat this, image editing programs
have a function called "unsharp mask" (from the old days when it was done
with unsharp low contrast film images). "Unsharp mask" sharpens only if
the difference between adjacent pixels exceeds a manually set threshold.
Only edges get sharpened; smooth areas are passed over; grain is not exaggerated.
I try to avoid oversharpening-- exaggeration of edges-- during
scanning. The illustration, above left, shows slight oversharpening. Oversharpening
can distort histograms, which can be extremely valuable for setting highlight
and shadow levels. In extremes (sometimes seen in digital cameras), it
can result in a disagreeable artificial appearance.
The results of adjusting the image are shown in the screen below and
in the second histogram. The effects of sharpening are exaggerated in this
screen-- they're more gentle in the full sized image.
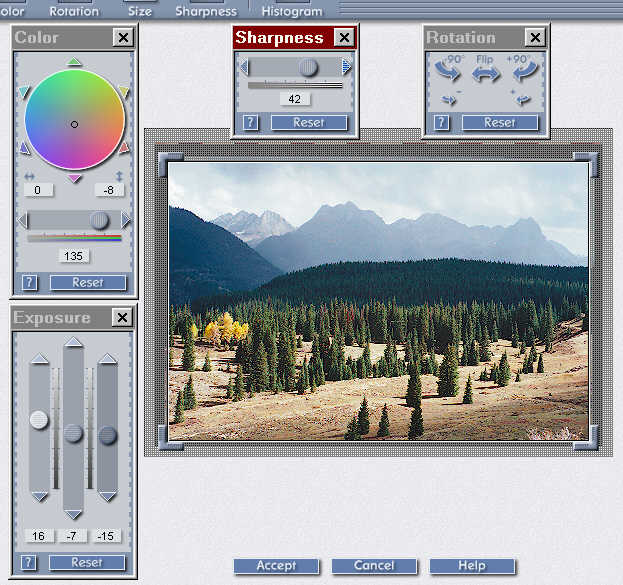 When you are satisfied with your settings, click Accept.
This brings back the Preview Scan screen. Make sure all the images you
want to scan are selected and you have the correct scan resolution, then
click on Final Scan. A 2400 dpi scan
is rather slow. Quality, not speed, is the objective. The 48-bit scanned
image will appear in Picture Window. You should save it as a 48-bit TIFF
(uncompressed) file, which can be as large as 46 MB (larger if you're scanning
a panoramic image)-- that's why you need a big hard disk drive. If you
want to save it as a JPEG file (the compressed format used for Web images),
you'll have to convert it to 24 bits.
When you are satisfied with your settings, click Accept.
This brings back the Preview Scan screen. Make sure all the images you
want to scan are selected and you have the correct scan resolution, then
click on Final Scan. A 2400 dpi scan
is rather slow. Quality, not speed, is the objective. The 48-bit scanned
image will appear in Picture Window. You should save it as a 48-bit TIFF
(uncompressed) file, which can be as large as 46 MB (larger if you're scanning
a panoramic image)-- that's why you need a big hard disk drive. If you
want to save it as a JPEG file (the compressed format used for Web images),
you'll have to convert it to 24 bits.
In Part 3 we describe image editing--
the heart of the creative printmaking process.
Links
A few scanning tips by Wayne Fulton.
A detailed, verbose approach covering all types of scanners. Much more
detail on scanning reflected media and scanning for purposes other than
making high quality prints.
Scanners

|
Images
and text copyright (C) 2000-2013 by Norman Koren. Norman Koren lives
in Boulder, Colorado, where he worked in developing magnetic recording
technology for high capacity data storage systems until 2001. Since 2003 most of his time has been devoted to the development of Imatest. He has been involved with photography since 1964. |
 |