Image
editing with Picture Window Pro:
Making
and using masks
by Norman
Koren
updated April 28, 2003
.
| This page
explains how to make and use masks: the key to adjusting selected portions
of an image. |
Introduction
to masking and selective image adjustments
Dodging and burning-- lightening and darkening portions of
an image-- are among the most important techniques for turning raw images
into a fine prints. It the classic darkroom you dodged and burned by placing
a mask-- your hands or a cutout made of opaque cardboard-- between the
enlarging lens and the paper. Exposure times were based on experience and
guesswork. It was hit and miss, and you couldn't see the results until
the print came up in the developing tray.
Image manipulation techniques such as dodging and burning are far more
powerful in the digital darkroom. Not only can you precisely control the
region and amount of alteration, but you can adjust contrast, color and
and sharpness as well. Any adjustment you can make to the entire
image can be applied to a selected portion.
Picture Window Pro provides
two approaches for adjusting portions of an image. For small areas (typically
under 100 pixels) you can use Miscellaneous
Tools ,
which include Lighten, Darken, Increase Saturation,
Decrease Saturation, Blur, Sharpen, Speck Removal, Smudge, Red Eye Removal,
and Add Noise. These operations are
performed with a brush with adjustable Radius, Transparency, and Softness.
Each has options
,
which include Lighten, Darken, Increase Saturation,
Decrease Saturation, Blur, Sharpen, Speck Removal, Smudge, Red Eye Removal,
and Add Noise. These operations are
performed with a brush with adjustable Radius, Transparency, and Softness.
Each has options for fine control. For example, Lighten
and Darken can operate on Highlights,
Midtones,
Shadows,
or All. For tightest control, a high
level of Transparency is recommended. You can undo errors with control-Z.
for fine control. For example, Lighten
and Darken can operate on Highlights,
Midtones,
Shadows,
or All. For tightest control, a high
level of Transparency is recommended. You can undo errors with control-Z.
 Miscellaneous
tools are fast and convenient for touching up small areas,
but for moderate to large areas you should use a mask--
a Black & White (grayscale) image with the same pixel dimensions as
the image you are editing. Masks provide far more precise control. The
strength of a mask is proportional to its grayscale level. It is normally
minimum for black and maximum for white, but it can be inverted. Masks
can also be used to protect areas from being modified by Clone
and Miscellaneous Tools
and to identify portions of images to be combined using the Composite
transformation.
Miscellaneous
tools are fast and convenient for touching up small areas,
but for moderate to large areas you should use a mask--
a Black & White (grayscale) image with the same pixel dimensions as
the image you are editing. Masks provide far more precise control. The
strength of a mask is proportional to its grayscale level. It is normally
minimum for black and maximum for white, but it can be inverted. Masks
can also be used to protect areas from being modified by Clone
and Miscellaneous Tools
and to identify portions of images to be combined using the Composite
transformation.
Making masks quickly is one of the primary
skills of the fine digital printmaker. It isn't difficult--
Picture Window Pro's tools for creating and editing masks are powerful
and convenient, but it takes practice to use them with speed and confidence.
I often make several masks in the course of editing an image. Making a
mask can be as simple as doing a freehand drawing and blurring the edges
. This is what I do most of the time; it's similar to traditional dodging/burning.
But there are several powerful tools for masking areas based on image properties--
great for selecting skies or areas with complex boundaries. There are lots
of tricks to master.
Jonathan Sachs has written two excellent, lucid PDF tutorials,
Creating
and Using Masks, and Dodging
and Burning, which I strongly recommend. I unavoidably duplicate
some of his material, but I present my own viewpoint here. It never hurts
to study a subject from more than one perspective.
Creating
a mask with the Mask tool
Although any B&W image with the same pixel dimensions as the input
image can be used as a mask, the best way to create one is with the Mask
or Gradient tools. The Gradient tool is best for
gradual masks with simple geometries; we'll discuss it later.
The Mask tool is far more versatile. To use it, select the image you want
to mask (the input image), then
click on Mask,
New
or click on the Mask icon .
This opens the Mask dialog box, illustrated on the right. You can also
use Mask to open an existing mask for
editing. .
This opens the Mask dialog box, illustrated on the right. You can also
use Mask to open an existing mask for
editing. |
 |
.
Once the Mask dialog box is open you create a mask with
the following steps.
-
Mask portions of the image (with
mask
mode at its default Add setting) using
-
Freehand outline or Paint
-- for drawing with the mouse.
-
Geometrical objects: Rectangle,
Oval,
Polygon,
or Spline.
-
Tools that create a mask based
on image properties: Color Range, Brightness
Curve, and Paint with Similar Pixels.
These are particularly powerful.
-
Adjust the mask by removing
excess areas: Use any of the available tools with mask mode set to Subtract.
Toggle between Add and Subtract as necessary.
-
Smooth or blur edges as necessary
using Feather or Blur. An unsmoothed mask can result in unnatural
and unpleasant edges.
-
When the appearance of the mask
is correct, press the OK button. The mask becomes an open image with the
name Untitled n, where n is an integer. You can name and save it if you
wish, and you can always reopen it for editing. Since a mask is an ordinary
B&W image, you can edit it with any of Picture Window Pro's
tools.
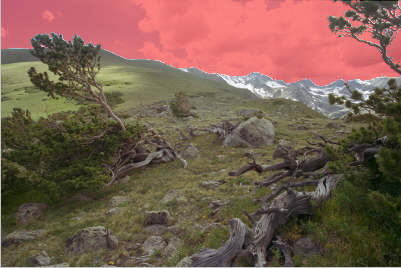
The mask
on the right was created using
Paint with Similar Pixels
(Track): an extremely powerful
technique for masking an area based on pixel values. It's not quite complete
as shown; it still needs some blurring or feathering.
|
 Mask overlay display:
Semitransparent (default)
Mask overlay display:
Semitransparent (default)
|
|
Opaque
|
Only
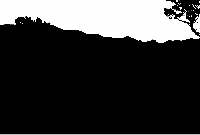
|
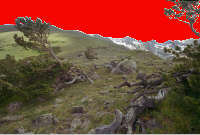
The mask is displayed as an overlay on the input image, updated after
each step prior to pressing OK. Its
appearance is controlled by the mask overlay display
commands in the second row of the dialog box.
Examples are shown on the right. I usually leave it on the default Semitransparent
setting, but I switch to Only
when I want to scrutinize the mask for omissions (holes) or excess coverage;
I usually enlarge the mask and scroll around it when I'm doing this. I
switch to Clear
to examine the image behind the mask.
Using
masks
 To
use a mask with a transformation, select the input image, open the
transformation dialog box, then click on the button to the right of the
Amount:
slider. All available masks (B&W images with the same pixel dimensions
as the input image, loaded into Picture Window Pro) are displayed. Select
the mask by clicking on it. The Amount:
slider splits in two. The white (upper) slider, which defaults to 100%,
indicates the strength of the transformation in the masked portion of the
image (where the mask is white). The black (lower) slider, which defaults
to 0%, indicates the strength of the transformation on the unmasked (black)
portion. Gray levels fall between the two. Adjust the sliders as desired.
I often invert the mask by setting white to 0 and black to 100%.
To
use a mask with a transformation, select the input image, open the
transformation dialog box, then click on the button to the right of the
Amount:
slider. All available masks (B&W images with the same pixel dimensions
as the input image, loaded into Picture Window Pro) are displayed. Select
the mask by clicking on it. The Amount:
slider splits in two. The white (upper) slider, which defaults to 100%,
indicates the strength of the transformation in the masked portion of the
image (where the mask is white). The black (lower) slider, which defaults
to 0%, indicates the strength of the transformation on the unmasked (black)
portion. Gray levels fall between the two. Adjust the sliders as desired.
I often invert the mask by setting white to 0 and black to 100%.
Before I complete the transformation by pressing OK,
I usually move the active (non-zero) slider back and forth to see the effect
of the transformation. If the mask has important boundaries (for example,
between foreground and sky), I enlarge the Preview window to make sure
there are no unpleasant edge effects.
You can perform a transformation while the Mask is active, before
you press OK.
Make sure the image is selected, then select and perform the transformation
as you normally would. You can switch between the transformation and mask
dialog boxes, making changes in each until you get it right. The effects
of both dialog boxes appear in the Preview window. The Undo
function of the Mask dialog box is particularly valuable at this time.
For example, you may need a mask with a blurred boundary, but you may not
know how much blur is best. Blur the mask  using an estimated Radius, observe its effect in the Preview window, then
click Undo and perform a blur with
another Radius. This is a very powerful technique.
using an estimated Radius, observe its effect in the Preview window, then
click Undo and perform a blur with
another Radius. This is a very powerful technique.
To use a mask to protect areas from change by small-area tools
(Miscellaneous Tools,
Clone,
or Paint),
select the image, click on Mask, select
the desired mask, then open the tool. Use the tool as usual. The masked
area is protected against change.
The
Mask dialog box
The mask dialog box contains several groups of icons whose functions are
summarized in the table below.
The top row contains basic utilities.
Top row
.
Utilities |
| Top
row |
 |
Utilities |
|
| All |
Mask the entire image. |
| None |
Clear the mask. |
| Invert |
Invert the mask. |
| Area... |
Compute the area of the
input image that is currently covered by the mask. Pixels that are partially
masked are counted as fractions. I rarely use this function. |
| Undo |
Undo the previous operation.
Very
useful. |
| Cancel |
Close the Mask dialog box
without completing the mask. |
| OK |
Create the mask and close
the dialog box. |
|
The second row contains icons that control
the function of the Mask drawing tools and the Mask preview display.
Second row
.
Mask
mode
and
display |
| Second
row |
 |
Mask
mode: Sets the function of Mask drawing tools. |
| Add |
 |
Add the selected area to
the existing mask. This is the default when the Mask dialog box is opened. |
| Subtract |
 |
Remove the selected area
from the existing mask. |
| Overlap |
 |
The existing mask remains
only where it overlaps selected area. Use this mode to create a mask based
on two conditions being met simultaneously (Boolean AND), for example,
to create a mask consisting of pixels in a certain region and with colors
in a certain range. |
| Invert |
 |
Invert the existing mask
in the selected area. |
| Second
row |
 |
Mask
overlay display |
|
| Overlay color |
 |
The color of the current
mask, which is displayed as an overlay on the input image. The default
is red. It should contrast with the
image. You'll want to change it if the image is predominantly red. |
| Clear mask overlay |
 |
The mask overlay is not
visible. |
Semitransparent
mask overlay |
 |
(Default) Displays the mask
overlay as a semitransparent layer whose color is set by Overlay color.
Lets you see the input image and mask at the same time. Depending on the
colors in the input image, changing the mask overlay color may make the
mask easier to see. See illustration, above. |
Opaque
mask overlay |
 |
Displays the mask overlay
as an opaque layer whose color is set by Mask overlay color. This makes
the mask more visible but obscures the masked parts of the input image. |
| Mask only |
 |
Displays the mask overlay
as white on a black background. Hides the input image. |
|
The third row contains the Mask tools. Controls specific to individual
tools are displayed below the third row.
Third row
.
Mask
tools |
| Third
row |
 |
Mask
tools: See Mask dialog in Picture Window Help for details. |
| Freehand Outline |
 |
Click on the input image,
press the mouse button, then draw the outline of the region you want to
mask. When you release the mouse button, the starting and end points are
connected and the interior of the outlined region becomes the new mask
object, which is then combined with the existing mask according to the
mask
mode setting, Add (the default), Subtract,
Overlap,
or Invert. To remove an area you accidentally masked, use Subtract.
TIP:
It's easier to draw a complex shape with several small Freehand outlines
than with one large one. |
| Rectangle |
 |
Click on the input image,
press the mouse button, then move the cursor diagonally. When you release
the mouse button, a rectangle is outlined. You can click and drag
the sides, corners, or interior to reposition it. To create a square region,
hold down the Shift key while dragging the sides or corners of the rectangle.
When you click Apply, the rectangle is combined with the existing
mask according to the mask mode setting. |
| Oval |
 |
Click on the input image,
press the mouse button, then move the cursor to the diagonally opposite
corner of a rectangle that contains the oval. When you release the
mouse button, the oval is outlined. You can click and drag the sides, corners,
or interior to reposition it. To create a circular region, press the Shift
key while dragging the sides or corners of the rectangle. When you click
Apply,
the oval is combined with the existing mask according to the mask
mode setting. |
| Polygon |
 |
Click on the input image,
press the mouse button, then move the cursor diagonally. When you release
the mouse button, a polygon in the shape of a rectangle is outlined.
A second, outer rectangle is used to resize the polygon. Shift-click on
a side of the inner rectangle to add a new vertex. Control-click to remove
one. There must be at least three vertices. Click and drag to reposition
a vertex; click and drag the handle in the center to reposition the polygon,.
To resize the polygon, click and drag a side or corner of the outer rectangle.
When you click
Apply, the polygon is combined with the existing
mask according to the mask mode setting. Save...
and
Load... can be used with Polygons. |
| Spline |
 |
A spline is a smooth
curve that passes through a specified set of control points.
Click on the input image,
press the mouse button, then move the cursor diagonally. When you release
the mouse button, a rounded shape with four control points is outlined.
A second, outer rectangle is used to resize the shape. Shift-click on the
inner shape to add a new control point. Control-click to remove one. There
must be at least four control points. Click and drag to reposition a control
point; click and drag the handle in the center to reposition the shape
To resize the shape, click and drag a side or corner of the outer rectangle.
When you click Apply, the spline is combined with the existing mask
according to the mask mode setting. Save...
and
Load... can be used with Splines. |
| TIP:..
The
five previous commands (Freehand Outline,
Rectangle,
Oval,
Polygon, and Spline) all draw outlines of shapes.
Mask mode
controls their effect. Normally, Mask mode is set to Add
to draw a mask. It should be set to Subtract
to remove areas of a mask. I typically start a mask with one or more Freehand
Outlines or geometric shapes, then I trim any excess. I soften edges with
Feather
or Blur. |
|
|
| Feather |
 |
Feather
the edges of the existing mask, i.e., soften (blur) them while either shrinking
or expanding the mask. The controls are: Feather width: specifies
the distance in pixels to extend the mask edges. Positive values expand
the mask; negative values shrink it. Falloff: Gradual softens the
edge of a mask by causing it to fade gradually. Sudden grows or shrinks
a mask by extending it inward or outward by the feather width. Corners:
Round extends mask edges in a circle; Square extends mask edges in a square.
Click Apply to feather the existing mask. Feather may be
applied several times to obtain a more gradual mask than allowed by the
maximum radius. Note:Feather
can be much slower than Blur
for large masks with complex details. |
| Blur |
|
Blur edges of the existing
mask. For example, masks created by the outline drawing tools (above) have
hard edges that can be softened with Blur. The Radius: setting
specifies the amount of blur in pixels. Equivalent to Gaussian Blur. Click
Apply
to blur the existing mask. Blur may be applied several times to
obtain a more gradual mask than allowed by the maximum radius. Useful for
Contrast
masking. |
| Color Range |
 |
 Mask
regions of the input image based on color properties. You can set Color
Space: to RGB, HSV,
or HSL. The three
color controls are labeled accordingly. For Black & White images there
is only a single control for gray level. Mask
regions of the input image based on color properties. You can set Color
Space: to RGB, HSV,
or HSL. The three
color controls are labeled accordingly. For Black & White images there
is only a single control for gray level.
(right)
the bottom of the dialog box, set for HSL color space
Each color control consists
of a color bar on top and a selector bar below. The grayscale values of
the selector bars indicate the values of each component to be selected.
White = selected; black = deselected; gray = partially selected. Each selector
bar has two pairs of sliders, one white and one black. The white sliders
adjust the range of selected values. The black sliders control how suddenly
the selection falls off. You can adjust the sliders manually or you can
adjust them automatically, following the procedure below.
When you click on the image
with the left mouse button, short vertical markers between the color and
selector bars indicate the values of the image pixel. The color above the
marker is the color you clicked on. The color stripes reflect the range
of each color component with the others held fixed. For example, the colors
in the S bar illustrate the color changes as S (saturation) goes from 0
and maximum, with constant H (hue) and L (lightness).
Clicking Contract
shrinks the selected ranges to the values indicated by the three markers.
To expand the selected ranges to cover an area of an input image, move
the cursor over the area while pressing the shift key and the left
mouse button. See TIP,
below.
Color Range behaves
like a Boolean AND: a pixel has to fall within the white region of all
three sliders to be included in the masked region. When you click Apply,
the pixels to be masked are computed and combined with the existing mask
according to the mask mode setting. If you are
not satisfied with the selection, click Undo and continue. Color
Range works faster if you first isolate a region with the Freehand
Outline (or similar) tool and then switch to Overlap mode. |
| TIP:..
To
mask an area based on its color properties, select Color Range,
click anywhere in the area you want to mask, then click on Contract.
Move the cursor around the area, keeping the shift key and the left mouse
button depressed. Be sure to cover all the representative values. Click
Apply
to view the mask. You can repeat the process (without Contract)
to mask areas you missed; you can also manually adjust the mask sliders.
When coverage is satisfactory you may want to blur or feather the mask.
Using
Feather with a positive pixel setting is a good way to cover
noisy pixels you might have missed.
Paint with Similar Pixels
(below) performs a similar function. |
|
|
| Paint |
 |
 Paint
on the mask by clicking the left mouse button and dragging the mouse. Radius,
Transparency, and Softness are adjustable (with sliders, not shown). An
image of the brush is displayed at the bottom left of the Mask Dialog.
Painting adds to or subtracts from the existing mask according to the mask
mode setting. Paint
on the mask by clicking the left mouse button and dragging the mouse. Radius,
Transparency, and Softness are adjustable (with sliders, not shown). An
image of the brush is displayed at the bottom left of the Mask Dialog.
Painting adds to or subtracts from the existing mask according to the mask
mode setting.
Apply To: controls
the way Paint works.
-
All Pixels (default)
– Paint operates normally.
-
Pixels in Color Range
– Painting is restricted to areas within the range of colors selected by
the
Color Range tool. To adjust the color range settings, switch
to
Color Range then switch back to Paint.
-
Similar Pixels (Fixed)
– The Paint tool samples the color of a small area of the underlying image
at the start of each brush stroke to establish a base color. For the remainder
of the brush stroke, only pixels close to the base color are masked. A
Threshold slider lets you adjust how closely pixels must match the base
color to be masked.
-
Similar Pixels (Track)
– Similar to Similar Pixels (Fixed), except that the base color
is resampled as you move the cursor. Since the brush can be larger than
the sampled area, you can mask one side of an object boundary even if the
background color is varying. Very powerful
for creating masks based on image area properties.
|
| TIP:..
Paint
with Similar Pixels (Track) is very
useful
for masking boundaries. Set the brush Radius large (you'll learn to adjust
it for the geometry) and the Transparency and Softness to 0. Click the
left mouse button and drag the mouse near a boundary. If Threshold is set
to an appropriate value, you'll mask the area on one side of the boundary
very nicely. If you make an error, set mask mode
to Subtract and drag on the other side of the boundary. Use Paint,
Freehand Outline, or another tool to complete the mask, then apply Blur
or Feather as needed. The result is similar to Color Range,
Contract
(above), but is frequently more accurate because the selection criteria
continuously adapts to the local region. It can be difficult to use near
complex boundaries, i.e., trees with lots of branches. |
|
|
| Combine Masks |
 |
 Clicking
on the small window to the right of Combine Mask: displays a list of mask
images that that can be combined with the current mask. When you select
one, a thumbnail version of the mask image is displayed in the small window.
When you click Apply, the masks are combined according to the current
mask
mode setting. Clicking
on the small window to the right of Combine Mask: displays a list of mask
images that that can be combined with the current mask. When you select
one, a thumbnail version of the mask image is displayed in the small window.
When you click Apply, the masks are combined according to the current
mask
mode setting. |
| Brightness Curve |
 |
Mask the image based on
brightness. The curve control at the bottom, identical to the Brightness
Curve... dialog box, lets you select portions of the tonal range to
mask. The higher the grayscale value, the stronger the mask. When you click
Apply,
the selected mask image is combined with the existing mask according to
the mask mode setting. Used in Contrast
masking. |
|
Creating
a mask with the Gradient tool
The Gradient tool can be used to generate gradual grayscale masks with
simple geometries. The most useful gradient shapes (set by Type)
are Linear (the default) and Oval.
Rectangular
and Multi-point are sometimes useful.
The best way to illustrate the Gradient tool is to jump right in with
an example, using Type: Oval. For most
gradients used for masks, keep Amount:
at 100.0%, Operation:
Fill, and Cycle: 1. Increase
Antialias:
above 1: only if smoother transitions are required.
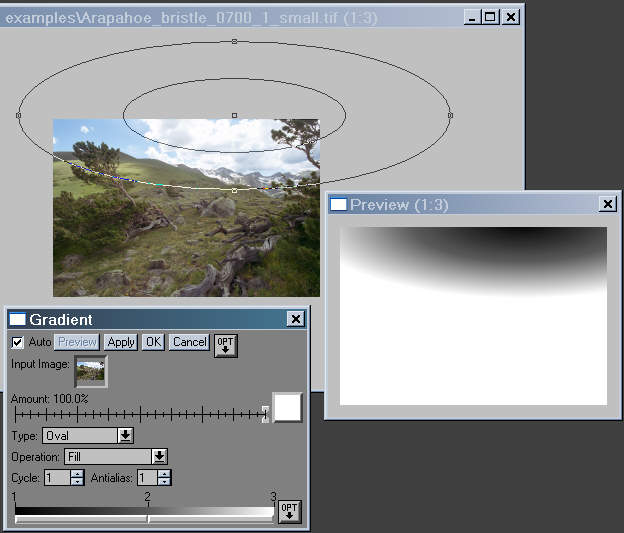 The gradient shape is adjusted with control points, which are overlaid
on the input image (top of the illustration, above). Some of the control
points may be outside the input image. When this is required, you should
reduce the magnification of the input image, then enlarge the window by
dragging a side or corner. You can force an oval or rectangular gradient
to be circular or square by holding down the shift key while you drag one
of the edge control points.
The gradient shape is adjusted with control points, which are overlaid
on the input image (top of the illustration, above). Some of the control
points may be outside the input image. When this is required, you should
reduce the magnification of the input image, then enlarge the window by
dragging a side or corner. You can force an oval or rectangular gradient
to be circular or square by holding down the shift key while you drag one
of the edge control points.
For a linear gradient, the control points are located at the start and
end points of the gradient line. The gradient itself is perpendicular to
the line connecting the start and end points.
Gradient tones and transitions can be adjusted using the color line
control at the bottom of the dialog box (bottom left of the illustration,
above). There are at least two control points, at the beginning and end
of the line. You can add a control point by shift-clicking on the color
control line. You can remove a control point by control-clicking on it.
You can move the control point and adjust its grayscale level by double-clicking
on the number above the control point. These adjustments give you great
flexibility. There is one added control point (2) in the illustration above.
Added control points appear as lines or curves in the Preview overlay.
Clicking on the bottom of the color control line brings up a list of
options for defining the transition betwen control points. The default
is Line (linear transition). Sine
can often produce a pleasing result when there are just two control points;
the start and end of the gradient are more gradual. Other options include
Step
Left, Step Center, and Step
Right.
The OPT
button
(to the right of Cancel) lets you select
various gradient options:
-
Line/Curve – If Line
is selected (the default), the gradient is derived from the color line
control, described above. If Curve
is selected, the gradient is derived from a curve that offers great flexibility.
-
Color/Black & White – When Color
is selected, you can select colors for the color line control and curve.
If only grayscale colors are selected, the gradient is a B&W image,
useable as a mask. When Black & White
is selected, you are restricted to grayscale levels.
Examples
Simple masks are used in Tinting and
hand coloring B&W images. A detailed example of a mask created
with Color Range appears in Example:
Sunset, Providence. Contrast masking
is an exceptionally powerful tool for masking (and taming) contrasty images.
Notes
on masks
Since a mask is just an ordinary B&W (grayscale) image whose only requirement
is that it have the same pixel dimensions as the input image, you can use
a number of transformations in addition to the Mask
and Gradient tools to create them. Among them,
-
Extract Channel
(in the Color
toolbox). Extracts Luminance, R, G, B, H, S, L, or V channels into a B&W
image.
-
Monochrome
(in the Color
toolbox). Converts a color image to B&W using a filter.
-
High Contrast
(in the Special Effects
toolbox). Produces a B&W image when Amount:
is 100%.
These can be quick and useful for certain transformations like selective
blurring or fancy contrast/saturation control. You can also edit masks
with any appropriate transformations: Blur,
Sharpen,
Levels
and Color,
Brightness Curve, Brightness,
Negative,
etc.
If you resize or crop an image and want to continue using a mask, you
should resize or crop the mask with the same settings.
.
|
Images
and text copyright (C) 2000-2013 by Norman Koren. Norman Koren lives
in Boulder, Colorado, where he worked in developing magnetic recording
technology for high capacity data storage systems until 2001. Since 2003 most of his time has been devoted to the development of Imatest. He has been involved with photography since 1964. |
 |