Eliminating color fringing (lateral chromatic aberration)
by Norman Koren
|
|
Every once in a while I come across something on my computer that thrills me so much I want to sing. But I decided to write this web page instead. If you ever heard me sing you'd be doubly glad I did.
 So
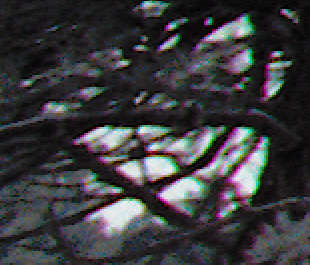
why the enthusiasm? Digital cameras, ultrawide and long telephoto lenses
frequently suffer from color
fringing, which appears as magenta and green bands
at contrast boundaries. Color fringing increases with the distance from
the center of the image; it's worst at the corners. It's plainly visible
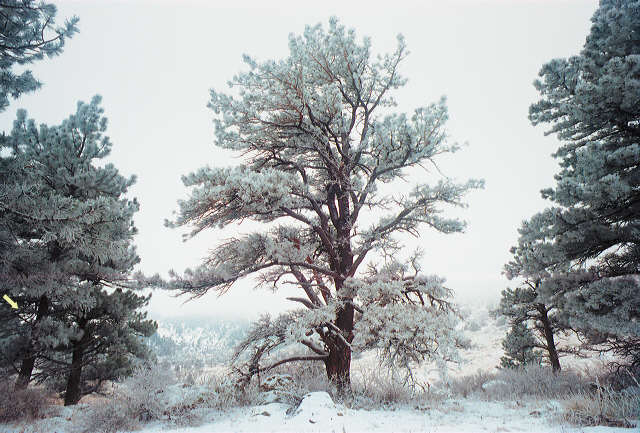
in the image on the right, which is a highly magnified portion of the left
side of the image below, indicated by the arrow. The image is an ice-coated
tree on the Homestead trail south of Boulder, Colorado, taken with the
Canon FD 20mm f/2.8 lens.
So
why the enthusiasm? Digital cameras, ultrawide and long telephoto lenses
frequently suffer from color
fringing, which appears as magenta and green bands
at contrast boundaries. Color fringing increases with the distance from
the center of the image; it's worst at the corners. It's plainly visible
in the image on the right, which is a highly magnified portion of the left
side of the image below, indicated by the arrow. The image is an ice-coated
tree on the Homestead trail south of Boulder, Colorado, taken with the
Canon FD 20mm f/2.8 lens.
I'm excited because my image editing program, Picture Window Pro, has a new feature that allows me to easily eliminate color fringing. There was nothing I could do about it in the traditional darkroom.Color fringing is caused by lateral chromatic aberration, one of the two types of chromatic aberration in lenses, both of which arise from dispersion in glass: the variation in its ability to bend light (its index of refraction) with wavelength (color). Longitudinal chromatic aberration is the change of the lens's point of focus for different wavelengths. Lateral chromatic aberration is the change in a lens's magnification for different wavelengths, resulting in color fringing. It tends to be worst in highly asymmetric lenses, particularly in retrofocus ultrawides (<24mm in the 35mm format), where the rear element may be further from the film than the focal length, and in true telephotos (>200mm in the 35mm format), which may be shorter than the focal length. The two types of chromatic aberration are described in Quality Criteria of Lenses by Schneider Optics. Paul vanWalree has an excellent in-depth discussion. His terminology is a little different: he uses transverse chromatic aberration (TCA) instead of lateral.
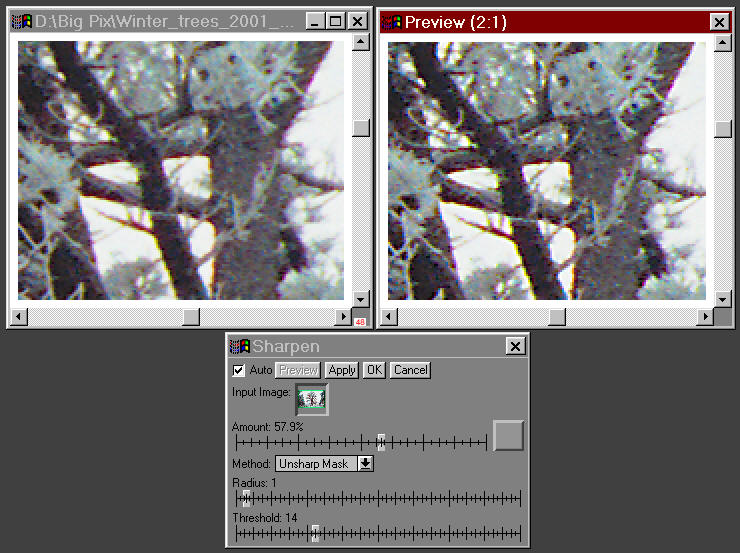
After you remove the chromatic aberration there will be colored bands at the margins of the image. You will need to crop these out. Click on Transformation, Geometry, Crop/Add border..., then remove one or two pixels from the margins. Set the preview image to 1:1 and scroll to the corners to make sure you've removed the right amount. Then click OK.
You should correct chromatic aberration before sharpening. I don't know the fine details of sharpening algorithm, but it is likely performed in HSV or HSL color space on the V (Value) or L (Lightness) boundaries, which will be much more distinct after removing chromatic aberration. As I indicated in Understanding image sharpness and MTF curves, Part 2, sharpening is an integral part of the digital imaging process, quite necessary for maximizing quality. Unsharp mask is the preferred technique because it allows you to set a threshold so you can avoid exaggerating the grain in smooth areas such as skies. The effects of unsharp masking on a portion of the central tree, about 2/3 of the way up from the bottom, are shown below. Before I click OK, I pan the Preview image to make sure I'm not oversharpening (I had to reduce Amount from 100%) and Threshold isn't set too high (which reduces the effective sharpening) or too low (which allows skies to become grainy).
Thank you, Jonathan Sachs, author of Picture Window Pro (and Lotus 1-2-3 at the dawn of the PC revolution).
Flo's Undistort Filter
is a Photoshop plugin that performs a CA-removal similar function. It also
corrects distortion.
| If I were to sing, I'd start with "Nessun Dorma," Puccini's heart-wrenching ode to insomnia from his opera "Turandot." Most appropriate since the muse that drives me to write these pages often wakes me up in the middle of the night. This magnificent song expresses the hero's romantic dilemma. He's in love, but the object of his affection is a serial killer, and he's next on her list. She allows nobody to sleep, on pain of death, until she learns his name, which will give her the privelege of dismembering him. What a sweetie-pie! But all will be forgiven because she's a princess and she's beautiful. Bill Clinton won't be so fortunate. You gotta love opera. |

| Images and text copyright © 2000-2013 by Norman Koren. Norman Koren lives in Boulder, Colorado, where he worked in developing magnetic recording technology for high capacity data storage systems until 2001. Since 2003 most of his time has been devoted to the development of Imatest. He has been involved with photography since 1964. |  |