Canon CanoScan FS4000US
4000 dpi 35mm/APS film scanner
by Norman Koren
|
|
|
News
|
My scanner came with FilmGet FS 1.0, Version 1.0.0. New versions are posted periodically on Canon's Powershot.com driver download website and on Canon UK. Read the instructions carefully. Typically you'll have to uninstall FilmGet, which can be done with DelFS, the Control Panel Scanners window or the Uninstall command on the FilmGet CD. Then run (unzip) the downloaded driver file and reboot your computer.
Digital Light and Color (makers of my excellent image editor, Picture Window Pro) now has an ICC color profile for the FS4000US. Click on Downloads, then scroll down the page to see the description.
This report focuses on image quality. It's not quite a full
product
review. I strongly recommend the following reviews, most of which
contain
details of scanner operation.
.
| The
Filmget software instrictions (7.72 MB) can be
downloaded from
this
page.
Imaging-resource
(has reviews of competing Nikon and Polaroid scanners)
There also a few sites where you can post comments and aks questions. I don't know all the answers; fortunately my scanner works fine. Imaging
resource scanner discussions (excellent) | Imaging-resource
Canon FS-4000 Scanner Discussion (also excellent)
|
Operation with the SCSI interface was fussier than USB until I found a little trick. The instructions tell you the scanner must be on when you boot up, but there's a fix. Open the Device Manager (by selecting Control Panel, System, Hardware, Device Manager), right-click on the computer name, then select "Scan for hardware changes." There wasn't much difference in speed with Windows 98 and with Windows XP at the beginning. But for some reason, USB operation with Windows XP became unbearably slow. SCSI is much faster.
The FS4000US comes bundled with several software packages
including
Photoshop LE, but we'll only be concerned with the basic driver
program,
FilmGet FS. FilmGet must be opened from an image editing program that
supports
the TWAIN interface. It doesn't run as a standalone application. I open
it from Picture Window Pro,
which can
edit 48-bit color files.
.
|
FilmGet allows a number of adjustments to the preview image prior to the final scan, including cropping, histogram, tone curve, brightness/contrast, and color balance. The only hardware adjustment that actually affects the final scan, apart from cropping, is the exposure time (normally set to Auto Gain). All the other adjustments are performed in software after the scan. In general, I'm not as comfortable with these adjustments as I am with the the adjustments in the HP S20 (particularly after I found that they were performed with only 8-bit precision).
A small part of the frame (a fraction of a millimeter) at the bottom of the negative carrier was cut off. It's wasn't much, but I since prefer to scan the entire negative I filed the bottom of the frame using a good quality nail file, making sure the edges were smooth and the negative holder was clean. This worked well. The image is scanned slightly tilted-- probably less than a quarter of a degree, but noticeable.
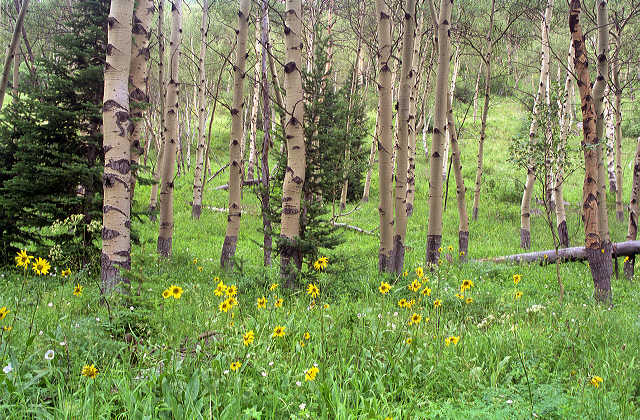 I use this extremely sharp image of Aspens on the Pitkin Creek trail near Vail, Colorado as an example-- the same image I used to illustrate the quality of digitized 35mm images in Making fine prints in your digital darkroom. It was made on Kodak Gold 100 with the superb Canon FD 35mm f/2.8 TS lens. The original CanoScan FS4000US scan size is 5617x3691 pixels (124,401,464 bytes in 48-bit color). It is reduced here by a factor of 8.78 to 640x420 pixels. |
The
images below illustrate a the CanoScan's image quality.
They
are unreduced 596x415
pixel
portions of the center of the above image, after the color and contrast
has been adjusted. If the entire image were reproduced at
a typical
monitor resolution of 75 pixels/inch (53x
magnification), it would cover 49x74
inches, nearly four times my printer's maximum 13x19
inch print size-- enormous.
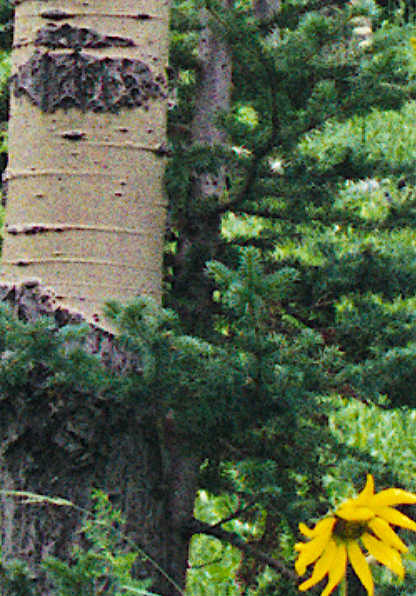
| RIGHT
Scanned with the Hewlett Packard Photosmart S20, 2400 dpi, sharpened
with
unsharp mask (in Picture
Window: Radius
= 1; Threshold around 10) and resized up by a factor of 5/3 (1.6667) to
be the same size as the Canon 4000 dpi scans.
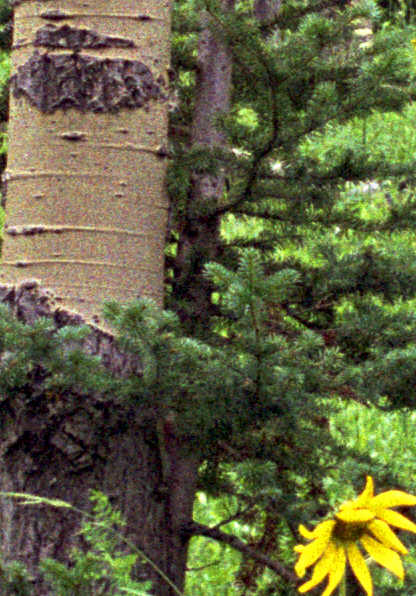
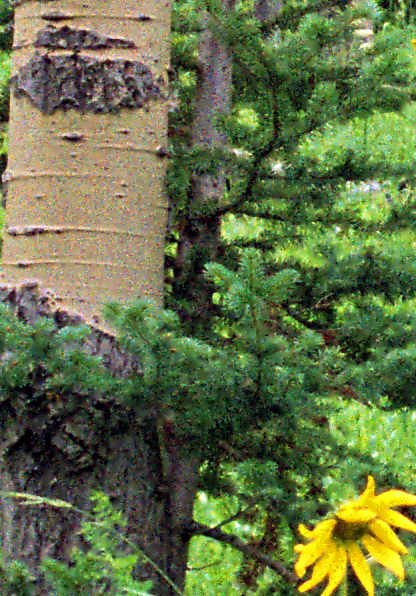
LOWER LEFT Scanned with the CanoScan FS4000US, FilmGet, 4000 dpi, unsharpened, one image pixel = one screen pixel. About as sharp as the sharpened 2400 dpi image, as predicted. LOWER RIGHT Scanned with the CanoScan FS4000US, FilmGet, 4000 dpi, sharpened with unsharp mask (Radius = 1; Threshold = 20), one image pixel = one screen pixel. As I indicated in Understanding image sharpness, Part 2, an appropriate amount of sharpening (unsharp masking) always improves image quality; that's why we compare sharpened 4000 dpi and 2400 dpi images. The 4000 dpi images are clearly sharper than 2400 dpi, about as much as the calculations predict. A 13x19 inch print is breathtakingly sharp; sharper than any conventional darkroom enlargement I've seen, and I've visited lots of galleries and museums. Sharper than any print I made in years of working with extremely fine darkroom equipment (Leitz Focomat 1c enlarger, El Nikkor 50 mm f/2.8 enlarging lens, Thomas Scoponet focusing magnifier used religiously to assure perfect focus). I could fool many photographers into believing it was taken on a 4x5. But it's not dramatically sharper than a 13x19 inch print from the 2400 dpi scan, which is surprisingly good, perhaps due to excellent software. On the other hand, grain is much more visible, in part because of the increased resolution, and in part because the FilmGet software performs some sharpening (though the electronic manual says nothing about it). I would like to be able to control the degree of sharpening or turn it off, as I can with the HP S20. I prefer to use Unsharp Mask with a manually selected threshold in order to minimize grain in smooth areas like skies. Once grain has been exaggerated by a sharpening operation it's a nuisance to soften it. The mottling of the flower, absent in the Photosmart S20 scan, is apparently the film grain. It's invisible in the 13x19 inch print. |
 |
 |
 |
 |
 Scanned with the CanoScan FS4000US, VueScan, 4000 dpi, sharpened with
unsharp
mask (Radius = 1; Threshold = 8).
Scanned with the CanoScan FS4000US, VueScan, 4000 dpi, sharpened with
unsharp
mask (Radius = 1; Threshold = 8). |
I prefer the VueScan images because they have good sharpness with less grain. VueScan allows you to turn sharpening on or off. (It was off for this scan; if it were turned on, the results would have been nearly identical to FilmGet.) No information is lost when sharpening is turned off; the image can be sharpened with unsharp mask after the scan (above right), resulting in less grain in the tree trunk. Performing unsharp masking in the image editor is a huge advantage for images with prominent smooth areas such as skies. You can also make a mask to remove smooth areas from sharpening. The reduced grain allows you to set the unsharp mask threshold: 8 for VueScan as compared to 20 for FilmGet in the images above. This improves the effectiveness of unsharp masking.
Slides have approximately three times the contrast of negatives; their densest areas can be much denser, hence the scanner's dynamic range, usually expressed by Dmax, is much more important. I scanned a the image below, taken on Kodachrome 64 in 1981 in Grenoble, France, on both the HP PhotoSmart S20 and the CanoScan FS4000US. The images below have been sharpened using unsharp mask with a threshold and adjusted for color and tones (I didn't try to match them exactly). The original FS4000US scan was much too blue-- it definitely required adjustment. This is an extremely sharp slide; the results come close to the potential of both scanners. 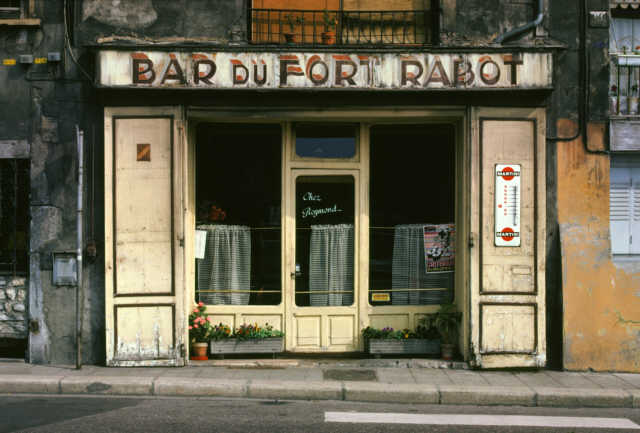 |
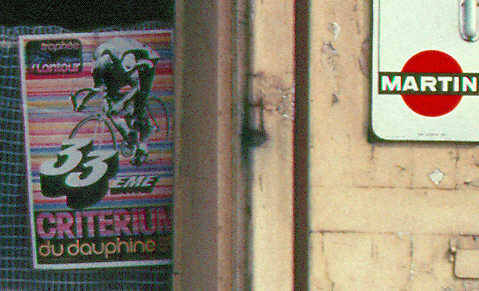 |
The image on the left was scanned on the 2400 dpi
Hewlett Packard PhotoSmart
S20; the image below was scanned on the 4000 dpi CanoScan FS4000US.
Unlike
the negative scan comparison above, these images are not reproduced the
same size; they're reproduced at the same 1:1 magnification relative to
the digital image size, i.e., one screen pixel for each image pixel.
Some observations: There is less color fringing in the FS4000US scan. This is particularly noticeable in the "M" in "MARTIN(I)." More detail is apparent in the bicycle poster: trophée (on the upper left of the poster) is more readable with the FS4000US. The FS4000US scan is clearly sharper, though not by the 4000/2400 (1.667) ratio. You wouldn't expect it. |
 |
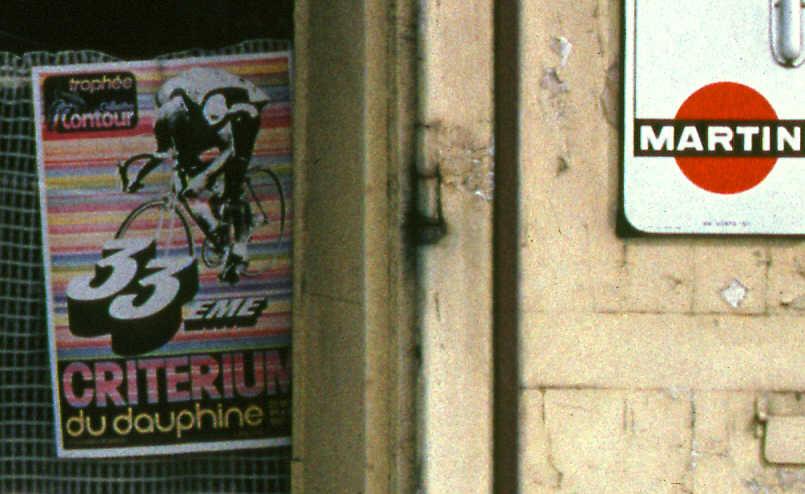
Because dark area noise isn't obvious in the above
images, I lightened
a portion of each: the CanoScan FS4000US on the left and the HP
PhotoSmart
S20 on the right. The difference is obvious-- the CanoScan
has much
lower noise in the dark areas, i.e., it has a much better effective
Dmax.
Dark noise is probably low enough to satisfy most slide users (the
majority
of my work is with negatives). The HP noise didn't bother me until I
tried
to sharpen the image. Dark areas came out speckled, even when I used
unsharp
mask with a threshold. To get around this I created
a mask to prevent sharpening in the dark areas-- not too
difficult
in Picture Window
(I often do this to
prevent sharpening in smooth areas like skies). This worked well, and I
thought I'd have to do it with the CanoScan, but I didn't.
I lightened these images only to reveal the shadow noise. I would never do this to an image I intended to display. |
 |
 |
 |
| The image on the right shows a portion of the chair,
lightened considerably
to show its detail. Everything I can see on the slide is present.
If you are having trouble with poor shadow detail in slides scanned with FilmGet, you should check the settings. Click Settings, Exposure Settings... The Auto Gain box should be checked and the Exposure Settings: should be set to zero (the slider should be centered). You may wish to play with these controls. Next, click Settings, Monitor Gamma... Monitor Gamma should be set to the value you used to calibrate your monitor, typically 2.2 for PC's or 1.8 for Macintoshes. If they neither of these settings help, your scanner is most likely defective. |
 |
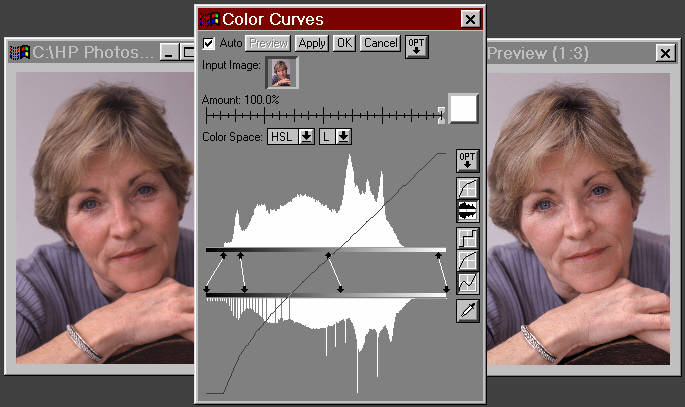
The control lines (with arrows at each end) map densities from the original to the output image. When you first call Color Curves there are two of them-- one each at the left and right. You can add them by shift-clicking on the upper bar and delete them by control-clicking on the arrow at either end. You move them by dragging the tips of the arrows. I've adjusted the image to that the darkest tone has a pixel value of zero and the contrast in the darkest region is very high. (Ansel Adams recommends that fine prints have at least a small area of deep black.) I boosted the density of the middle and high tones somewhat. I routinely expand the shadow contrast of most of my scans.
This transformation works best when you scan in 48-bit color or 16-bit B&W. Lines and gaps are present in the bottom (output) historgram because the preview calculations-- those done before you perform the final transformation-- when you click "OK"-- are performed in 24/8 bit arithmetic, which uses 256 levels per color channel. This creates gaps between levels where contrast is boosted. If you are working with a 48/16 bit file (65536 levels), the gaps won't be present after the final transformation. The histogram will remain smooth.
| The histogram of the Canon FS4000US
scan of the aspens (above),
taken from Picture Window's
Brightness
Curve transformation, has a disturbing feature. It's not smooth; it has
large spikes and dips. This is in striking contrast to Photosmart S20's
histograms, which are always smooth. I was able to determine the cause
of this problem. When I made this scan I did a considerable adjustment
of the tone curve (the highlights were much too blue). Even though the
scanned image has 14 bits per channel (42 total for 3 channel color
images;
a 48 bit color image was imported into my image editor), FilmGet 1.0
processed
the image at 8 bit precision, and as a result, levels were lost. That
is
why I prefer to edit images in 48 bit color (or 16 bit B&W). I
often
do multiple manipulations of the image, and if each manipulation were
done
with 8 bit precision, significant image quality would be lost. There
isn't
much loss in a single manipulation, but I still don't like it. I'm a
bit
of a fanatic on this issue I'm paying for 14 bits per channel, and I
expect
to get it.
How do I know processing was done with 8 bits precision? When I scanned the image without doing any adjustments, the histogram was smooth. No detail was lost; FilmGet 1.0 transferred the full precision of the scanner. For this reason I've stopped using FilmGet 1.0's convenient adjustments; I do all my adjustments in my image editor, Picture Window Pro 3.1. I'd like to see Canon address this issue. |
 |
Raw scans from the FS2400US
tend to be full toned,
ranging from a pixel level near 0 for the darkest tones to near 255 for
the brightest. The middle tones may be too light or dark-- they may,
for
example, be skewed by overly bright highlights-- but the full tonal
range
is present. When such a scan is transferred to the image editor as a 48
bit color file (or 16 bit B&W), all the
information in the image
is present. Although it's more convenient to adjust
the image during
the scan, the end result is no different if you adjust it in the
editor,
and editor adjustments tend to be more versatile and precise than the
adjustments
in FilmGet 1.0. My favorite editor, Picture
Window Pro 3.1, does a fantastic job with 48 bit color
images. Since
I always do some editing on the image, I don't need them to look
perfect
at scan time; the loss of convenience is not significant to me. The
appearance
of scans should be more consistent with slides than with negatives. You
can save the scan adjustment settings if you desire. I'd certainly like
it better if those adjustments were done with 16 bit precision.
 |
FARE dust removal has been
discussed in several of the above
reviews listed above. It works extremely well. It saves an enormous
amount
of time, even though still go over the image at 1:1 magnification for
minor
touch-up. It doesn't help much with fingerprints. I'm fanatic about
handling
film, but the underpaid employees of local photo labs may not be. So
watch
for fingerprints and clean them off (isopropyl alcohol, applied very
sparingly, is cheap and effective).
< Kodachrome scan without dust removal
Kodachrome scan with
dust removal >
|
 |
The Eject button The FS4000US has no hardware eject button for the film holder. To properly eject it, you must press the eject button in FilmGet. I had trouble in version 1.0.0 (Windows 98) because FilmGet turned itself off at the end of the scan, even though the "Close FilmGet FS after Aquire" box in the Settings, Preferences... screen was unchecked. Everything works fine in version 1.0.1+ for Windows XP. You may want to check for the latest drivers on Canon's driver download website.
The best alternative way to eject the film holder is to open the front door slightly, then close it (thanks, Matt Mead). Works like a charm. There is apparently no harm in slowly pulling it out, but I never felt comfortable doing it.
|
|

|
Remedies: Use finer grained (usually slower) film. Use slide
film. It
has less grain than negative film, but also less exposure range.
Perform
a blur (the opposite of sharpen) with a threshold to minimize blurring
on contrast edges. Use a mask if necessary to avoid blurring areas with
important detail; grain is always more visible in skies and smooth
areas
than in textured areas. The image on the right is the FilmGet scan on
the
left blurred in Picture
Window Pro with
Threshold set to 7%. This preserves detail at contrast edges, though
the
overall image is softer. The Grain
page lists several software
remedies, most notably Neat
Image--
a truly outstanding program.
.
| Bottom line: What
appears to be scanner noise is probably film grain-- the grain you
never
saw in those soft, creamy camera shop prints.
You
are seeing the unintended consequence of the CanoScan's extreme
sharpness.
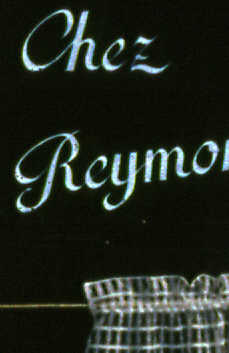
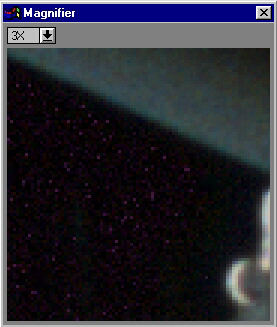
. Daniel Tung appeared to have a real problem: pixel-sized dark red spots in black areas of an image scanned from an Ektachrome slide. They looked more like constellations than grain, and they became very obvious after the image was sharpened. But it wasn't the scanner hardware! It was a bad custom ICC profile. The red spots didn't appear with standard profiles (the best was from Digital Light & Color); they only appeared with a profile Daniel generated using a Kodak IT8 (Q-60) target and Little CMS. His comparison of profiles is worth checking out. A
portion of the image magnified
3x
|
 |
The
CanoScan FS4000US will be my last 35mm scanner. It's more than adequate
to capture the detail in my images going back to the 1960's. Digital
cameras
are improving so fast that I doubt I'll be using 35mm after 2003.
Current
digital cameras approach 35mm in quality. There's plenty of debate on
whether
they've surpassed 35mm already, but they certainly will sometime in
2003.
Any digital camera you buy today will be obsolete in a year or two, but
you have to weigh the cost of the camera against the savings in film
and
processing. The scale is tipping ever more strongly towards digital.
Film
sales will soon start dropping like a rock; prices will go up and less
popular films will disappear. It's over for film.
This statement got quite a response in Tony Sleep's Filmscanners mailing list. (I used a 2002 date-- I've pushed it back a year.) It was called radical, but after the phenomenal images I've seen from my son's 3.1 Megapixel $500 Kodak DC4800, I don't think it's radical at all. Digital cameras, memory, and workflow are improving at an incredible rate. Witness the 5 Megapixel Sony DSC-F707 with a 5x Zeiss f/2.0-2.4 zoom for under $1000 US. And there are some great snapshot cameras for around $250. No more trips to drop off film and pick up prints. I'm giving myself a year or two to make the switch; I'll probably buy one more scanner for large format. My son has seen the light; he won't be going back to film. |
So far this is just a preliminary look, written at a busy time for me. The weather is nice; the wildflowers are in bloom. It's time to get out and make photographs! I'll update this page in a few weeks.
| The bulletin board has been closed to new entries because the crude software offered no protection against bogus SPAM entries and because it didn't inform me of all posts (some of interest). Also, the FS4000US is no longer a hot new product, though it's still a great scanner. If you have questions about the FS4000US, you can contact me. |
The following comments were added before I added the bulletin board.
From Soren Svensson. Aug. 9. 2001: It sounds like his scanner is defective. I'll keep this message until his problem is resolved.
I bought a Canon FS4000 scanner a few days ago and I've encountered some serious problems. The scanner works, the installation was very easy and I had high hopes on this one. But after scanning all sorts of films the last few days I'm ready to send it back.Aug. 13. Soren has sent in his FS4000 for exchange. I'll let you know the results.B/W negs: works VERY well. I was impressed.
Color negs: Works very well for the few I've tried.
Color slides: Absolutely sucks!!
I've tried several different films, Velvia, Provia, Elite Chrome and they all come out VERY dark and bad. I'm not talking about dark highlights, the whites are white, but there's absolutely no shadow detail. It looks like it has a Dmax of 1.0 !! And I choose well exposed slides with easily scanned shadows.
I called Canon tech support and after several hours managed to talk to someone who barely knew what he was talking about and his answer was, get this, "Yes, we know it has problems with 'custom' films but it works very well with 'normal' film, the type you buy at wal-mart"!?!?! I was so stunned that I almost dropped the phone! I also have to mention that the first two guys I talked to had never heard of Velvia!
I scanned the same slides on my other scanner (Epson 1640 Photo) and even though that scanner is REALLY bad for 35mm (but really good for 120 and 4x5) they still came out better than from the FS4000!!
Is there anyone on this list that have an FS4000? What kind of slide film have you scanned with it? Are the results acceptable?
From Dale Cotton, Sept. 2, 2001.
Your highly detailed review of the FS4000 was very important to me in replacing my S20. After dithering over the various models available I finally broke down to buy the FS4000 a few days ago. I couldn't be more happy with it. Since your review is going to be equally instrumental in the decision-making process for many other people, I would like to bring a few small details to your attention:From Scott Hill, Sept. 4, 2001 (Macintosh: Titanium PowerBook 400MHz, 384 MB RAM, 10 GB HDD, OS X 10.0.4 and OS 9.1):"A small part of the frame (a fraction of a millimeter) at the bottom of the negative carrier is cut off." - Not on my neg holder. What I see is a bit of play in the width dimension of the holder, so it is possible to lose that fraction of a millimeter either to the top or bottom of the film strip, unless I position the film just so. This play also potentially results in a slight, >1/2 degree, slant to the film when scanned. Without this play, I suppose it is possible that film manufactured just slightly wider than spec would be bowed in the holder. I have no idea what the consistency in film dimensions between manufacturers of film is, however, I have both Fuji and Kodak film samples and both have the play I mentioned. Hmmm. Another issue is the size of the exposed portion of each frame. I shoot two different Nikons. Perhaps the Canon shutter window is fractionally larger ?
"The crazymaking Eject button The FS4000US has no hardware eject button for the film holder. To properly eject it, you must press the eject button in FilmGet. But when the film is finished scanning, FilmGet turns itself off." - I don't have this problem with "Close FilmGet FS after Aquire" unchecked. ROM version 1.0.7, FilmGet version 1.0.1.
Incidentally, I *do* see the histogram spiking you report when I do any image correction in FilmGet then scan at 42 bits. Thanks for pointing that out. The FilmGet editing tools are too crude to be of much use anyhow, so like you I now do zero pre-processing then scan at 42 bits.
Regarding Taylor Hively's issue with batch scanning. He's quite correct that we are limited to scanning only as many frames as will fit in RAM. However, there is no law restricting one to 4000 ppi scans. My own workflow, when I sit down with a new roll of film is to scan every frame at 1000 ppi and 24 bits. I do two or three 4-frame strips at a time, revert to Photoshop to save them to disk, then repeat. Once I identify any keepers I re-scan those, one at a time, at 4000/42-bit. In any case, because of the flimsy plastic holders and the hazards involved in getting the scanner to grab the holder, I don't think this scanner would be appropriate for a high volume, production shop.
"Digital cameras are improving so fast that I doubt I'll be using 35mm after 2002." - I have worked extensively with digital camera images and am not so optimistic about buying a digital camera that will equal or surpass 35mm in the next few years. A 6 mp digital camera image is 2000 x 3000 pixels or some permutation thereof. At 240 ppi (for printing) this is 8.33" x 12.5". Unfortunately, I find that these images do not scale up nearly as well as film images do. I find pixellation/stair-stepping spoils interpolation results after about 115% or 120% enlargement. This is especially the case when there are any hard edges in the image, as in architecture, cars, etc., even clothing. But don't take my word for it, there are plenty of full size samples from cameras like the D1X and the Sony DSC-707 on review sites, including the occasional TIFF.
My Comments: Unchecking "Close FilmGet..." doesn't work for me. Canon gave me an elaborate procedure for reinstalling FilmGet to eliminate the Eject buttom problem. I haven't tried it yet, but I may soon. I have FilmGet 1.0 Version 1.0.0. I may wait for a new version for Windows, perhaps 1.0.1, "coming soon" from Canon's Powershot.com Customer Service Drivers website. Hamrick's latest VueScan works OK with the FS4000-- the original had bugs.
My editor, Picture Window Pro 3.1, resamples images using bicubic interpolation when it sends them to the printer. Results are excellent; I don't seem to have problems that Photoshop users report. He has an article on resizing on http://www.dl-c.com/Resampling.pdf . That may account for the amazing results I've seen on big enlargements from my son's 3.1 Megapixel DC4800.
I filed out my negative holder with great success-- no apparent problems.
I spent some time with the scanner this past weekend and found something of interest. As you note on your site, FilmGet will only let you batch scan as many frames as your memory will hold at any one time. I had an additional problem where, after scanning a 4000 dpi, 48-bit + FARE slide, saving and closing in Photoshop, I couldn't do another one of the same size and resolution without closing Photoshop completely; closing only FilmGet didn't help. I was able to reproduce this many times. It seems FilmGet/Photoshop has a problem releasing memory after a scan.From Philip Noll, Sept. 19, 2001In a related note, VueScan, which is now working very well with the FS4000 (it gave blurry results prior to 7.1.11), in Mac OS 9, I was unable to scan a 4000 dpi + FARE 35mm slide due to memory constraints (I have 384MB of physical memory, with 300MB assigned to VueScan, no additional virtual memory active). Mac OS X, with a different memory management architecture, has no such problem.
I've found another problem with my CanoScan FS4000US and was wondering if you have seen anything similar or have any suggestions. I've noticed that the scanner adds streaks across every image that I scan no matter what resolution is used or what type of film I'm scanning. The streaks are hard to see (or invisible) in bright "busy" areas of the images but in dark areas that have been lightened--they look terrible! At first I thought I was scanning old/bad film but when I scanned a new slide and then tried to brighten the darker areas in Photoshop (using the "curves"), I noticed streaks that go across the film and continue across the cardboard slide mount! I've posted some samples at http://www.photo-forums.com/WebX?13@86.jqpGaJnAlrB^2@.ee85741/9From Nicole Vincent, Oct. 20, 2001In the mean time, I scanned the same slide on a Polaroid SprintScan 4000 at work--absolutely no streaks! And, black is black, not a rainbow of speckled colors (See samples at website above). Have you had any trouble like this?
Take a slide with a very dark or black area, scan it a 4000 dpi, then adjust the curves or brightness to brighten the dark area and let me know if you see any streaks. I'm beginning to think my scanner is defective since I cannot reproduce this effect using the Polaroid scanner.
My Comments: At your suggestion I lightened a portion of the "Bar du Fort Rabot" (above), and whatever streaks are present appear to be part of the image. The image was sharpened, which would exaggerate streaks and noise. Noise looks very good-- much lower than the HP PhotoSmart S20. I even found a reflection of myself, twenty years younger. I take mostly negatives; if streaks were present, they would show up in light areas like skies, especially when I darken them. So I'd guess your scanner is defective. Send it back. I'm getting the impression that early samples of the FS4000US have excessive manufacturing defects (something Japanese cars are noted for not having). But when it's good, it's very, very good...
When using the FS4000 with VueScan, do you ever find that you get 1-pixel-width bright red or green lines extending across the direction of the scan? When I use my FS4000 with FilmGet 1.0.1 I never have these problems, but when I use it with VueScan then these lines appear (I've tried it only at 4000dpi and 48bit colour but I assume that they simply shouldn't appear at _any_ resolution or colour depth). This is particularly disappointing since Ed's VueScan does do wonders with multi scanning, but what's the use of a very noiseless image that has a number of lines across it. The lines are usually visible when the image is brightened slightly and are especially visible across darker regions.From Soren Svensson, Oct. 20, 2001I've also noticed that they don't appear in the first few minutes of the scanner's being switched on, but only start appearing after a few minutes once it has warmed up. It's as if the scanner's CCD starts generating errors (ccd pixels that just switch on and aren't reset or something like that) as soon as its temperature gets above a certain level.
Oct. 28 update: Another user (Vincent Lowe) has reported this same problem with his scanner, so there's now two of us. He hadn't noticed it until his attention was drawn to it by my message posted on your web page. Your page has therefore been instrumental in putting us in touch with one another - thank you so much for putting my message on your page. I've also spoken to a very helpful person (Sean) at Canon Australia who, after discussing the problem with me, is sending me another scanner to see if I can replicate it. When Sean tested his scanner with VueScan at Canon he couldn't see the problem, but he wanted to check his scanner with my system. I'll let you know the results.
Oct. 30 update: The Canon representative just left my place a few minutes ago after spending an hour and a half testing out my scanner side-by-side with their scanner. Here's what happened.
Both scanners were given time to warm up and then we performed the tests. Using VueScan we performed everything from a single pass scan to a 16X multi-pass scan on a very contrasty slide with some bright highlights and dark important shadows on both scanners. Upon inspection in PhotoShop, my scanner showed up 14 red and green lines (some of them very bright, suggesting that those pixels were permanently switched on in _all_ of the scans, so maybe we should count them as more than 14 lines), and Canon's scanner showed only one very faint blue line. So it seems like a pretty open-and-shut case - it would appear that my unit is defective. I was advised that Canon will replace my unit.
I'd like to also comment that the Canon representative was very courteous, pleasant, and that he is a real asset to Canon here in South Australia. Top notch service with a smile! The replacement scanner may take up to 10 days to get here, so please expect one more update from me (They make house calls, eh? You've done the impossible. Made me turn green with envy even though my scanner works quite nicely. --NK) Nov. 16. Hamrick claims to have solved the problem with VueScan version 7.2.7.
After a lot of problems (returning the scanner and waiting for a replacement, computer crashing and going through 4 motherboards before getting a good one, ...) I'm finally up and running again. And I must say that this scanner is probably the worst buy I've ever made. It doesn't do slides well at all and the Photoshop plug-in is a joke. It is like it's designed for 3 year olds! I have tried Vuescan, but first of all the slide quality doesn't improve and second, Vuescan must have one of the worst user interfaces I've ever seen. Overall, I'm VERY disappointed with this scanner and I don't recommend it to anyone. (I don't know how to comment. Mine works fine. One detail: I don't expect tones to be perfect right out of the scanner. I always use the image editor. It's the end result that counts for me. --NK)

| Images and text copyright © 2000-2013 by Norman Koren. Norman Koren lives in Boulder, Colorado, where he worked in developing magnetic recording technology for high capacity data storage systems until 2001. Since 2003 most of his time has been devoted to the development of Imatest. He has been involved with photography since 1964. |  |
