Photographic technique part 2:
Vision, panoramic photography, travel
by Norman Koren
|
|
|
Part 2 | Vision | Panoramic | Level | Travel | Airport X-rays |
Photographic technique part 1 discusses camera equipment and technique. This part discusses photographic vision, panoramic photography, and travel.
Simplicity
The biggest enemy of good images is too much stuff. (Don't ask about my garage.) The camera actually sees more than we do; a lot more. That's because we usually focus our attention on our subject and fail to notice the surroundings— everything else. And that "everything else," more than anything, keeps an image from greatness. Look at the entire image, and remember that SLR viewfinders are usually wide open when you look through them: depth of field is narrow; more comes into focus when the lens stops down during exposure. The prime directive of composition is simplify, simplify! Keep it simple but not too simple.Light
Light is a critical element in landscape photography. Learn to observe it relentlessly. For landscape photography, the most spectacular light happens when the sun is low in the sky— early morning or late afternoon. Clouds are a big help. My least favorite light is cloudless sun, particularly near midday— I nap or I put on sunscreen and work in the garden or go on a bike ride; I rarely bother with my camera. I love the drama of early or late light playing against clouds. It brings out the best in landscapes.Negative space
Negative space is the areas between and around the objects in the photograph. It's an extremely important part of the composition. In an abstract sense it's as important as the objects themselves. Observe it. As an exercise, in your imagination, think of the negative spaces as objects and objects as spaces. What do you see?Emptiness
Seemingly empty areas can be very important parts of a composition if they are alive in some way: it could be in their shape (i.e., negative), their tonality or their texture. It's difficult, but not impossible, to keep pure black or white alive. Making effective use of "empty" areas is an important part of maintaining simplicity and focus.Classic subjects
Certain subjects are photographed over and over again: sunsets, weathered wood, delicate flowers, ruins, sweeping landscapes— you know the territory. I tend to love these subjects, but I'm also ambivalent. A great image, repeated often enough, can become a cliché. Why do we keep seeing the same images? Several reasons. It's easier to make a beautiful photograph when you're not breaking new ground; when you're treading the path of the masters. And I've begun to realize that there are a limited number of great scenic landscapes in the western US— landscapes that "have it all." These include California's Point Lobos, Yosemite— especially Insipration and Glacier Points, and Bodie, Colorado's Maroon Bells, San Juan range (including Mt. Sneffels) from Dallas Divide (between Ridgway and Telluride) and Crystal Mill in autumn, Wyoming's Schwabacher's Landing and Oxbow Bend in Grand Teton National Park, Southern Utah's canyons (Zion, Bryce, and Capitol Reef) and the surrounding redrock country, Arches National Park, especially Turret Arch from North Window and Delicate Arch, Arizona's slot canyons, especially Antelope, "The Wave," Monument Valley, etc. (A little-known Monument Valley viewpoint called Hunt's Mesa could become one of the great classics, but it's relatively inaccessible and requires the services of a Navajo guide. Perhaps we should be thankful it hasn't become another cliché.)
I've been to art fairs where every photographer had the obligatory Antelope Canyon image, all made in the same quarter mile stretch, all with exaggerated Velvia color. The photographer who first discovered it (Bruce Barnbaum?) deserves special credit. What more could I add? |
|
"Early morning is a time of magic in Cannery Row. In the gray time after the light has come and before the sun has risen, the Row seems to hang suspended out of time in a silvery light. The street lights go out, and the weeds are a brilliant green. The corrugated iron of the canneries glows with the pearly lucence of platinum or old pewter. No automobiles are running then. The street is silent of progress and business... It is the hour of the pearl— the interval between day and night when time stops and examines itself."Steinbeck would have also made a great photographer, but luckily for us he stuck with his typewriter and left the camera to a guy named Edward Weston, a few miles to the south. Some of the old places may still remain, but it's mostly condos and boutiques. Its official website promotes as a place to "shop till you drop." God knows, we're plagued with enough of those. It just ain't the same... |
There are no strict rules of composition, just concepts and ideas to play with and accept or reject as appropriate. Dale Cotton has put up an excellent page on composition with a nice set of concepts. (He honors me by using some of my images.)Rules of composition: learn 'em and break 'em
The most infamous rule of composition is the rule of thirds. John Fielder (a well-known Colorado landscape photographer) is a big fan of it. The idea is that the "hottest" zones of the image are the zones a third of the way from the borders (1/3 from bottom left, top left, bottom right and top right), and the most important parts of the subject should be placed there. Sometimes it works; sometimes it doesn't. Learn this rule and break it! The important thing is to start observing the effect of subject placement on the image. Look carefully and see what happens when you change the framing.Beginners usually put the subject dead center with terrible results. Whenever I'm on the trail and a stranger takes my picture, my head is in the center, my feet are just cut off, and half the image is empty sky. Sorry, it's one of my pet peeves. I just got some film back with several of these atrocities. But is putting the subject dead center always bad idea? No! It's another rule made to be broken. Sometimes centering the subject is absolutely correct. The important thing is to learn to make an aesthetic decision based on what you see the frame, not on any preconceptions.
A tale of the thirteenth century Turkish Sufi mystic, Mulla Nasrudin.
A neighbor once found Nasrudin searching for something on the street outside his house. "What have you lost, Mulla?" he asked. "My key," said Nasrudin. So they both got down on their hands and knees and looked for it. After a while the other man asked: "Where exactly did you drop it?" "In my house." "Then why, for Heaven's sake, are you looking out here?" "There is more light here." Born six hundred years too soon for photography!Students of photography should note what Nasrudin didn't say. It could have cost him his standing as a guru.
"Ansel found his key here." Ansel who? The Japanese print
Japanese prints had a tremendous influence on late nineteenth and early twentieth century western artists, for good reason. The brilliant prints of Kawase Hasui provide an object lesson in compositon; you can learn everything you need to know by studying them in depth. Castle Fine Arts also has some nice reproductions. Books are, alas, scarce.
|
 The
Noblex
135U has a sharp lens, but it's quirky and somewhat unreliable. It's
compact and light enough for me to carry on my side in its case. I use
it on a tripod, even though it's hand-holdable; Macduff
Everton claims to hand hold his (a larger format model) most of the
time. I keep a Manfrotto 3157N quick release plate permanently mounted
on the Noblex so I can quickly mount and remove it from the tripod. You
must be careful not to get your fingers in the image, especially on the
shutter release side. A groove is provided on the right side. If your fingers
go over the groove they will appear in the image. The viewfinder isn't
great. The frame edges depend on where you place your eye and the level
settles very slowly. I don't pay it much attention unless the scene has
definite horizontal lines. I use one of my other camera systems (often
the XPan) as a light meter. Because it's not easy to mount filters, the
Noblex probably best suited for negative film. One quirk: it's important
to press the shutter
all the way down when taking a picture. The
shutter motor starts rotating before the double exposure prevention is
released; if you don't press the shutter all the way, you won't be able
to wind the film to the next frame. (You can always turn the camera off
and press it all the way.) It's very important to turn the camera off between
exposures; leaving it on can run down the batteries quickly. The Noblex
works poorly in cold weather (below 20o F). Your local camera
repair shop may not have heard of the Noblex. Pro
Photo Connection in Irvine, CA (949-250-7073) does an excellent job
of repairing them.
The
Noblex
135U has a sharp lens, but it's quirky and somewhat unreliable. It's
compact and light enough for me to carry on my side in its case. I use
it on a tripod, even though it's hand-holdable; Macduff
Everton claims to hand hold his (a larger format model) most of the
time. I keep a Manfrotto 3157N quick release plate permanently mounted
on the Noblex so I can quickly mount and remove it from the tripod. You
must be careful not to get your fingers in the image, especially on the
shutter release side. A groove is provided on the right side. If your fingers
go over the groove they will appear in the image. The viewfinder isn't
great. The frame edges depend on where you place your eye and the level
settles very slowly. I don't pay it much attention unless the scene has
definite horizontal lines. I use one of my other camera systems (often
the XPan) as a light meter. Because it's not easy to mount filters, the
Noblex probably best suited for negative film. One quirk: it's important
to press the shutter
all the way down when taking a picture. The
shutter motor starts rotating before the double exposure prevention is
released; if you don't press the shutter all the way, you won't be able
to wind the film to the next frame. (You can always turn the camera off
and press it all the way.) It's very important to turn the camera off between
exposures; leaving it on can run down the batteries quickly. The Noblex
works poorly in cold weather (below 20o F). Your local camera
repair shop may not have heard of the Noblex. Pro
Photo Connection in Irvine, CA (949-250-7073) does an excellent job
of repairing them.
|
|
 |
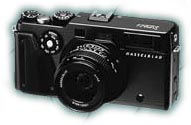 The
Hasselblad
XPan, manufactured by Fuji, resembles a widebody Leica M6 and posesses
similar ruggedness and reliablilty. It works well in cold weather, which
gives me a strange thrill after a dozen years in San Diego. My only quibbles
are that the lens shade obscures the lower right portion of the image and
the exposure LED, which displays -, o, or +, is too dim to see clearly
in bright sunlight. I have to put my shaded hand in front of the finder
window to see it. I need to because I usually use manual exposure (for
the simplified zone system). It's less important
if you use automatic exposure. To learn more, read
Michael
Reichmann's review.
The
Hasselblad
XPan, manufactured by Fuji, resembles a widebody Leica M6 and posesses
similar ruggedness and reliablilty. It works well in cold weather, which
gives me a strange thrill after a dozen years in San Diego. My only quibbles
are that the lens shade obscures the lower right portion of the image and
the exposure LED, which displays -, o, or +, is too dim to see clearly
in bright sunlight. I have to put my shaded hand in front of the finder
window to see it. I need to because I usually use manual exposure (for
the simplified zone system). It's less important
if you use automatic exposure. To learn more, read
Michael
Reichmann's review.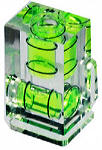 The 45 mm lens has considerable light falloff at the edges of the image.
I finally bought the bullet and bought a center filter to even the exposure
(The list price is $240 US; I lucked out and found one used at B&H.)
Picture
Window Pro's Light Falloff transformation corrects this effectively—
as long as the edges aren't severely underexposed. You just set the lens
focal length (45 mm) and image length (65 mm maximum).
April
29, 2003: Hasselblad has announced the XPan
II, incorporating a number of refinements, most notably a better
viewfinder display.
The 45 mm lens has considerable light falloff at the edges of the image.
I finally bought the bullet and bought a center filter to even the exposure
(The list price is $240 US; I lucked out and found one used at B&H.)
Picture
Window Pro's Light Falloff transformation corrects this effectively—
as long as the edges aren't severely underexposed. You just set the lens
focal length (45 mm) and image length (65 mm maximum).
April
29, 2003: Hasselblad has announced the XPan
II, incorporating a number of refinements, most notably a better
viewfinder display.
Level An inexpensive spirit (or bubble) level is a necessity
for panoramic photography. My eye isn't reliable for leveling any
camera (and I'm not alone in that regard), but the penalty for poor leveling
is worse for panoramic cameras— more image area is lost. The XPan viewfinder
isn't accurate enough to align horizons accurately; I've lost too much
area in too many images (I've learned this lesson the hard way). The "Adorama
Double Bubble Level" (sounds like chewing gum) costs about $29; identical
levels from Cullmann, Hasselblad, or Manfrotto, all of which fit in the
accessory shoe, cost about $33 at B&H. (They're probably all made in
the same factory.)
 Scanning.
As
of December 2003 the scanner situation for the XPan and Noblex is problematic.
The Hewlett-Packard Photosmart S20 does a good job of scanning panoramic
images, although it's somewhat slow with the HP software— it scans the
entire
strip to make one panormaic image. Hamrick
VueScan software also does a good job driving the S20, and it's faster
for panoramics. Unfortunately the S20 hs been discontinued. There were
bargains for a while on new S20s, but now you'll have to search eBay
(look for HP S20 or Hewlett-Packard S20). They sell for $120-160 US. A
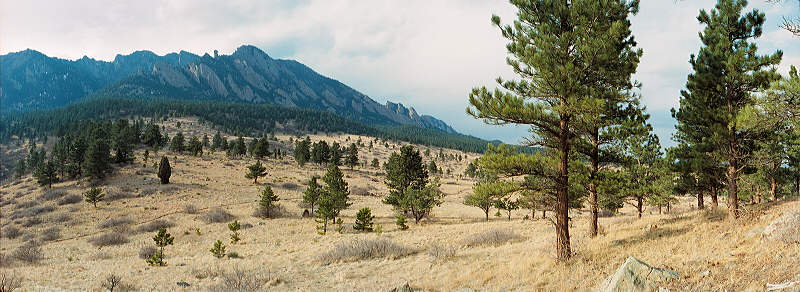
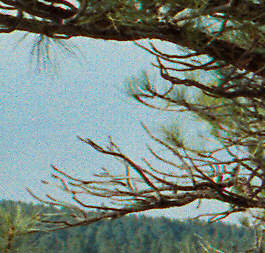
Noblex image, taken with Kodak Supra
100 and scanned with the S20, is shown above, and an enlarged (1:1)
portion is shown on the right. I'm very pleased with its sharpness; I must
be doing better than
Michael
Reichmann. Assuming a screen display of 75 pixels per inch, the entire
6177x2257 pixel image would be 82x30
inches at this magnification. I don't plan to print larger than about 34x12.6
inches. Most of my panoramic prints are 27 by about 10.5 inches, which
works well with 20x32 inch mats— half
a 32x40 inch sheet.
Scanning.
As
of December 2003 the scanner situation for the XPan and Noblex is problematic.
The Hewlett-Packard Photosmart S20 does a good job of scanning panoramic
images, although it's somewhat slow with the HP software— it scans the
entire
strip to make one panormaic image. Hamrick
VueScan software also does a good job driving the S20, and it's faster
for panoramics. Unfortunately the S20 hs been discontinued. There were
bargains for a while on new S20s, but now you'll have to search eBay
(look for HP S20 or Hewlett-Packard S20). They sell for $120-160 US. A
Noblex image, taken with Kodak Supra
100 and scanned with the S20, is shown above, and an enlarged (1:1)
portion is shown on the right. I'm very pleased with its sharpness; I must
be doing better than
Michael
Reichmann. Assuming a screen display of 75 pixels per inch, the entire
6177x2257 pixel image would be 82x30
inches at this magnification. I don't plan to print larger than about 34x12.6
inches. Most of my panoramic prints are 27 by about 10.5 inches, which
works well with 20x32 inch mats— half
a 32x40 inch sheet.
Other scanners. The Epson 3200 flatbed and its successors are fast, convenient, and have excellent color, but their sharpness, even at 3200 dpi, is not the equal of the HP S20 at 2400 dpi. Flatbeds are not as sharp because their lenses have to cover an 8.5 inch wide field vs. about 1.8 inches (diagonal) for 35mm. I compare them here. It's a great scanner for medium format and 4x5, but enlargements over 8 inches high will be a little soft. When I want the highest quality I scan the film in two passes (left and right sides, overlapping) with the Canon CanoScan FS4000US. I use Vuescan software to make the exposures on the two sides equal— Canon's FilmGet doesn't do this. Then I stitch the two images using Picture Window Pro's Composite transformation with Operation: Blend and Alignment: 2 point (shift/rotate/scale), using Refine to optimize the alignment with sub-pixel accuracy. The 35mm/medium format Nikon 8000 ED (and its successor, the 9000 ED) should work extremely well with 35mm panoramics— better then the HP S20, but they're expensive— around $2,000 US.
Trying to feed roll paper into the 1270 printer was a nightmare; I never perfected it. You needed one, maybe two, sheets of rigid board the same width as the paper (the box for letter-sized Semigloss works perfectly). One goes under the paper to lift it into the feeder slot. The other might go on top to straighten the paper. Be sure to leave at least an inch (3 cm) for damage. Good luck. Epson's engineers slipped on this one. But they got it right with the 2200. The roll feeder and paper cutter work flawlessly.
On the 1270/1280/1290 printers, Epson Premium Luster and Semigloss papers (especially older batches), which come in 13 inch rolls suitable for panoramic prints, are susceptible the dreaded red shift, which I discuss elsewhere. See also Bob Meyer's site. The pigment-based 2100/2200/7600 printers do not suffer from this problem— Luster produces beautiful results.
Tip: When you partially squeeze the grip of the Manfrotto 3265/222 head (above) it swivels in a way that facilitates stitching, maintaining perfect horizontal registration. It works best when you increase the tension above the normal setting. No other Manfrotto head I know of swivels this way. Since good stitching requires about a 20-30% overlap, which you eye can judge adequately, this head may be almost all you need. An added bracket to position the camera so it pivots under the front nodal point of the lens would make it perfect (it would make a difference when there are close objects in the field). I'll be trying it with my EOS-10D, set for manual exposure.
More panoramic images are displayed in Images 2001 and Images 2002.
Panoramic links I haven't tried stitching (digitally combining several images into one) yet, but I'm looking into it. Digital cameras make it relatively convenient.Panoguide.com General site with technical advice and software reviews.
The Panorama factory Stitching software— inexpensive shareware. $35 or $60, depending on version.
Panavue Another highly recommended stitching package. $64.
PTGui/Panorama Tools PTgui (Panorama Tools Graphic User Interface) is a front-end for Helmut Dersch's free Panorama Tools stitching software. $55. Click on an alternate Panorama Tools site if the main site— maintained by academic elves in the Black Forest who take their holidays seriously— is unavailable. A strong community has grown up in support of Panorama Tools. Thomas Niemann has written an excellent tutorial. Then there's The PTools Absolute Beginners Guide by Sascha Kerschhofer, How to use Panorama Tools & PTGui to produce a printable panorama by John Houghton.
PTAssembler Panorama Tools Assistant by TawbaWare (Max Lyons) is another intriguing front end for PTGui.
ImageABC offers an excellent price on 5x15 inch prints at the time of developing— $3.00 each (adds up at about 21 XPan images per 36 exposure roll). It's on p. 18 of their PDF catalog.
Paul Holman has a basic article about making stitched panoramas as well as a particularly interesting article on How to modify the Minolta Dimage Scan Multi Pro film scanner to handle 35mm panoramic film.
Ricardo Carvalho has an excellent page on panoramic photography, with lots of links, in Portugese.
KingPano: an intriguing and affordable panoramic head that allows you to pivot around the front nodal point. Favorably reviewed by Max Lyons.
 |
Photographing the Southwest, Vol. 1, A guide to the natural landmarks of Southern Utah & Colorado, Laurent Martrès. Paperback, 270 pages. I carry it on trips. Laurent also has an informative website, PhototripUSA.com. |
|
 |
Photographing the Southwest, Vol. 2, A guide to the natural landmarks of Arizone & New Mexico, Laurent Martrès. Paperback, 224 pages. |
|
Outside the USA
Sacredsites.com: Places of Peace and Power The Sacred Site Pilgrimage of Martin Gray. A remarkable site for travelers, pilgrims, and photographers, with some lovely images.
| Images and text copyright (C) 2000-2013 by Norman Koren. Norman Koren lives in Boulder, Colorado, where he worked in developing magnetic recording technology for high capacity data storage systems until 2001. Since 2003 most of his time has been devoted to the development of Imatest. He has been involved with photography since 1964. |  |

