Understanding image sharpness part 4:
Printer test results
by Norman Koren
|
|
|
Note (November 2004):
This page is out of date; it hasn't been updated for my Epson 2200
printer and my (superior) Epson 3200 scanner. I have, however, measured the sharpness of the Epson 2200 using the Imatest program, which employs a superior technique— simpler to run and much more accurate. I've also discussed print sharpness in Sharpness: what is it and how is it measured?, particularly in the section on Interpretation of MTF50. |
 Print
magnification: 4x Print
magnification: 4x
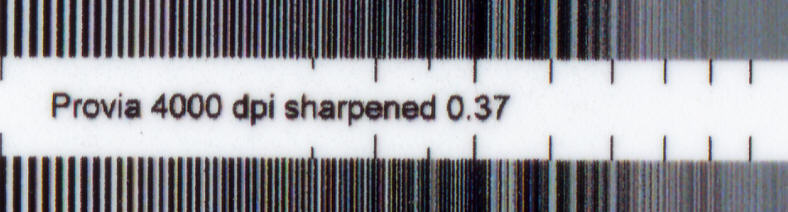
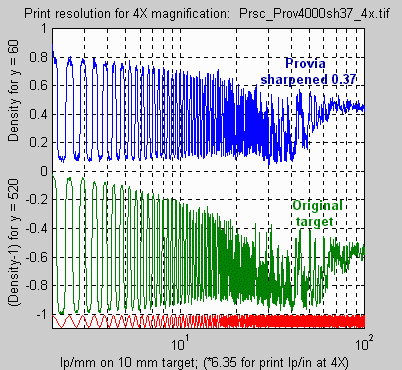
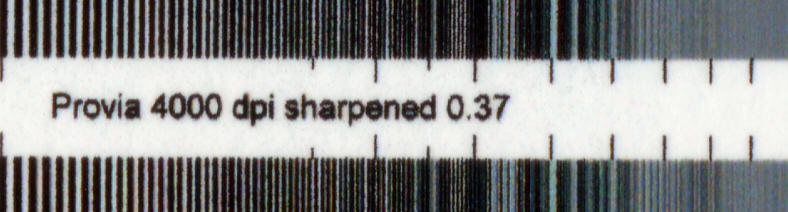
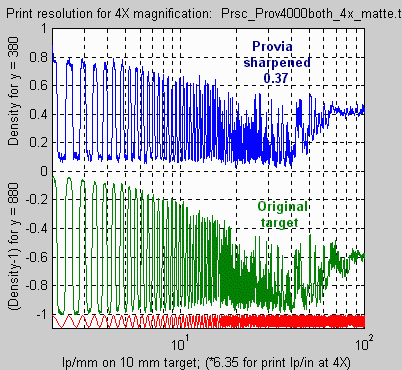
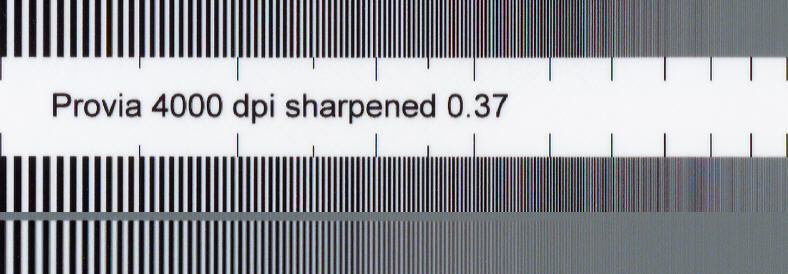
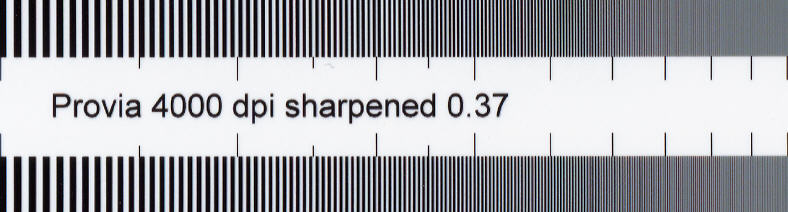
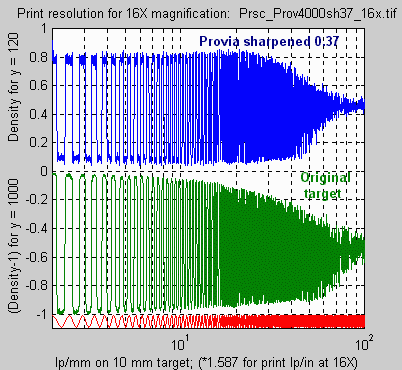
Illustrates ultimate printer sharpness 4000 dpi scan; 1000 dpi sent to printer
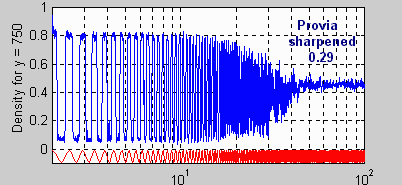
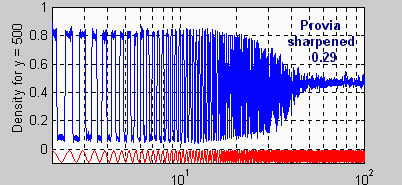
Note the missing tic marks! It might be wise to resize this image down (to 500 dpi or below) before printing. A small amount of color fringing is visible near some of the edges. These colors are barely visible to the naked eye, but they show up quite clearly under a 10x loupe. The ultimate printer sharpness can be derived from the density curves at 4x magnification. For the original target, f50 and f10 are 120 and 190 lp/in on the print (19 and 30 lp/mm referenced to the film). For sharpened Provia, f50 and f10 are 165 and 190 lp/in on the print (26 and 30 lp/mm referenced to the film). Response above 190 lp/in is mostly aliasing-- garbage. This test illustrates the improvement from sharpening, even at low magnification. This improvement takes place across a wide range of magnification. The gradual rolloff of print response starting around 25 lp/mm is striking. Sharpening goes a long way towards compensating this rolloff. These density curves are ugly, but the 1270 is an excellent printer capable of making extremely sharp images. We are seeing the results of an extremely sensitive test that reveals the finest details of printer performance. |
 Print
magnification: 4x Print
magnification: 4x
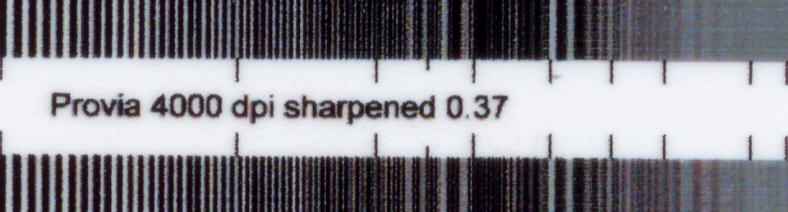
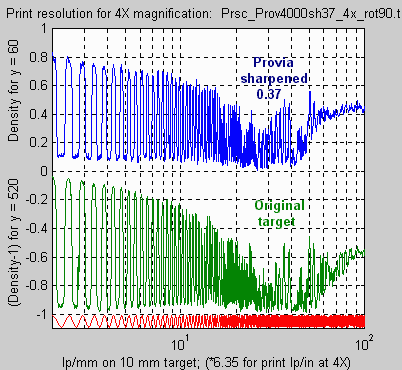
rotated 90o (direction of print head motion) Illustrates ultimate printer sharpness (transverse direction) 4000 dpi scan; 1000 dpi sent to printer
Different tic marks are missing. Some horizontal banding, not apparent in other scans, is noticeable, as is a small amount of color fringing near some of the edges. These defects are barely visible to the naked eye, but they show up quite clearly under a 10x loupe. Resolution is slightly lower than the direction of paper motion. For the original target, f50 and f10 are 108 and 171 lp/in on the print (17 and 27 lp/mm referenced to the film). For sharpened Provia, f50 and f10 are 120 and 171 lp/in on the print (19 and 27 lp/mm referenced to the film). Response above 171 lp/in is mostly aliasing-- garbage. This test illustrates the improvement from sharpening, even at low magnification. This improvement takes place across a wide range of magnification. |
 Print
magnification: 4x Print
magnification: 4x
Matte Heavyweight paper Illustrates ultimate printer sharpness with matte paper 4000 dpi scan; 1000 dpi sent to printer
Different tic marks are missing. A small amount of color fringing, comparable to Semigloss and barely visible to the naked eye, is visible near some of the edges. Resolution is just slightly lower than for semigloss paper. For the original target, f50 and f10 are 114 and 171 lp/in on the print (18 and 27 lp/mm referenced to the film). For sharpened Provia, f50 and f10 are 114 and 184 lp/in on the print (18 and 29 lp/mm referenced to the film). Response above 171 lp/in is mostly aliasing-- garbage. The sharpness of Matte Heavyweight paper is surprisingly close to Semigloss. It is a fine paper, capable of producing rich tones-- better by far than any photographic matte paper I've seen. |
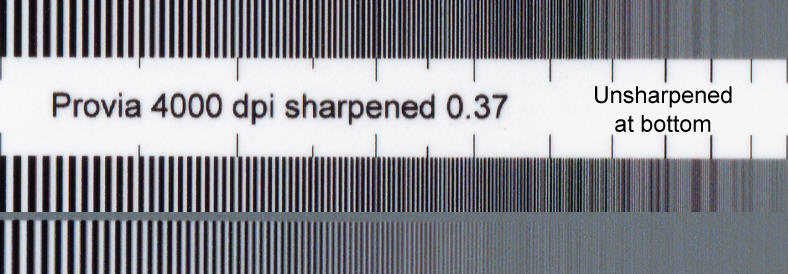
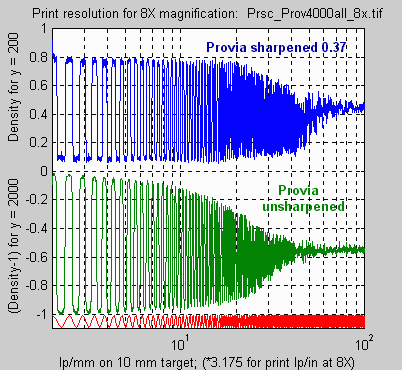
Print magnification: 8x4000 dpi scan; 500 dpi sent to printerScreen magnification @ 75 pixels per inch: 6.7 8x magnification is typical of letter sized (8.5x11 inch) prints made from 35mm or 16 inch long prints made from medium format (6x6 or 4.5x6). For sharpened Provia, f50 and f10 are 130 and 165 lp/in on the print (41 and 52 lp/mm referenced to the film). For unsharpened Provia, f50 and f10 are 76 and 127 lp/in on the print (24 and 40 lp/mm referenced to the film). The improvement due to sharpening is very striking. Image sharpness is still mostly limited by the printer at this magnification. Of course most 35mm images, particularly those taken with fast films, large apertures, hand-held, etc., won't be this sharp. |

Print magnification: 8x 2400 dpi scan2400 dpi scan; 300 dpi sent to printerScreen magnification @ 75 pixels per inch: 6.7 For sharpened Provia, f50 and f10 are 98 and 130 lp/in on the print (31 and 41 lp/mm referenced to the film). The image extremely sharp, but only about 78% as sharp as the 4000 dpi scan (scan resolution is 60% of 4000 dpi). I was surprised by the advantage of the 4000 dpi scanner at this magnification; prints from my 2400 dpi HP Photosmart S20 are very sharp. |
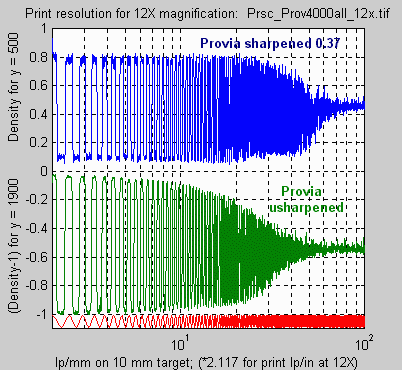
Print magnification: 12x4000 dpi scan; 333 dpi sent to printerScreen magnification @ 75 pixels per inch: 4.4 12x magnification is between the typical magnification for an A3 (11.7x16.5 inch) print and a Super B (13x19 inch) print made from 35mm, or 25 inch long prints made from medium format (6x6 or 4.5x6). For sharpened Provia, f50 and f10 are 97 and 118 lp/in on the print (46 and 56 lp/mm referenced to the film). For unsharpened Provia, f50 and f10 are 57 and 95 lp/in on the print (27 and 45 lp/mm referenced to the film). The improvement due to sharpening remains striking. The image is still very sharp, though not as sharp as 8x. Sharpness is primarily limited by the image, but still affected by the printer. |

Print magnification: 12x 2400 dpi scan2400 dpi scan; 200 dpi sent to printerScreen magnification @ 75 pixels per inch: 4.4 For sharpened Provia, f50 and f10 are 74 and 91 lp/in on the print (35 and 43 lp/mm referenced to the film). The image is still reasonably sharp for a large print, about 76% as sharp as the 4000 dpi scan, even though scan resolution is 60% of 4000 dpi. Still, this is why I will purchase a 4000 dpi scanner. |
Print magnification: 16x4000 dpi scan; 250 dpi sent to printerScreen magnification @ 75 pixels per inch: 3.3 A 16x print from a 35mm negative would be 15.x23 inches-- considerably larger than you could print on a 13x19 inch home printer with borders. For sharpened Provia, f50 and f10 are 81 and 104 lp/in on the print (51 and 66 lp/mm referenced to the film). For the original target, f50 and f10 are 82 and 130 lp/in on the print (52 and 82 lp/mm referenced to the film). At this magnification most of the target resolution is reproduced; the print is no longer a significant limiting factor. |
A summary of the results can be found at the end of part 2.
| Images and text copyright © 2000-2013 by Norman Koren. Norman Koren lives in Boulder, Colorado, where he worked in developing magnetic recording technology for high capacity data storage systems until 2001. Since 2003 most of his time has been devoted to the development of Imatest. He has been involved with photography since 1964. |  |
