The Canon EOS 10D Digital SLR:
Impressions and techniques Part 2
by Norman Koren
|
|
|
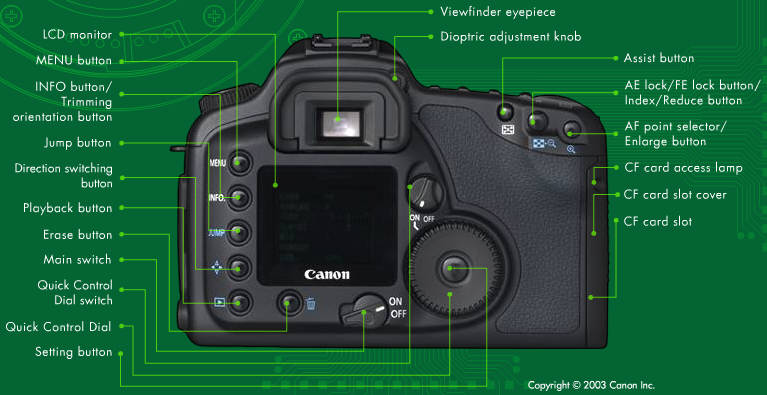
Back view, courtesy Canon.
|
[default] |
|
|
|
[Large/Fine] |
|
I leave it at the default, Large/Fine (JPEG), for casual images, but change it to RAW when I want optimum image quality. |
|
|
|
I turn it Off. Unnecessary and distracting. |
|
[Standard (sRGB)] |
|
I usually leave it at Standard (sRGB), but Adobe RGB is of interest in color-managed workflows. These settings are applied in the camera unless RAW quality is selected. |
|
[1 minute] |
|
I set it to 2 or 4 minutes. 1 minute is just too short. This feature can be annoying since you have to wait about three seconds for the camera to turn on. For critical work like weddings I'd set it to 30 min. or off, and keep a supply of extra batteries handy. I always keep at least one extra. |
|
[On] |
|
I prefer On (Info), which displays a histogram and other exposure data, and causes burnt out highlights to flash black and white. This is a great feature-- you can see instantly if all the scene information has been captured. You know immediately if you need to reexpose the image with a different exposure compensation setting. See the discussion of Histograms, below. |
|
[2 sec.] |
|
I use 8 sec. 2 seconds is much too short to see what's happening and 4 seconds is marginal. You can erase an image if you don't like it, then reexpose if necessary. |
|
(C.Fn) [all 0] |
|
C.FN-12 enables the mirror lockup when set to 1. Very handy for critical work such as close-up or long telephoto images with slow shutter speeds. Probably makes the biggest difference for exposures between 1/30 to 1/4 second. For longer exposures, vibration from the mirror is damped during most of the exposure. I'd like this setting to be a little handier. |
|
Shutter release w/o CF card [0: Possible] |
0: Possible to make exposure
without CF card.
1: Not possible. |
So you've removed your CF card to upload images and forgotten to return it. You head out to take the photos of a lifetime. If C.FN-02 is at its default setting of 0, you snap away merrily without knowing that nothing has been saved. Change this setting to 1! Whoever selected 0 as the default needs to have his or her head examined. |
|
||||||||||||||
.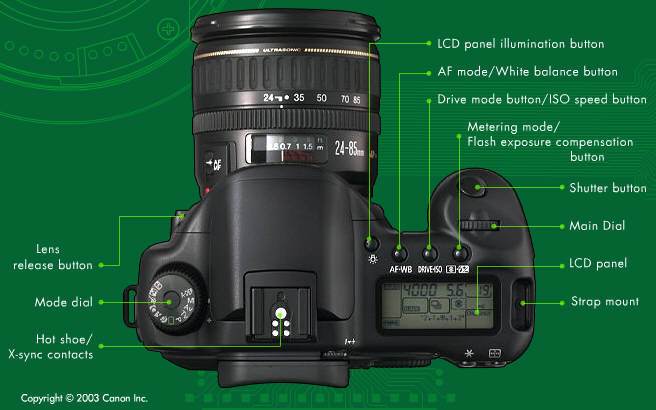
Top view, courtesy Canon.
The LCD panel normally shows the white balance setting, shutter speed, aperture (f-stop), estimated number of images remaining (a function of the quality setting), quality setting, drive mode, metering mode, ..., battery charge, exposure compensation, and Autofocus mode. To see ISO speed you need to press the Drive mode/ISO speed button.
Basic Zone (Programmed Image Control) modes are
optimized for a variety of situations. They don't allow fine adjustments
(White Balance, ISO speed, etc.), overrides, or exposure compensation.
The simplest point-and-shoot mode is Fully Automatic, indicated by the
green rectangle ![]() on the Mode dial. It works well much of the time. Other Basic Zone modes
are indicated by images. The modes are shown in the table below, clockwise
starting with
on the Mode dial. It works well much of the time. Other Basic Zone modes
are indicated by images. The modes are shown in the table below, clockwise
starting with ![]() .
All use JPEG (your choice), Auto ISO speed (100 to 400, depending on the
light level and mode), Auto White Balance, and Evaluative metering. Custom
functions are unavailable. Settings are described below.
.
All use JPEG (your choice), Auto ISO speed (100 to 400, depending on the
light level and mode), Auto White Balance, and Evaluative metering. Custom
functions are unavailable. Settings are described below.
|
Setting |
|
(head) |
(Mountain) |
(Tulip) |
(Runner) |
Portrait |
off |
|
|
|
|
|
|
|
|
|
|
|
frame |
|
frame |
frame |
|
frame |
frame |
|
flash |
|
|
|
|
|
|
|
I rarely use Basic Zone modes. If you want
any control at all, you'll have to use one of Creative zone modes, listed
in the table below. AE indicates automatic exposure. On
all AE settings, the Quick Control Dial (on the back) can be used to set
exposure compensation if the adjacent switch is ON.
|
|
|
|
|
|
|
|
|
|
|
|
|
|
|
|
|
|
|
|
|
|
|
|
|
|
|
Depth-of-Field AE |
|
|
|
|
[default] (dial) |
|
|
|||||||||||||||||||||||||||||||||||||||||||||
|
mode [One-shot AF] (main) |
One-Shot AF for still
subjects.
AI Servo follows moving subjects. It uses more battery power. Action photographers should read this post on Robgalbraith.com, which has valuable information from Canon. AI Focus AF switches automatically from One-Shot to AI Servo if a subject starts to move. May switch unintentionally if the camera is moved. Inoperative when the lens is set for manual focus: MF or M. Digital cameras never know for sure where you want to focus, though they make pretty good guesses. Manual focus is the way to go when they don't get it right. Incredible invention! I can't praise it too highly. Use it when you need it. |
Autofocus is activated by
pressing the shutter halfway. The AF point (one of seven) is selected by
a program, which can be erratic. You can select an autofocus point manually
with the AF point selector (on the back, top right).
Don't hesitate to focus manually if autofocus doesn't focus where you want! You can focus manually by setting the lens to MF (M in some) or by setting One-Shot AF and focusing manually after the autofocus point has been found. You can't do this with AI Servo or AI Focus AF. |
|||||||||||||||||||||||||||||||||||||||||||||
|
[AWB (Auto)] (QC) |
The higher the Kelvin (K) setting, the cooler (bluer) the image. The tiny symbols used for the settings are difficult to see on the LCD panel and difficult to remember. |
I usually keep White balance
at
AWB (auto), but it can be fooled for some subjects. It's sometimes
better to use one of the settings for specific lighting, but easy to forget
the setting when the lighting changes.
Custom is the most accurate approach: you can photograph a white or light gray card (it should cover the entire partial metering circle in the central 9.5% of the frame) and use it to set the balance. Some photographers use the Wallace Expo/Disc for this purpose. Setting WB to Color Temp. [K] sets the color temperature to the value in the Color temp. menu setting. White balance is difficult to evaluate in the camera-- the LCD monitor isn't good enough. It is applied later, not in the camera, when quality is set to RAW. If there are any concerns about White balance, for example, the color of a wedding dress, set quality to RAW and perform White balance off the camera using RAW conversion software. |
|||||||||||||||||||||||||||||||||||||||||||||
|
[Single frame] (main) |
Single frame One
shot at a time
Continuous Approximately 3 frames per second Self-timer |
Maximum burst length is 9 shots. | |||||||||||||||||||||||||||||||||||||||||||||
|
[100] (QC) |
ISO is the imager sensitivity,
equivalent to film speed. The ability to change ISO is one of the joys
of using digital cameras. Settings are 100, 200, 400,
800,
and 1600.
3200 is available if ISO expansion (a menu
setting) is On.
Click here to learn how ISO speed is defined. |
The higher the ISO, the noisier the image, but the 10D has much less noise than film. Noise is almost nonexistent at 100 and 200, slight at 400 and 800, and moderate at 1600. I use 100 or 200 for still subjects, 400 for subjects like flowers, which always seem to sway a little, and 800 or 1600 for action photography. Dpreview.com has data on Noise vs. ISO. | |||||||||||||||||||||||||||||||||||||||||||||
|
[Evaluative] (main) |
Evaluative Metering:
Matrix metering using 35 zones in a 5x7 grid. The zones near the selected
autofocus points are given the greatest weight. Best for general use and
action.
Partial Metering:Meters a circle in central 9.5% of the image area. Best for tricky lighting and the zone system (with manual exposure). Center-weighted Average Metering Scene average weighted towards the center. Found in most SLRs. |
Evaluative (matrix) metering works well in most situations, but it can be fooled by bright highlights or strong backlighting. Use exposure compensation, or, if necessary, Partial metering with exposure compensation in this case. It never hurts to make test exposures and look at the histograms when lighting is tricky. | |||||||||||||||||||||||||||||||||||||||||||||
|
[0 (Zero)] (QC) |
Can be set to +/- 2 f-stops in 1/2 stop increments. | Works in the same way as exposure compensation. |
 Exposure
compensation is an extremely
important feature of the 10D. The meter can get confused by tricky light.
Mind-reading exposure mode is no more available than mind-reading autofocus.
Practice changing Exposure compensation (using the Quick Control dial on
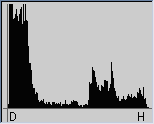
the back) by making exposures and using the histogram
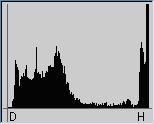
as your guide. The histogram is my primary
means of evaluating exposure. (To
take full advantage of the histogram, make sure Review
is set to On (Info)
and Review time
is set to at least 4 and preferably 8 seconds.) Try exposure compensation
in strong backlighting or where bright skies intrude into the scene. In
such situations the histogram frequently indicates burnt-out highlights
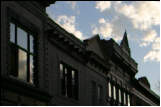
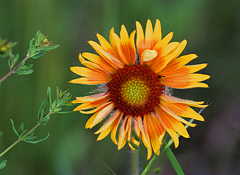
(see the example on the right). I frequently set compensation to -1/2 or
-1 stop (decreased exposure). Burnt-out highlights are much more common
than "dead" shadows, but either can be a problem in contrasty light.
Exposure
compensation is an extremely
important feature of the 10D. The meter can get confused by tricky light.
Mind-reading exposure mode is no more available than mind-reading autofocus.
Practice changing Exposure compensation (using the Quick Control dial on
the back) by making exposures and using the histogram
as your guide. The histogram is my primary
means of evaluating exposure. (To
take full advantage of the histogram, make sure Review
is set to On (Info)
and Review time
is set to at least 4 and preferably 8 seconds.) Try exposure compensation
in strong backlighting or where bright skies intrude into the scene. In
such situations the histogram frequently indicates burnt-out highlights
(see the example on the right). I frequently set compensation to -1/2 or
-1 stop (decreased exposure). Burnt-out highlights are much more common
than "dead" shadows, but either can be a problem in contrasty light.
I increase exposure less often-- only when the histogram indicates that the brightest areas of the image are far from saturation. This typically occurs in low contrast scenes. Increasing the exposure reduces the distance between digitized steps, resulting in smoother tonalities. See Michael Reichmann's Expose (to the) Right for a detailed explanation. Shooting RAW is particularly advantageous in low contrast lighting because you can take advantage of the extra precision (12 bits instead of 8) when you increase contrast to make the final image look good.
To review images you've taken, press the Playback button (lower left on the rear of the camera). The shutter speed, aperture (f-stop), image number and total images taken (e.g., 7/12 for exposure 7 of 12) are superimposed on the image. The image is selected with the Quick control dial (center, rear). You can zoom the image using the Enlarge and Reduce buttons (upper right, rear) and scroll it (when zoom is active) using the Quick control dial with direction controlled by the Direction switching button (above the Playback button). Zoom is turned off by pressing the Playback button.
If you press the Info button (the third button above the Playback button) while reviewing an image, the image size is reduced and a histogram is displayed, along with autofocus mode, operating mode (P, Tv, Av, etc.), ISO speed, shutter speed, aperture, exposure compensation, flash compensation, white balance, image number and total images taken, quality setting, date, and time.
The diopter correction knob, located on the upper right of the viewfinder eyepice, should be adjusted for your individual eye. If it's adjusted properly the viewfinder image will appear sharp and clear. Once I bumped the camera, and for several days the viewfinder image just wasn't clear-- I started to think I'd either damaged the camera or my eyes (a very frightening thought). Then I remembered the little knob-- easy to forget since you normally adjust it only once.
Black & White images taken on the 10D can look spectacular, but you should not use color filters, particularly a red filter (Ansel Adams' favorite), when capturing the image. The Bayer array sensor has twice as many green pixels as red and blue pixels. RAW conversion algorithms take advantage of high resolution green information in interpolating red and blue channels-- image quality is best if you capture all the color channels. You can filter the image when you convert to B&W. Picture Window Pro's Monochrome transformation does a particularly good job; you can select the ideal filter by previewing its effect. If you plan to simulate a red filter I recommend capturing the image at a low ISO speed, preferably 100, to minimize red channel noise.
To achieve optimal tonal quality in your prints, read the tutorial, Tonal quality and dynamic range in digital cameras.
Part 1 | Introduction | News | The EOS-20D | Links | Why I chose the 10D | Lenses | Accessories
Part 2 | Read the manual! | Menu | Operating modes | Settings | Tips
Part 3 | Image quality/file formats | Nikon D100 comparison | RAW conversion | Flash
Part 4 | Resolution compared to 35mm | Dynamic range and tonal response | Summary
Related pages: Digital cameras | Digital vs. film | Tonal quality and dynamic range in digital cameras

| Images and text copyright © 2000-2013 by Norman Koren. Norman Koren lives in Boulder, Colorado, where he worked in developing magnetic recording technology for high capacity data storage systems until 2001. Since 2003 most of his time has been devoted to the development of Imatest. He has been involved with photography since 1964. |  |