Technical notes
This page describes the equipment and techniques used to make the images for the2022 Boulder JCC and 2016 NCAR shows.
Cameras – Digitization – Raw conversion/editing – Framing
Sony A7Rii – Google Pixel – Panasonic FZ1000 – Sharpenng
Cameras
Images made before 2003 were captured on film. 35mm Cameras included the Leica M2, Canon FTb and F1 (old and new), and T90, with too many lenses to mention here. Medium format cameras included the Mamiyaflex (late 1960s), Rolleiflex 2.8F (early 1970s), and Hasselblad 500C (mid 1970s and later). I used a folding 4×5 camera with a lovely Schneider 150mm Symmar lens for a while in the late 1960s, but it was slow, awkward, hard to develop negatives evenly, and didn’t fit my style.
Most of my Black & White images were made before 1985 on Ilford FP4 film, developed in Edwal FG7 diluted 1:15 in an 18% sodium sulfite solution. This provided a pleasing compromise between sharpness and fine grain.
I mostly used color negative film between 1985 and 2003 — Kodak gave me 20 boxes a year, mostly Kodacolor Gold 100 or 200, when I worked for them from 1985 to 1998. I recently digitized many of these images with disappointing results. Kodacolor has nice colors and tones and looks good in 4×6 inch snapshots, but image quality falls apart when enlarged beyond 8×12 inches. Images are grainy and have poor sharpness (MTF; what we measure at Imatest). They can’t compare with my Ilford FP4 B&W negatives from the 1970s or with Kodak’s flagship product, Kodachrome transparency film (which was slower but phenomenally fine: looked great projected, but had high contrast that made it difficult to print). To put it bluntly, Kodacolor’s mediocre quality helped pave the way for the rapid acceptance of digital photography, which in my view surpassed film in 2008 (using Kodachrome as the benchmark; in 2005 compared with Kodacolor). None of the 35mm color negative images are in the 2022 show.
Images made starting in 2003 were captured on a variety of digital cameras, whose resolution improved over the years: the Canon EOS20D, EOS40D, EOS6D, Panasonic Lumix LX7, G3, LX100, FZ-1000, and the Sony A7Rii, which has amazing image quality. Since 2019, I’ve used the Panasonic FZ-1000 for most of my serious work. Quality is outstanding though not quite as good as the A7Rii (the difference is only visible in very large prints). I like it because it’s smaller and lighter (which makes a difference at my age), and has a an amazingly good and wonderfully versatile long zoom lens (25-400mm equivalent). About all it lacks is ultra-wide capability (it can’t capture a full rainbow near sunset).
Digitization — I purchased some gear from Negative Supply (a stand called a riser, a light box, and holders for 35mm and 120 film) for digitizing images with the 42 megapixel Sony A7Rii and the outstanding Sony 90mm f/2.8 macro lens— a significant improvement over the HP Photosmart 2400 dpi scanner used to digitize many of my images, but only a small improvement over the 4000 dpi Canon FS4000US scanner, which was very slow and is unlikely to work with recent computers. I captured raw images with the Sony, and converted them using the Film Negative feature of RawTherapee. The workflow was fairly fussy (especially for color negatives, which were highly inconsistent), but the results were excellent.
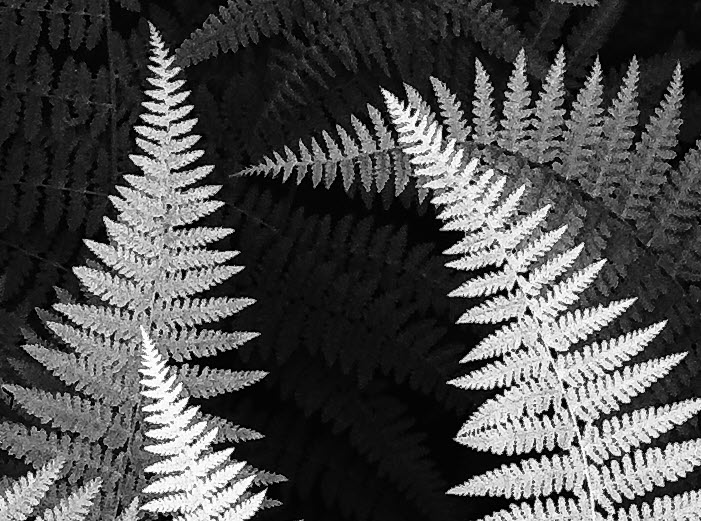
| The fine detail of a digitized 4×5 inch negative, shown in the 1:1 crop on the right, is phenomenal.
On my 2560×1440 pixel Asus PB278 monitor, which has a pixel pitch of 0.233mm (109 pixels/inch), the full image (7097×5250 pixels) of the crop on the right would be 1654×1223mm = 65.1×48.1 inches, much larger than I ever plan to print it. It’s about 23.7×17.5 inches (framed 32×24 inches) in the 2022 show — about 36% of the magnification of the cropped image on the right — and ultra-sharp at that size. |
 |
Raw conversion and editing — Raw digital images were converted using RawTherapee ( a great free raw converter), saved as 48-bit color or 16-bit B&W TIFF files, then edited with Picture Window Pro (my old favorite but now very obscure; written by Jonathan Sachs, who was the author of Lotus 123). Using a bit depth of 16 enabled me to do a large amount of editing without losing information or worrying about banding. I did a lot of fine tonal adjustments using masks (sophisticated dodging and burning) to bring the images into balance.
![]() Framing — I printed the images with borders, bringing the total size of the artwork to 18×24 and 24×32 inches (a 3:4 aspect ratio). They were framed with Nielson 117 metal section frames using 1/4 inch Econospace self-adhesive spacers attached to the acrylic covers to keep them from contacting the artwork. This eliminated the need for overmats, which can be difficult to make and (in my view) add little to the print appearance.
Framing — I printed the images with borders, bringing the total size of the artwork to 18×24 and 24×32 inches (a 3:4 aspect ratio). They were framed with Nielson 117 metal section frames using 1/4 inch Econospace self-adhesive spacers attached to the acrylic covers to keep them from contacting the artwork. This eliminated the need for overmats, which can be difficult to make and (in my view) add little to the print appearance.
The prints for the 2016 show were framed with SB25 Shadow Box frames, which had a built-in spacer to separate the artwork from the acrylic cover. Because it was very thin, it tended to bow when picked up in the middle of the frame, which caused the print to pop out and contact the acrylic sheet. This is probably why it was discontinued. The Nielsen 117 frames are very rigid and do not have this problem.
Sony A7Rii full-frame mirrorless camera
The Sony A7Rii deserves special mention. I got it in late 2015. In some ways it represents the “holy grail” of cameras for me. I can make large prints with the detail I always dreamed of— finer than the great master images I saw at the Eastman House when I was young. Follow-on cameras have more megapixels but only minor quality improvements. Numbers sell. It seems that companies have to keep introducing new products; product life is much shorter than when I was young (the superb Leica M3 was around for many years). There isn’t much room for improvement for a number of reasons.
- The backside-illuminated image sensor has very high quantum efficiency. It’s not far from the theoretical limit. It has outstanding dynamic range and low light performance.
- The pixels in the 42-megapixel sensor are small enough so that no anti-aliasing (AA) filter (also called OLPF for Optical Low Pass Filter) is needed. This is a big deal because Digital SLRs with up to about 20 megapixels need AA filters, which slightly blur the image, to eliminate unpleasant aliasing artifacts that can appear when lenses are too sharp for the sensor (technically, when there is too much energy above the maximum spatial frequency that can be digitally sampled— the Nyquist frequency). For this reason there is a bigger than expected improvement in sharpness for 36+ megapixel cameras.
- It’s a mirrorless camera. The absence of mirror slap is especially helpful with long telephoto lenses. Older mirrorless cameras had rather ugly viewing screens, but they’ve gotten really good. (2022 update: Mirrorless cameras now dominate the market for interchangeable lens cameras. DSLRs have all but disappeared.)
- The image sensor has built-in image stabilization, which is especially nice with some of my excellent older lenses, like the Canon 70-200 f/4L (available in a newer IS version; but the old lens is awesome).
- It can be adapted (with a Metabones adapter) to work with a wide variety of lenses, including my old Canon lenses, some of which are outstanding. Autofocus works extremely well with the Metabones. Because the A7Rii doesn’t have a mirror box it can be used with a huge variety of lenses. There is even an autofocus adapter for old Leica lenses (I haven’t tried it).
- Speaking of lenses, some of Canon’s older lenses are superb, but they couldn’t reach their full potential with older, lesser cameras. I test them with Imatest— a fantastic program for testing camera and lens quality (I know it’s great because I wrote it — well, most of it 😀 ). It lets me quickly map sharpness over the entire images for all apertures so I can determine where a lens performs best.
- The recent Canon 24-70mm f/4L has amazing performance at f/8-f/11. In practice (in the field) it’s far better than any 4×5 view camera. (I’ll save the technical detail for elsewhere.) By the way, I tried three sample of Canon’s popular 24-105mm f/4L lens. All had defects (poor autofocus or regions of poor sharpness).
- With good lenses, the A7Rii is capable of making absolutely stunning razor-sharp 24×36 inch (60×90cm) images and excellent 40×60 inch (1×1.5 meter) images. A 100 megapixel medium format camera may have an edge with 40×60 inch images, but seriously, who has room for many 40×60 images? Especially in a town where the median home price reached $1.55 million in 2022? Medium format cameras and lenses are bulky, heavy, and really expensive. The 23×34 inch images (framed 29×40 inches) I made for the 2016 show seem gigantic to me. They’re about as large as I’m comfortable framing. My largest prints for the 2022 show are 24×32 inches (5.33 square feet) framed. Large enough.
Google Pixel phone
I got the Google Pixel in late 2016 only partly for the camera, which had excellent reviews. It enabled me to move my mobile phone service to Google Fi, which lets me make reasonably-priced calls from anywhere in the world. I travel a lot (four international trips in 2017— a feat I don’t plan to repeat).
![]() Before I rave too much I need to make a disclaimer (well… maybe a boast). I’ve been involved in the development of Google Pixel cameras. There is a very nice video on the technology of the Pixel 2 (I still have the original Pixel): https://www.youtube.com/watch?v=PIbeiddq_CQ . I was quite thrilled to see our Imatest test charts in the video at 0:55, 7:42-7:49 and 8:00. The image on the right shows the eSFR ISO chart.
Before I rave too much I need to make a disclaimer (well… maybe a boast). I’ve been involved in the development of Google Pixel cameras. There is a very nice video on the technology of the Pixel 2 (I still have the original Pixel): https://www.youtube.com/watch?v=PIbeiddq_CQ . I was quite thrilled to see our Imatest test charts in the video at 0:55, 7:42-7:49 and 8:00. The image on the right shows the eSFR ISO chart.
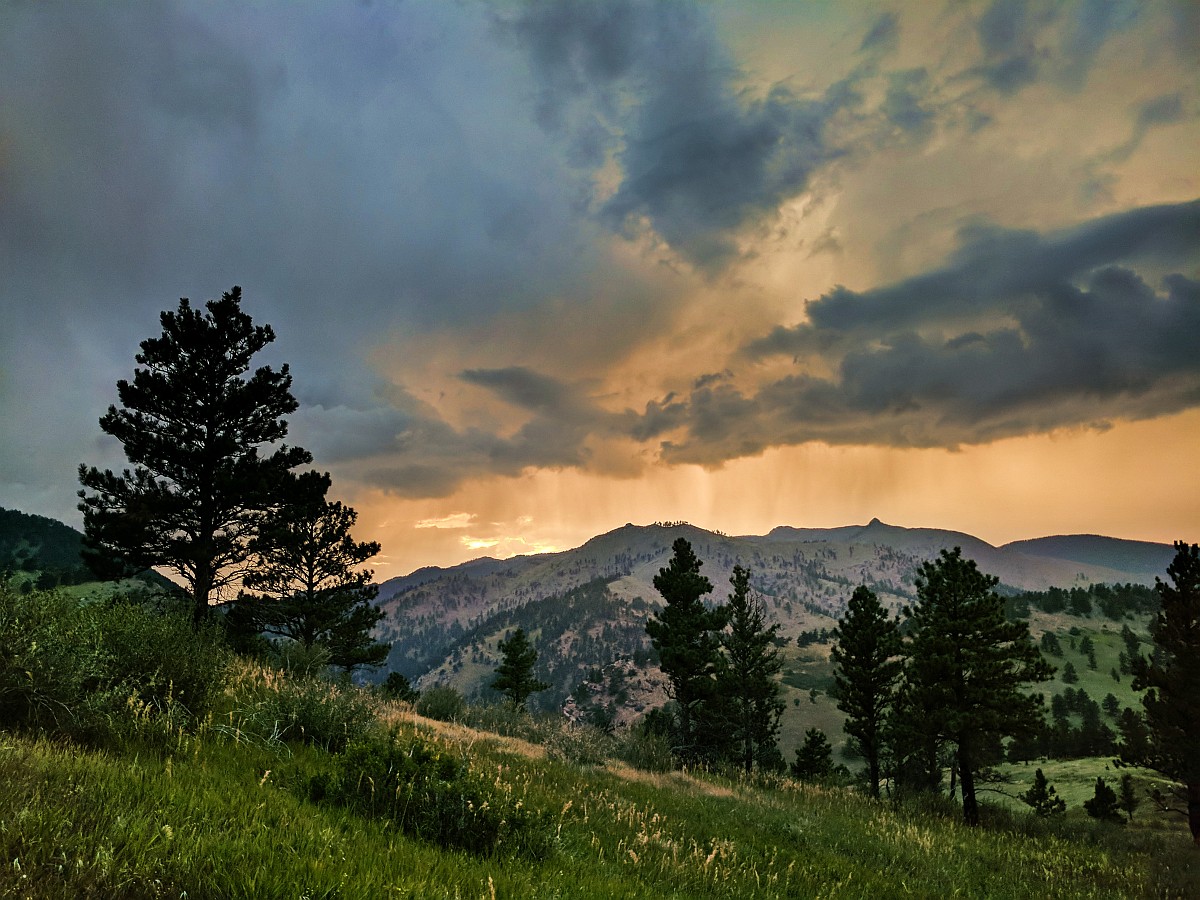
I’ve made some wonderful images with the Pixel; its quality is actually better than my old Leica M2 (a great camera in its time). I probably won’t upgrade to the Pixel 2, though I’m tempted. It has some impressive technology “under the hood”— so impressive I regard it as the beginning of a second digital revolution (the first was when we changed from film cameras). Essentially it takes a number of short exposures (up to 10, I think), then combines them with sub-pixel accuracy for remarkable sharpness. Since each exposure is underexposed, highlight detail is maintained nicely, especially in challenging situations like sunsets that have areas of extreme brightness. It performs tone mapping to maintain highlight detail when combining the images. The results are wonderful. The technology is explained in “Burst photography for high dynamic range and low-light imaging on mobile cameras“.
The Pixel is good for enlargements up to about 15×20 inches; good enough for most of the prints I plan to make. (I can remember when 8×10 inches was a “big” print.) The Sony A7Rii is good for much larger prints— 30×45 inches or more, but I don’t have enough wall space for many of those. I carry it the Sony only when I’m “serous” about fine art photography.
The picture below is an excellent example (though I don’t have a good “control” image to show how badly the sky would have washed out without tone mapping). There are more on Images mid Images mid 2016 to late 2017.
 In 2020 I had to replace the Pixel 1 with a newer Pixel 4S5G for two reasons. The battery died, and Google stopped supporting the Pixel 1 in 2020. I’m a little annoyed by the “planned obsolescense”, but the quality is better and the ultrawide camera is a nice addition.
Panasonic Lumix FZ1000 (and similar cameras)
I purchased the Panasonic Lumix DMC-FZ1000 (its full name) in 2019 at a very low closeout price, just to see if a superzoom lens (which traditionally involves serious design compromises) could be any good. It turned out to be outstanding— far beyond my expectations. I now use it for most of my work and for travel. I thought it was discontinued, but it seems to be listed at B&H.
It has been replaced by the DMC-FZ1000-II and DMC-2500. The 2500 has a 480mm maximum focal length (compared to 400mm for the FZ1000), but apart from that I don’t know how the two models differ. There is just one other camera in this class (superzoom cameras with ≥1 inch sensors, which are relatively large and capable of excellent image quality): the Sony DSC-RX10 IV. It’s significantly more expensive than the 2500. I expect image quality to be comparable (i.e., excellent). Its main advantages are that it can zoom to 600mm equivalent and it’s water-resistant.
Compared to the Sony A7Rii, the FZ1000 is smaller, lighter (makes a big difference at my age), and the 25-400mm (equivalent) f/2.8 superzoom lens is far more versatile. The main thing I miss is ultrawide capability. A few other points of comparison:
- My old but superb Canon 70-200 f/4 lens (which I’ve adapted to the Sony) doesn’t focus as close as I’d like. The newer version does. It would cost more than the FZ2500.
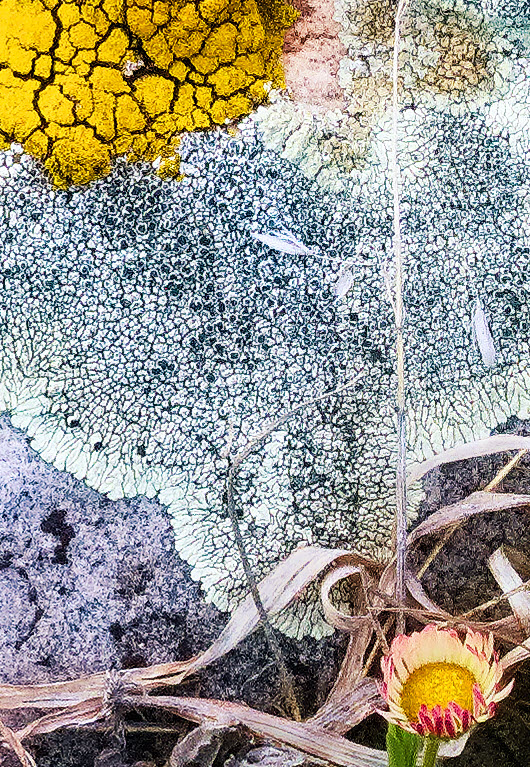
- It’s capable of outstanding 20×30 inch enlargements— about as large as I want to go these days. I could print larger if needed, but I have lots of excellent images to hang and limited space (real estate is crazy-expensive here in Boulder). The largest prints in the 2022 show, 18×24 inches, framed 24×32 inches, are large enough for my needs. The A7Rii can make comparable quality enlargements at 30×45 inches. Here is an image from the FZ1000, reduced on the left and shown cropped and full-sized (1:1) on the right.
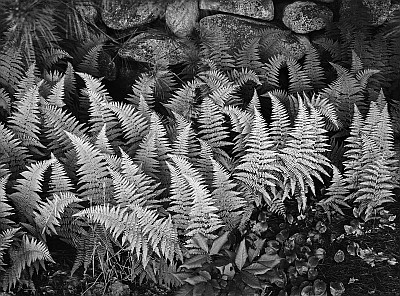
FZ1000 fine detail, shown in the 1:1 crop on the right, is phenomenal.
As we noted elsewhere, most web browsers soften the image slightly.
You can see the full detail of the cropped image on the right by right-clicking on it, selecting Copy image, then pasting it (from the clipboard) into an image viewer or editor. (Irfanview is an excellent free image editor for this purpose and many others.)
On my 2560×1440 pixel Asus PB278 monitor, which has a pixel pitch of 0.233mm (109 pixels/inch), the full image (3656×4914 pixels) of the crop on the right would be 852×1145mm = 33.5×45.1 inches, much larger than I ever plan to print it. It’s about 13×17.4 inches (framed 18×24 inches) in the 2022 show — and ultra-sharp at that size.
Sharpening
I always sharpen images: it always improves visual quality— there are no exceptions to this rule— as long as you don’t excessively oversharpen, i.e., sharpen so much that there are strongly visible “halos” near edges. I sharpen somewhat conservatively, which means I slightly oversharpen, but not enough for the halos to be strongly visible under typical display conditions.
| The Imatest page on Sharpening contains an excellent (but quite technical) introduction. |
The images on these pages were sharpened for computer display: some halos may be visible if the images are viewed at high magnification.
I’ve learned that additional sharpening is required for optimum print quality, and that the optimum sharpening radius depends on the actual pixels per inch (PPI) on the print (which is not generally the same as the PPI setting in the file). I add extra sharpening with 1 pixel radius for PPI < 200, 2 pixel radius for PPI between 200 and 400, 3 pixel radius for PPI between 400 and 600, etc. (Over 600 PPI is rare in my work.) These numbers are for the Epson P9000 printer with the Epson standard printer driver. It’s possible that different printers or RIPs may behave differently (they might have built-in sharpening), so I recommend some experimentation — a bit of trial-end-error could be very beneficial.
Files sharpened for printing may have highly visible halos when viewed on a computer monitor, but the halos tend to disappear on the print itself. The added sharpening will, however, significantly improve the print’s appearance. This sharpening is beneficial even for cameras with high megapixel count (high PPI).
I save the sharpened-for-printing files separately from the edited 48-bit color or 16-bit B&W files, typically as 100% quality JPEG files with bit depth = 8 (24-bit color). I never edit these files or use them for anything other than printing.
This extra sharpening compensates for sharpness (MTF) loss, which is present in all printers. It’s enabled me to make some really stunning prints from older cameras that had good lenses but low pixel counts (8 and 10 megapixels). And yes, it makes a difference with prints from the 43-megapixel Sony A7Rii.