Norman
Koren SPICE/PSpice
tube model package and instructions
updated August 28, 2001
This page contains instructions for the files and models that accompany
Norman
Koren's articles on SPICE and preamplifier design, most notably Improved
Vacuum Tube Models for SPICE Simulations and SPICE
and the art of preamplifier design. The models can be downloaded as
a compressed file which must be "unzipped" with Pkunzip, Winzip or a similar
program by shift-clicking here on Tubemods.zip.
These models are available as shareware. All the usual legal disclaimers
apply to these models. They were developed with the best efforts of the
author, who bears no legal liability for their use or misuse.
The parameters in my tube models are based on published data sheets,
and are far from perfect for all cases. Tubes vary from unit-to-unit and
batch-to-batch. My chief sources of tube data are Duncan's
Amp Pages and Frank's
Electron tube Pages.
Several files come with each PSpice model. The
.dat files (complete results of a PSpice simulation used as input to Probe)
are not included because they're too large and not readable.
| PSpice file extension |
Description |
| .SCH |
Schematics diagram file. |
| .CIR |
Control file generated by Schematics. ASCII. |
| .NET |
Netlist (circuit description) generated by Schematics. ASCII. |
| .ALS |
Alias file generated by Schematics. Needed for PSpice simulation. |
| .PRB |
Control file for Probe plots. Contains settings from last run, scaling,
etc. |
| .DAT |
Complete output file generated by PSpice; input to Probe. Not readable;
very large, hence not included in shareware package. |
| .OUT |
Readable ASCII output file from PSpice simulation. Contains dc levels,
etc. |
August 28,
2001: Some of these files are out of date. I'll be updating and purging
them in the next few weeks. The .sch files for individual tubes are older,
but should work OK.
| File name |
Description |
| Pent_P.sch ... |
Schematic for calculating plate characteristic
curves from pentodes in Pentode mode. Uses 6550; other tubes may be substituted. |
| Pent_UL.sch ... |
Schematic for calculating plate characteristic
curves from pentodes in Ultra-Linear mode. Uses 6550; other tubes may be
substituted. |
| Pent_TR.sch ... |
Schematic for calculating plate characteristic
curves from pentodes in Triode mode. Uses 6550; other tubes may be substituted. |
| TRIOTEST.sch |
Schematic for calculating generic triode
plate curves. Uses 12AU7; other tubes may be substituted. |
| 12AX7TST.sch |
Schematic for calculating 12AX7 plate
curves (used by Pspice Schematics program). |
| 12AU7TST.sch |
Schematic for calculating 12AU7 plate
curves. |
| EL34PTST.sch |
Schematic for calculating EL34 plate curves
(pentode mode). |
| EL34TTST.sch |
Schematic for calculating EL34 plate curves
(triode mode). |
| EL34UTST.sch |
Schematic for calculating EL34 plate curves
(ultra-linear mode). |
| errata.txt |
Errata for GA Tube models article with
additional models. |
| Pasorgtc.sch ... |
Original Dynaco PAS with tone controls. |
| Paspursp.sch ... |
Spiced PAS, purist version (without tone
controls). |
| Pasphon.sch |
Spiced PAS phono preamp. |
| Paspurln.sch |
Spiced PAS line stage- purist mod. |
| Pentode.cir |
SPICE file for calculating pentode plate
curves. Old. |
| Lochero.sch ... |
"Local Hero" amplifier (modified Dynaco
Mark 3) from Feedback and Fidelity, Part
2. |
| psreadme.txt |
Old instructions-- kept for historical
interest. |
| trio300B.sch |
Schematic for calculating 300B curves
from Western Electric data reprinted in The Parts Connection Catalog &
Resource Guide. |
| Triode.cir |
SPICE file for calculating triode plate
curves. Old. |
| Tube.lib |
Tube model library. |
| Tube.slb |
Tube symbol library |
| Tube1.lib and Tube1.slb |
Additional tube model and symbol libraries
: I moved some devices that I'm not currently using into these files because
the evaluation version of PSpice limits user-created libraries to 20 models. |
| PAS94.TXT |
Excerpts from the 1994 PAS modification
article. Should help with some of the construction details.
Turn on word wrap to view if you use Notepad. |
Files in the shareware package
Several commercial versions of SPICE run on personal computers, most
notably PSpice from Orcad, 888-671-9500.
The downloadable Pspice
evaluation package has limited capabilities by standards of solid-state
circuit design, but it can be amazingly useful in simulating vacuum tube
amplifiers, which tend to have fewer components. All examples in this article
can be run on the MicroSim Pspice evaluation package. Other well-known
SPICE implementations include Electronics
Workbench, 800-263-5552, and ICAP/4, from Intusoft,
P.O Box 710 San Pedro, CA 90733-0710; 310-833-0710. Duncan Munro's list
of SPICE vendors may contain some hidden treasures. WinSpice
is a free Spice3F4 Port for Windows 95, 98, 2000 & NT. Very
intriguing. It will simulate much larger circuits than evaluation PSpice.
The simulations in the accompanying files can be run on the PSpice evaluation
package, which consists of Schematics for entering circuits, PSpice for
simulating them, Probe for viewing the simulation results, a set of documentation
and tutorials.
I'm still using Pspice version 6.3 because versions 7+ limit the total
number of parts more strictly (to 50). In the newer versions, files that
contain both the phono preamplifier and line amplifier (such as paspursp.sch)
may need to be separated into two separate files. For those of you who
run into problems with Paspursp.sch, I have included Pasphon.sch (phono
only) and Paspurln.sch (line amp only).
Installing
the tube and symbol libraries
After you've installed PSpice on your computer you must install or
create the tube models. Although PSpice is up to level 9.1 as I write
this, I use version 6.3 for this example because I'm familiar with it and
because you can also get away with a few more parts than newer versions
allow. I assume you've downloaded my models. You'll need to install two
files: the tube symbols (TUBE.SLB) and SPICE models (TUBE.LIB). Both are
installed from the Schematics program.
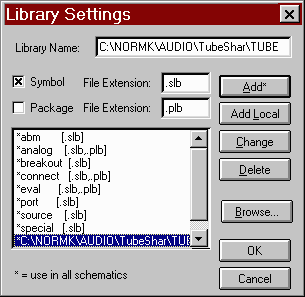
Installing the symbol library (TUBE.SLB)-- From
the Schematics screen, click Options,
Editor
Configuration..., Library Settings. The screen on the right
appears. Enter the foll pathname of the file containing the schematics
symbols, except for the extension, in the
Library Name: window, C:\NORMK\AUDIO\TubeShar\TUBE in the example.
Check the box to the left of Symbol
to get the .slb file extension. Click OK,
OK. |
 |
Installing the SPICE model library (TUBE.LIB)-- From
the Schematics Screen, click Analysis,
Library
and Include Files... The screen on the right appears. Enter the
full pathname of the SPICE model file (including extension) in the File
Name: window, C:\NORMK\AUDIO\TubeShar\TUBE.LIB in the example. Click
Add
Library*, OK, OK.
PSpice should be ready to run with tubes! |
 |
Creating
your own models
The technique for linking drawings to models is quite complex, and the
PSpice tutorial must be studied to grasp it. It would be wise to look it
over before continuing! The following steps will bring up a good example
that can be adapted for tube models. From Schematics, click on File,
Edit
Library to get into the Parts Library editor. Click on File, Open...,
eval.slb to open a library file that contains some parts useful as examples.
(Be patient: Your screen will still be blank at this point.) Click on Part,
Get..., IRF9410 to load the drawing for a P-channel mosfet. (Choose another
part if you desire, but this MOSFET is as close as you can get to a tube
in this library.) Click on Part, Attributes... to see the statements that
define this part. For the IRF9410, they are
template=M^@refdes %d %g %s %s @MODEL
refdes=M?
PART=IRF9140
MODEL=IRF9140
Template links the part to the model library: With appropriate substitutions,
for example, IRF9140 for @MODEL, it appears in the netlist. A number on
the schematic diagram replaces ? in refdes. To alter an attribute, click
on it in the box on the right and edit it in the boxes on the upper left.
The attributes of the 12AX7 that link it to its subcircuit in TUBE.LIB
are:
template=X^@REFDES %P %G %C @MODEL
refdes=TU?
PART=12AX7
MODEL=12AX7
To create a new library file, click on File, New, then File, Save as...,
tube.slb (or a full path name of your choice). To insert a part into the
new library file, draw it following instructions in the tutorial or modify
an existing part (such as the IRF9410), then save it by clicking Part,
Save to Library... Either type the library file name or use the usual Windows
navigation techniques to locate it. Good luck and please do the tutorial.
Parts are entered into PSpice Schematics drawings by clicking on the
little box with the "and" gate. You can enter "R", "L", "C", "BUBBLE",
etc. for common parts, or click on Browse... to examine a library of parts.
I recommend using the rubberband option, which can be set by clicking Options,
Display Options..., Rubberband. Named nodes (1G, 1P, etc.), which are created
by double-clicking on lines and entering a name, are required for voltages
to be examined in Probe. Input files to Schematics have the three character
extension .SCH. Clicking Analysis, Create Netlist creates files with extensions
.CIR (the control file), .NET (the netlist), and .ALS (an alias file which
speeds up analysis) which are used as inputs to Pspice. The .CIR and .NET
files contain ASCII text in SPICE format, as described in Paul Tuinenga's
excellent text10. Clicking Analysis, Simulate creates the netlist, runs
Pspice, and loads Probe to display results. Press the Insert key to select
a voltage or current for Probe display. You can use "VDB" or "VP" to display
a voltage in dB or its phase in degrees. There are many more possibilities
for controlling the display.
Obtaining
plate curves
Figures 3 and 4 on the
previous page are schematics diagrams for generating triode and pentode
characteristic curves. Their netlists are shown in Appendices A1 and A2.
Each of these circuits requires that you perform a few added steps to generate
the characteristic curves. We will use the pentode
(Fig. 4) as an example.
To step the grid voltage, click on Analysis,
Setup...,
Parametric...
Set Swept Var. Type to Voltage
Source,
Sweep Type to Linear,
Name:
to VG1,
Start
Value to 0, End Value: to -75
(or as appropriate), and Increment:
to -15 (or as appropriate), then click OK.
You may set the plate voltage sweep while the Analysis
Setup... box is still open. Click DC
Sweep... Set Swept Var. Type
to Voltage Source, Sweep
Type to Linear, Name:
to VP, Start
Value to 0, End Value: to 600
(or as appropriate), and Increment:
to 5 (or as appropriate), then click OK.
The DC Sweep... and Parametric
boxes should contain check marks. Finally, click Close.
All voltage sources except VG2NOM are set to DC=0 in the schematic diagram.
(Attributes can be viewed and changed by double-clicking on the symbol.)
Grid and plate voltages are controlled by the DC
Sweep... and Parametric... settings.
VG2NOM is the nominal screen grid voltage. It is 300V in Figure 5 (pentode
mode) and 450V in Figure 7 (ultra-linear (UL) mode). (It has no meaning
in triode mode, where screen grid voltage equals the plate voltage). E2
is an EVAL voltage-controlled voltage source that controls how the screen
grid voltage tracks the plate voltage. For Ultra-Linear mode it is set
to V(%IN+, %IN-)*.4+V(1P)*.6 . For pentode mode it is V(%IN+, %IN-). For
triode mode it is V(1P). VP is set to zero: -I(VP) is the correct polarity
for plate current plotted by Probe. When you have completed entering the
schematic, click Analysis, Simulate.
This will create a netlist, run PSpice, and then run Probe to display the
results. Error messages can appear at any one of several stages of this
process. They are unavoidable when you start out. Don't get frustrated.
This is where real learning happens.
Images
and text copyright (C) 2000-2012 by Norman
Koren. Norman Koren lives in Boulder, Colorado. Since 2003 most of his time has been devoted to the development of Imatest. He has been involved with photography since 1964.
E-mail Norman Koren | Improved
Vacuum Tube Models for SPICE Simulations
